
Master whirlpool arm construction for your brewing kettle with our comprehensive guide. Learn materials, techniques, installation tips, and DIY methods for superior homebrewing results.
For any serious homebrewer looking to elevate their brewing game, understanding whirlpool arm construction represents a crucial step toward producing clearer, more flavorful beer. Whether you’re a weekend warrior or an aspiring craft brewer, mastering the art of whirlpool arm construction can transform your brewing process from amateur to professional-grade.

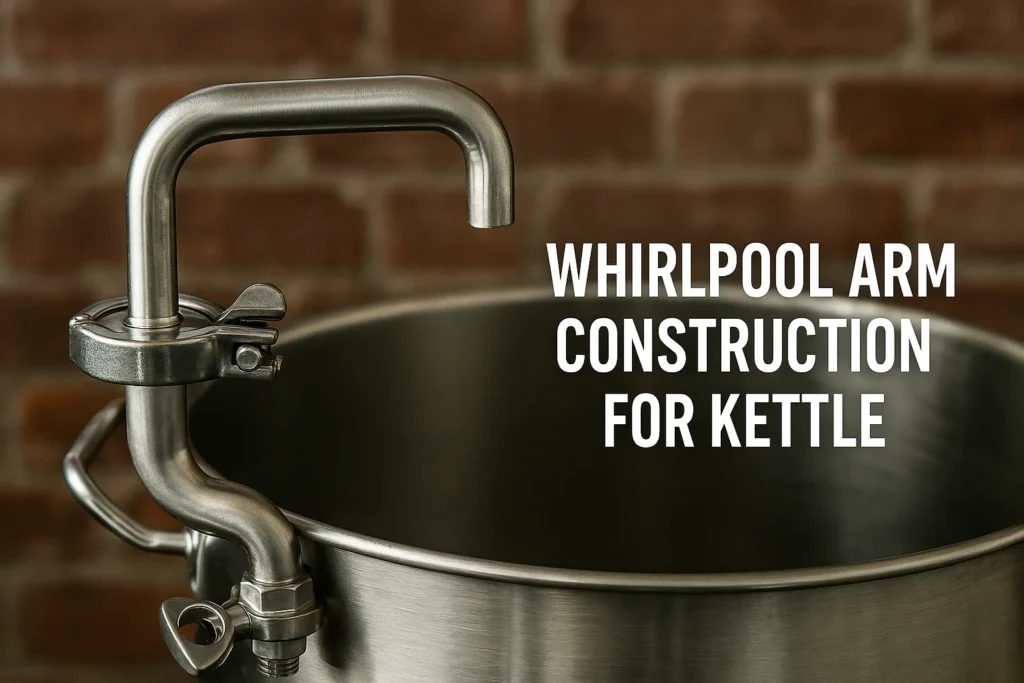
What is a Whirlpool Arm and Why Does Construction Matter?
A whirlpool arm is a specialized brewing device designed to create controlled circular currents in your brew kettle during the post-boil phase. The construction quality directly impacts its effectiveness in separating trub, hops debris, and cold break materials from your finished wort.
The science behind whirlpool arm construction relies on the tea leaf paradox, where centripetal force and friction work together to collect solid particles in the center of your kettle. A whirlpool promotes clearer wort by collecting the cold break solids in the center of the brew kettle, making proper construction essential for optimal results.
Core Benefits of Proper Whirlpool Arm Construction
Faster Chilling Times: Well-constructed whirlpool arms dramatically reduce cooling time by maintaining constant wort movement. The time it takes to chill wort to yeast pitching temperatures greatly decreases when whirlpooling.
Superior Wort Clarity: Professional construction ensures maximum trub separation, resulting in cleaner fermentation and reduced off-flavors.
Enhanced Hop Utilization: Because whirlpooling cools wort faster, post-boil hop additions instill more flavor and aroma without too much of the bitterness.
Reduced DMS Formation: Proper whirlpool construction helps eliminate dimethyl sulfide, preventing unwanted cooked corn flavors in your finished beer.
Essential Materials for Whirlpool Arm Construction
Stainless Steel: The Gold Standard
304 Stainless Steel remains the preferred material for whirlpool arm construction among professional brewers. Grades 304 and 316 are predominantly used for the optimal balance of corrosion resistance, fabrication properties, and cost. This food-grade material offers several advantages:
- Corrosion Resistance: Stainless steel resists corrosion and oxygen interaction, has high cleanability, and meets hygiene requirements
- Durability: With proper maintenance, major stainless steel vessels and piping have a service lifespan of 25-30 years or longer
- Sanitation: Easy to clean and sanitize between batches
- Professional Appearance: Maintains aesthetic appeal in your brewing setup
316 Stainless Steel provides even superior corrosion resistance but comes at a higher cost. For most homebrewing applications, 304 stainless steel offers the perfect balance of performance and affordability.
Copper: The Traditional Choice
Copper remains popular for whirlpool arm construction due to its excellent thermal conductivity and malleability. The only whirlpool arm that is made of 5/8″ outside diameter copper and is designed to give you the highest possible flow rate. Benefits include:
- Easy Fabrication: Copper bends easily without specialized equipment
- Thermal Properties: Excellent heat transfer characteristics
- Cost-Effective: Generally less expensive than stainless steel
- Antimicrobial Properties: Natural antimicrobial surface
| Material | Durability | Cost | Ease of Construction | Thermal Properties |
|---|---|---|---|---|
| 304 Stainless | Excellent | High | Moderate | Good |
| 316 Stainless | Outstanding | Very High | Moderate | Good |
| Copper | Good | Moderate | Easy | Excellent |
Whirlpool Arm Construction Methods
Weldless Construction Approach
Weldless whirlpool arm construction offers accessibility for homebrewers without welding equipment. Want clearer wort? Quicker chilling times? Higher hop utilization during flameout? Achieve all this and more by upgrading your system with the new Weldless Whirlpool Arm.
Components Required:
- Bulkhead fitting (1/2″ NPT)
- Elbow joint (90-degree)
- Ball valve for flow control
- Compression fittings
- Appropriate gaskets and washers
Construction Steps:
- Kettle Preparation: Drill precise hole using step drill bit
- Bulkhead Installation: Secure with appropriate gaskets
- Fitting Assembly: Connect elbow and valve components
- Leak Testing: Pressure test before first use
Welded Construction for Permanent Installation
Professional welded construction provides the most durable and leak-proof solution. TIG welding is most common. Laser and electron beam welding are also used to minimize heat input and distortion.
Welding Considerations:
- Use appropriate filler materials
- Maintain proper heat control
- Ensure food-grade welds
- Post-weld cleaning and passivation
Clamp-On Construction for Portability
For brewers wanting flexibility, clamp-on whirlpool arm construction eliminates permanent kettle modifications. Simply slide it over the top of your kettle, connect it to your pump, and turn it on. The whirlpool arm will do the rest.
Advantages:
- No kettle modifications required
- Portable between different vessels
- Easy storage when not in use
- Quick setup and breakdown
DIY Whirlpool Arm Construction Guide
Planning Your Build
Before beginning whirlpool arm construction, consider these critical factors:
Kettle Dimensions: Measure internal diameter and height to determine optimal arm length and positioning.
Flow Rate Requirements: Calculate pump capacity to match arm diameter specifications.
Connection Method: Choose between permanent installation or removable design.
Copper Whirlpool Arm Construction
Materials List:
- 1/2″ copper tubing (2-3 feet)
- 90-degree copper elbow
- Male camlock fitting
- Compression fittings
- Silicone tubing protection
- Beam clamp for attachment
Step-by-Step Construction:
- Measurement and Cutting: The kettle I’ll be using it in is 21″ tall. It looks like the racking canes are usually 24″ tall, and if the last few inches are bent it should work out just fine
- Bending the Outlet: Create 90-degree bend approximately 2-3 inches from bottom end
- Fitting Installation: Solder or compress-fit connections ensuring food-grade seals
- Mounting System: Install beam clamp with silicone protection for kettle rim
- Connection Setup: Attach camlock or barb fitting for pump connection
Stainless Steel Construction Challenges
Stainless steel whirlpool arm construction requires specialized tools and techniques. First I had to drill my kettle, pain in the f*****g ass, if anyone has any tips on how to make this any easier I would appreciate it.
Professional Tips:
- Use cutting fluid during drilling
- Start with center punch for accuracy
- Employ progressive drill bit sizes
- Invest in cobalt drill bits for durability
Design Optimization for Maximum Efficiency
Diameter Selection Impact
The internal diameter significantly affects whirlpool arm construction performance. When recirculating through a CFC, the Whirly MAMMOTH can decrease chilling times by as much as 50% compared to a typical 1/2″ outside diameter whirlpool arm.
Diameter Guidelines:
- 3/8″ diameter: Ideal for 5-15 gallon batches
- 1/2″ diameter: Standard for most homebrewing applications
- 5/8″ diameter: High-flow applications and larger batch sizes
Outlet Design Considerations
Having a smaller exit will make the wort shoot out faster and improve the whirlpool. Consider incorporating a reducer at the outlet for enhanced whirlpool formation.
Outlet Modifications:
- Tapered nozzle for increased velocity
- Angled discharge for optimal flow direction
- Adjustable positioning for different kettle sizes
Installation Best Practices
Positioning for Optimal Performance
Proper positioning during whirlpool arm construction ensures maximum effectiveness. Unlike other whirlpool arms, the Whirly MAMMOTH is contoured to direct the flow of wort to follow the outside edge of the kettle giving you a nice cone of trub in the center.
Installation Guidelines:
- Position 2-3 inches below wort surface
- Angle tangentially to kettle wall
- Ensure adequate clearance from immersion chiller
- Consider future equipment additions
Connection Systems
Quick Disconnect Fittings: Enable rapid setup and breakdown for efficient brewing workflow.
Ball Valve Integration: Provides precise flow control during whirlpool operations.
Camlock Connections: Professional-grade connections ensure leak-free operation and easy cleaning.
Troubleshooting Common Construction Issues
Inadequate Whirlpool Formation
Symptoms: Weak vortex, poor trub separation Solutions:
- Increase pump flow rate
- Adjust outlet angle
- Check for system leaks
- Verify proper positioning
Clogging and Blockages
Prevention Strategies:
- Use appropriate screen filters
- Maintain proper hop addition timing
- Regular cleaning protocols
- Consider hop spider integration
Leak Issues
Common Causes:
- Inadequate thread sealant
- Worn gaskets or O-rings
- Improper torque specifications
- Thermal expansion problems
Maintenance and Longevity
Cleaning Protocols
Proper cleaning ensures long-term performance and food safety. It is also easy to clean, so you can keep your brewing system sanitary.
Cleaning Steps:
- Disassemble removable components
- Rinse with hot water
- Circulate cleaning solution (PBW recommended)
- Thorough rinse and sanitization
- Air dry before storage
Inspection Schedule
Monthly Checks:
- Gasket condition assessment
- Connection tightness verification
- Flow path inspection
- Corrosion monitoring
Annual Maintenance:
- Complete disassembly and deep cleaning
- Replacement of wear components
- Leak testing under pressure
- Performance evaluation
Advanced Construction Techniques
Integrated Temperature Control
Advanced whirlpool arm construction can incorporate temperature monitoring for precise control during hop stands and whirlpool additions.
Features:
- Thermowell integration
- Digital temperature display
- Automated flow control
- Data logging capabilities
Multi-Port Configurations
Professional setups benefit from multiple whirlpool arm construction approaches:
Dual-Arm Systems: Separate arms for different flow rates and applications Adjustable Height Mechanisms: Accommodate varying batch sizes Modular Components: Interchangeable parts for different brewing styles
Cost Analysis and ROI
Investment Breakdown
| Construction Type | Material Cost | Time Investment | Skill Level | Performance |
|---|---|---|---|---|
| DIY Copper | $25-50 | 2-4 hours | Beginner | Good |
| DIY Stainless | $50-100 | 4-8 hours | Intermediate | Excellent |
| Professional Kit | $100-200 | 1-2 hours | Any | Excellent |
Return on Investment
Quality whirlpool arm construction pays dividends through:
- Reduced Batch Losses: Clearer wort transfer
- Time Savings: Faster cooling and processing
- Quality Improvement: Better beer consistency
- Equipment Longevity: Durable construction materials
Safety Considerations in Construction
Hot Wort Handling
Working with boiling wort requires specific safety measures during whirlpool arm construction and operation.
Safety Protocols:
- Heat-resistant materials selection
- Pressure rating verification
- Emergency shutdown procedures
- Personal protective equipment usage
Electrical Safety
When integrating pumps and control systems:
- GFCI protection requirement
- Proper grounding techniques
- Moisture protection measures
- Professional electrical consultation
Future Trends in Whirlpool Arm Construction
Smart Brewing Integration
Modern whirlpool arm construction increasingly incorporates smart technology:
IoT Connectivity: Remote monitoring and control capabilities Automated Optimization: AI-driven flow adjustment Data Analytics: Performance tracking and improvement Integration Platforms: Seamless brewery management systems
Sustainable Materials
Environmental consciousness drives innovation in construction materials:
- Recycled stainless steel options
- Eco-friendly manufacturing processes
- Reduced energy construction methods
- Biodegradable packaging solutions
Mastering Whirlpool Arm Construction
Successful whirlpool arm construction represents more than just building a brewing accessory—it’s about understanding the science, materials, and techniques that separate amateur from professional brewing operations. Whether you choose DIY copper construction for budget-friendly flexibility or invest in professional stainless steel systems for maximum durability, the key lies in matching your construction approach to your brewing goals and skill level.
The investment in proper whirlpool arm construction pays immediate dividends in beer quality, brewing efficiency, and overall satisfaction with your homebrewing experience. As you progress in your brewing journey, remember that quality construction techniques, appropriate materials selection, and proper maintenance protocols ensure your whirlpool arm will serve you well for many brewing seasons to come.
For additional brewing insights and equipment recommendations, visit Brew My Beer where passionate brewers share their expertise and help elevate your homebrewing craft to new heights.
About the Author: John Brewster is a passionate homebrewer with over a decade of experience experimenting with different beer styles. After working at three craft breweries and winning several regional homebrew competitions, John now dedicates his time to developing innovative recipes and teaching brewing techniques. His specialty lies in creating unique flavor profiles by combining traditional brewing methods with unexpected ingredients. When not tending to his five fermenters, John enjoys pairing his creations with artisanal cheeses and hosting tasting sessions for friends and family.