
Master the art of bottle conditioning with our comprehensive guide. Learn how temperature affects carbonation time, troubleshoot common problems, and discover expert techniques for perfect naturally carbonated beer every time. Includes an interactive carbonation timeline calculator.
The first time I attempted bottle conditioning, I ended up with a case of disappointingly flat beer. The second time, I overprimed and created “bottle bombs” that exploded in my closet, leaving a sticky mess and shattered glass. After several years and countless batches later, I’ve finally mastered the subtle art of bottle conditioning—and I’m here to help you avoid my early mistakes.

Bottle conditioning is the traditional method of naturally carbonating beer by adding a precise amount of fermentable sugar before bottling. The remaining yeast consumes this sugar and produces carbon dioxide, which, with nowhere to escape, dissolves into the beer—creating those delightful bubbles we all love.
In this comprehensive guide, I’ll walk you through everything I’ve learned about the bottle conditioning process, from the basic science behind it to practical tips for consistent success. By the end, you’ll have the knowledge to create perfectly carbonated beer with that distinctive bottle-conditioned character that many brewers (myself included) prefer over forced carbonation.
The Science Behind Bottle Conditioning
Bottle conditioning works on a simple principle: yeast + sugar = carbon dioxide + alcohol. But the details matter tremendously.
When you add priming sugar to your beer before bottling, the remaining yeast—or freshly added yeast in some cases—metabolizes these simple sugars in a sealed environment. With nowhere to escape, the CO₂ dissolves into the beer, creating carbonation. This process is essentially a mini-fermentation that happens in the bottle.
The standard formula for calculating how much carbonation you’ll get is:
Volumes of CO₂ = (Grams of sugar × 0.5) ÷ Liters of beer
For example, adding 100 grams of table sugar to 19 liters (5 gallons) of beer will produce approximately 2.6 volumes of CO₂—a typical carbonation level for many American ales.
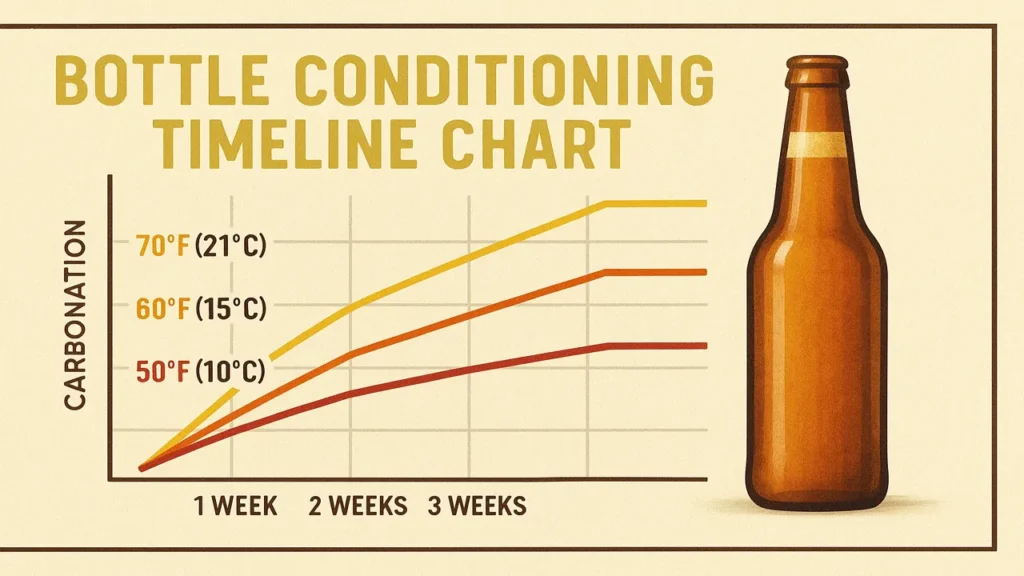
Bottle Conditioning Timeline Calculator
Visualize how carbonation develops over time at different temperatures
About Bottle Conditioning
Bottle conditioning is the natural carbonation process where yeast consumes priming sugar to produce CO₂. Temperature significantly affects how quickly this process occurs. Use this interactive tool to estimate carbonation development for your specific beer.
Carbonation Status
Types of Carbonation: Natural vs. Forced
Before diving deeper, it’s worth understanding how bottle conditioning differs from forced carbonation:
- Bottle Conditioning (Natural Carbonation) involves adding sugar before bottling and letting yeast create CO₂ naturally over 1-3 weeks.
- Forced Carbonation involves applying pressurized CO₂ directly to the beer, typically in a keg, achieving carbonation in hours rather than weeks.
While forced carbonation is faster and more predictable, bottle conditioning offers several advantages, which I’ll cover later in this article.
Why Choose Bottle Conditioning?
After experimenting with both methods extensively, I’ve found compelling reasons to bottle condition:
1. Enhanced Flavor Development
The mini-fermentation that occurs during bottle conditioning doesn’t just create bubbles—it contributes to flavor development. As Dr. Charlie Bamforth, professor of brewing science, explains, bottle conditioning creates compounds that enhance flavor stability and complexity.
I particularly noticed this when bottle conditioning Belgian styles. My saison developed a delightful peppery character during bottle conditioning that wasn’t present at bottling time.
2. Extended Shelf Life
The remaining yeast continues to scavenge oxygen in the bottle, which helps prevent oxidation—a primary cause of beer deterioration. According to research published in the Journal of the Institute of Brewing, bottle-conditioned beers often age more gracefully than their force-carbonated counterparts.
3. Smoother Carbonation
Many brewers, including myself, find that naturally carbonated beers have finer, more persistent bubbles that create a smoother mouthfeel. The carbonation seems more integrated with the beer rather than just dissolved gas.
4. Authentic Traditional Character
For many beer styles, particularly Belgian ales, German wheat beers, and British real ales, bottle conditioning is traditional and contributes to their characteristic profiles.
5. Practicality for Homebrewers
For homebrewers without kegging systems, bottle conditioning is far more accessible and requires minimal equipment.
Essential Equipment for Bottle Conditioning
To set yourself up for bottle conditioning success, you’ll need:
- Bottles: Brown glass bottles with untampered crowns are ideal. For highly carbonated beers, thicker Belgian or German bottles are recommended.
- Bottle Caps: Fresh, unused caps ensure a proper seal.
- Bottle Capper: Either a bench or hand capper works fine.
- Bottling Bucket: A food-grade bucket with a spigot makes transferring beer to bottles much easier.
- Auto-Siphon: For transferring beer from fermenter to bottling bucket.
- Bottle Filler: A spring-loaded bottle filler speeds up the process and ensures consistent fill levels.
- Priming Sugar: While various sugars can be used, corn sugar (dextrose) is most common.
- Digital Scale: Accuracy matters tremendously when measuring priming sugar.
- Thermometer: The amount of sugar needed depends partly on beer temperature.
Step-by-Step Bottle Conditioning Process
Over the years, I’ve refined my bottle conditioning process to these key steps:
1. Ensure Fermentation is Complete
This is critical. Bottling beer that hasn’t finished fermenting can lead to dangerous over-carbonation. Always take consecutive gravity readings 2-3 days apart. If they’re stable, you’re ready to bottle.
I once rushed to bottle an imperial stout that dropped from 1.030 to 1.028 and seemed “stable enough.” The result? Bottle bombs that could have caused serious injury. Now I always wait for truly stable readings.
2. Calculate the Right Amount of Priming Sugar
Various factors affect how much priming sugar you need:
- Desired carbonation level: Different styles require different levels of carbonation. A British bitter might need only 1.5-2.0 volumes of CO₂, while a Belgian tripel could require 3.0-4.0 volumes.
- Residual CO₂ from fermentation: Colder beer retains more CO₂. If your beer is cold, it already contains some dissolved CO₂.
- Temperature during conditioning: Warmer temperatures accelerate carbonation but may affect flavor development.
Instead of guessing, I recommend using a priming calculator like the one provided by Brewer’s Friend to get precise measurements.
3. Prepare the Priming Solution
I’ve found the most consistent results come from creating a priming solution rather than adding dry sugar directly to the bottling bucket:
- Boil the calculated amount of sugar in about 2 cups of water for 5-10 minutes.
- Cool to room temperature (or at least below 160°F/71°C).
- Add to the bottling bucket before transferring the beer.
4. Transfer Beer Carefully
Minimize oxygen exposure by:
- Gently siphoning beer into the bottling bucket containing the priming solution.
- Ensure the siphon tube extends to the bottom of the bucket to reduce splashing.
- Allow the beer to mix naturally with the priming solution as the bucket fills.
5. Fill Bottles with Precision
- Fill bottles to approximately 1 inch (2.5 cm) from the top. This headspace is crucial for proper carbonation.
- Cap immediately after filling to minimize oxygen exposure.
6. Condition at the Right Temperature
Store bottles in a location with:
- Stable temperature: Constant temperature is more important than perfect temperature. Fluctuations stress yeast.
- Generally between 65-75°F (18-24°C): This range works for most ale yeasts. Lagers may require cooler temperatures.
- Away from light: UV light creates “skunky” off-flavors.
I use a dedicated closet for conditioning, with a small heater for winter months to maintain at least 65°F (18°C).
7. Allow Sufficient Time
Patience is perhaps the most important ingredient. Generally:
- Standard-strength ales (below 7% ABV): 1-2 weeks
- High-gravity beers (above 7% ABV): 2-4 weeks
- Bottle-conditioned lagers: 3-4 weeks
- Belgian strong ales and barleywines: 4+ weeks, sometimes months
Common Bottle Conditioning Problems and Solutions
Through my brewing journey, I’ve encountered and resolved various bottle conditioning issues:
Undercarbonatoin
Causes:
- Insufficient priming sugar
- Poor yeast health or insufficient viable yeast
- Too-cold storage temperature
- Incomplete sealing of bottles
Solutions:
- Verify your calculations using a priming calculator.
- For high-ABV beers (above 8%), consider adding fresh yeast at bottling—approximately ½ teaspoon of rehydrated dry yeast per 5 gallons.
- Increase storage temperature to 70-75°F (21-24°C).
- Check bottle caps for proper sealing. Replace if necessary.
Overcarbonation (Bottle Bombs)
Causes:
- Too much priming sugar
- Bottling before fermentation is complete
- Infection by wild yeast or bacteria
- Uneven distribution of priming sugar
Solutions:
- Double-check your calculations.
- Ensure fermentation is complete with stable gravity readings.
- Practice impeccable sanitation.
- Thoroughly mix priming solution with beer before bottling.
Gushing Bottles
Causes:
- Overcarbonation (as above)
- Nucleation points from particulate matter or scratched bottles
- Some infections
Solutions:
- Refrigerate bottles thoroughly (24+ hours) before opening.
- Open bottles very slowly, releasing pressure gradually.
- For future batches, improve beer clarity by cold crashing or using fining agents before bottling.
Off-Flavors Developing in the Bottle
Causes:
- Oxidation during the bottling process
- Contamination
- Autolysis (yeast death and breakdown)
Solutions:
- Minimize oxygen exposure during transfers.
- Improve sanitation practices.
- If autolysis is suspected (meaty, rubbery flavors), reduce the amount of trub/yeast transferred to bottles.
Advanced Bottle Conditioning Techniques
As your brewing skills advance, you might consider these more sophisticated approaches:
1. Krausening
Rather than adding sugar, krausening involves adding actively fermenting beer (at high krausen) to the mature beer before bottling. This traditional German technique:
- Produces exceptionally fine carbonation
- Avoids any chance of a sugar flavor
- Often results in better head retention
I’ve used this technique successfully with German lagers, adding about 10% actively fermenting beer to the bottling bucket.
2. Bottle Conditioning with Champagne Yeast
For high-alcohol beers or aged beers with potentially dormant yeast, adding a small amount of champagne yeast at bottling can ensure proper carbonation. Champagne yeast:
- Tolerates high alcohol levels
- Doesn’t contribute significant flavors
- Carbonates reliably even in challenging conditions
I use approximately 0.2 grams of dry champagne yeast per 5 gallons, rehydrated in warm water for 15 minutes before adding to the bottling bucket.
3. Bottle Refermentation for Fruit Beers
When bottle conditioning fruit beers, the added complexity requires special consideration:
- Ensure fermentation of fruit sugars is complete before bottling.
- Account for the volume of fruit when calculating priming sugar.
- Consider adding fresh yeast at bottling if extended aging with fruit may have reduced viable yeast counts.
My best fruit lambic required two months of conditioning to achieve perfect carbonation, but the result was well worth the wait.
4. Natural Conditioning for Sour and Wild Ales
For sour and wild ales, bottle conditioning takes on another dimension:
- These beers may continue to develop for months or years in the bottle.
- Mixed cultures can sometimes produce more CO₂ than expected from conventional yeasts.
- Using thicker bottles is critical for long-term aging.
I typically prime these beers slightly lower (about 2.2-2.4 volumes CO₂) and use heavy Belgian bottles to accommodate potential continuing fermentation over time.
Bottle Conditioning for Different Beer Styles
Through experimentation with various styles, I’ve developed these guidelines for different beer types:
American Ales (Pale Ales, IPAs, Ambers)
- Target: 2.3-2.6 volumes CO₂
- Conditioning Time: 10-14 days
- Temperature: 65-70°F (18-21°C)
- Notes: Hop aroma may fade during conditioning, so for hop-forward styles, dry hop generously.
Belgian Ales (Tripels, Dubbels, Strong Ales)
- Target: 2.8-3.5 volumes CO₂
- Conditioning Time: 2-4 weeks
- Temperature: 68-75°F (20-24°C)
- Notes: The extended conditioning period contributes to the complex flavor profile. Use thicker bottles for higher carbonation levels.
British Ales (Bitters, ESBs, Milds)
- Target: 1.5-2.2 volumes CO₂
- Conditioning Time: 7-10 days
- Temperature: 65-68°F (18-20°C)
- Notes: Traditional British ales are deliberately lower in carbonation than American or Belgian styles.
German Wheat Beers (Hefeweizen, Dunkelweizen)
- Target: 3.0-4.0 volumes CO₂
- Conditioning Time: 10-14 days
- Temperature: 68-72°F (20-22°C)
- Notes: The high carbonation is characteristic of the style. Be sure to use bottles designed for high pressure.
Imperial Stouts and Barleywines
- Target: 2.0-2.4 volumes CO₂
- Conditioning Time: 3-8 weeks
- Temperature: 65-70°F (18-21°C)
- Notes: Consider adding fresh yeast at bottling due to high alcohol content. These beers continue to develop in the bottle for months or even years.
When to Drink Bottle Conditioned Beer
Knowing when your beer has reached optimal conditioning is crucial:
Visual Indicators
- Clear beer with a uniform layer of sediment at the bottom
- Consistent carbonation across sample bottles
Practical Approach
I always recommend setting aside one clear bottle (kept away from light) as a “tester” so you can visually monitor conditioning progress without opening bottles.
For most ales, I follow this testing schedule:
- Test one bottle after 7 days
- If carbonation is insufficient, wait another 3-5 days and test again
- Once carbonation is satisfactory, refrigerate the remaining bottles for at least 24 hours before drinking
Aging Potential
Many bottle-conditioned beers continue to improve with age. In my experience:
- Hop-forward beers are best within 3 months of conditioning
- Malt-forward beers can improve for 6-12 months
- Strong ales and barleywines can develop beautifully for years
Storage and Serving Bottle Conditioned Beer
To get the most from your bottle-conditioned creations:
Storage
- Store upright to allow yeast to settle compactly at the bottom
- Keep at cellar temperature (50-55°F/10-13°C) for long-term storage
- Avoid temperature fluctuations, which can accelerate aging
Serving
- Refrigerate for at least 24 hours before serving to help yeast compact
- Pour carefully, leaving the yeast sediment behind
- For some styles (hefeweizen, certain Belgian ales), the yeast is traditionally roused and included in the pour
For special bottles I’m aging long-term, I mark them with bottling dates and anticipated “drink after” dates to avoid opening them prematurely.
The Rewarding Art of Bottle Conditioning
Bottle conditioning may require more patience and precision than forced carbonation, but the results speak for themselves. The complex flavors, fine bubbles, and traditional character make the extra effort worthwhile.
Through years of brewing, I’ve come to appreciate bottle conditioning not just as a carbonation method, but as an integral part of the brewing art that connects us to centuries of tradition. Every time I open a perfectly conditioned bottle that I’ve patiently waited for, I’m reminded that great beer—like many good things in life—simply can’t be rushed.
Whether you’re bottle conditioning by necessity as a homebrewer without kegging equipment, or by choice for the unique qualities it brings, I hope this guide helps you achieve consistent, excellent results. Remember that even experienced brewers occasionally encounter issues—the important thing is to learn from each batch and continue refining your process.
About the Author:
This article was written by Olivia Barrelton, Barrel Aging & Wood Infusion Expert at Brew My Beer. Olivia comes from three generations of coopers (barrel makers) and brings unmatched expertise in wood aging techniques to the brewing world. After apprenticing at distilleries in Scotland and wineries in France, she applied her knowledge of wood influences to beer aging.