


Master the DIY Clean-In-Place system for home conical fermenters. Achieve unparalleled sanitation and operational efficiency by automating your cleaning protocols. This guide details component selection, system assembly, chemical management, and validation, ensuring aseptic conditions for superior beer production. Elevate your brewing hygiene with precise, repeatable processes, directly impacting beer quality.
DIY CIP System Components for Conical Fermenters
|
Component |
Specification |
Function |
Material |
Approx. Cost (USD) |
|---|---|---|---|---|
|
Centrifugal Pump |
2-5 GPM, 10-25 PSI, Food-Grade |
Circulates cleaning solutions; provides necessary pressure for spray ball. |
304/316 Stainless Steel head, Food-Grade Impeller/Seals |
150-400 |
|
Static Spray Ball |
1.5-3″ Diameter, Tri-Clamp/NPT Mount, 360° Coverage |
Distributes cleaning solution evenly across internal fermenter surfaces. |
304/316 Stainless Steel |
50-150 |
|
Sanitary Hoses |
0.75-1.5″ ID, Food-Grade, Chemical/Temp Resistant |
Conveys cleaning solutions between pump, fermenter, and reservoir. |
Silicone, EPDM, PVC (reinforced) |
30-100 per 10ft |
|
Ball Valves |
Tri-Clamp/NPT, Full Port, 3-Piece Design |
Controls flow direction and isolation of components. |
304/316 Stainless Steel, PTFE seats |
20-80 each |
|
Tri-Clamp Fittings & Gaskets |
Assorted Tees, Elbows, Clamps, Reducers |
Ensures leak-proof, sanitary connections throughout the system. |
304/316 Stainless Steel fittings, Silicone/EPDM gaskets |
5-30 each |
|
Chemical Reservoir |
10-20 Gallon Capacity, Chemical Resistant |
Holds cleaning solutions (caustic, acid, sanitizer). |
HDPE, Polypropylene |
30-80 |
|
Immersion Heater (Optional) |
1500-2500W, PID Temperature Controller |
Heats cleaning solutions for increased efficacy. |
304/316 Stainless Steel element |
50-150 |
|
Sight Glass |
Tri-Clamp/NPT, Borosilicate Glass |
Allows visual inspection of solution clarity/foam during circulation. |
304/316 Stainless Steel, Borosilicate Glass |
40-100 |
CIP System Calculations:
1. Required Pump Flow Rate for Spray Ball:
To ensure adequate impingement and coverage, a static spray ball typically requires a minimum flow rate. For a 3-inch diameter static spray ball in a 1-barrel (31.5 gallon) fermenter, a common rule of thumb is 2-3 Gallons Per Minute (GPM) per linear foot of fermenter diameter. However, more precise sizing relates to the spray ball’s orifice design and internal head pressure, often specified by the manufacturer.
Example: If a spray ball is rated for optimum performance at 10 PSI and 2.5 GPM, your pump must reliably deliver this. For a 30-gallon fermenter, a common target is 1-2 GPM per 10 gallons of fermenter volume, ensuring sufficient turnover.
2. Caustic Dilution Calculation (1.5% NaOH solution):
Assume you are using a 50% solution of liquid Caustic (Sodium Hydroxide, NaOH).
Target Concentration (C1) = 1.5%
Volume of Cleaning Solution (V2) = 10 Gallons (for example, to fill reservoir and lines)
Stock Concentration (C2) = 50%
Formula: C1 * V2 = C2 * V1 (where V1 is volume of stock solution needed)
1.5% * 10 Gallons = 50% * V1
V1 = (1.5 * 10) / 50 = 15 / 50 = 0.3 Gallons
Therefore, you would need 0.3 Gallons (approx. 38.4 fl oz or 1136 mL) of 50% liquid NaOH added to 9.7 Gallons of water to achieve a 1.5% solution.
3. Peracetic Acid (PAA) Sanitizer Dilution (200 ppm solution):
Assume you are using a 15% PAA solution, aiming for 200 ppm in 5 gallons of water.
Conversion: 1% = 10,000 ppm. So, 15% PAA = 150,000 ppm PAA.
Target ppm (C1) = 200 ppm
Volume of Water (V2) = 5 Gallons
Stock ppm (C2) = 150,000 ppm
Formula: C1 * V2 = C2 * V1
200 ppm * 5 Gallons = 150,000 ppm * V1
V1 = (200 * 5) / 150,000 = 1000 / 150,000 = 0.00667 Gallons
Convert to mL: 0.00667 Gallons * 3785.41 mL/Gallon ≈ 25.26 mL
Therefore, you would add approximately 25 mL of 15% PAA to 5 gallons of water to achieve a 200 ppm sanitizing solution.
NOTE: Always refer to chemical manufacturer’s specific dilution instructions and Material Safety Data Sheets (MSDS) for accurate and safe handling.
Deep Dive: The Definitive Master-Guide for DIY CIP Systems for Home Conical Fermenters
The pursuit of brewing excellence hinges fundamentally on impeccable sanitation. For the serious homebrewer utilizing conical fermenters, manual cleaning, while diligent, inherently carries risks of incomplete surface contact, chemical exposure, and inconsistencies. A Clean-In-Place (CIP) system mitigates these risks, offering a repeatable, safe, and highly effective method for maintaining aseptic brewing conditions. This guide dissects the technical intricacies of designing, assembling, and operating a DIY CIP system tailored for home conical fermenters, transforming your sanitation protocol from a chore into a precise engineering process.
The Imperative of CIP for Conical Fermenters
Conical fermenters, with their intricate geometries including sample valves, racking ports, thermowells, and trub dumps, present formidable challenges for manual cleaning. Brushes cannot reliably reach every crevice, and visual inspection alone is insufficient to confirm microbial cleanliness. CIP automates the delivery of cleaning and sanitizing solutions under controlled conditions of pressure, flow, temperature, and chemical concentration, ensuring comprehensive coverage and consistent efficacy. The benefits extend beyond mere cleanliness; they encompass brewer safety by minimizing chemical handling, increased efficiency, and most critically, a dramatic reduction in the risk of infection, leading to consistently higher quality beer.
Core Principles of CIP: The “TTTCC” Framework
Effective CIP adheres to five fundamental principles:
1. Turbulence: This is the mechanical action. The spray ball atomizes the cleaning solution, creating a high-velocity, high-impact stream that scours internal surfaces, dislodging organic soils and biofilm. Insufficient turbulence results in inadequate cleaning.
2. Time: Adequate contact time allows chemicals to penetrate and break down soils. Each stage of the CIP cycle (pre-rinse, caustic, acid, sanitize) requires specific durations for optimal performance.
3. Temperature: Elevated temperatures significantly enhance the efficacy of most chemical cleaners. Caustic solutions, for instance, are far more potent at 120-160°F (49-71°C), accelerating the breakdown of proteins and carbohydrates. Sanitizers often operate effectively at ambient temperatures, but residual heat from cleaning can sometimes accelerate their action or evaporation.
4. Chemical Concentration: The precise dilution of cleaning and sanitizing agents is critical. Too low, and they are ineffective; too high, and they become wasteful, potentially corrosive, and dangerous. Refer to manufacturer specifications rigorously.
5. Coverage: Every square inch of the fermenter’s internal surface, including ancillary ports and valves, must be contacted by the cleaning and sanitizing solutions. This is primarily achieved through correct spray ball selection and pump sizing.
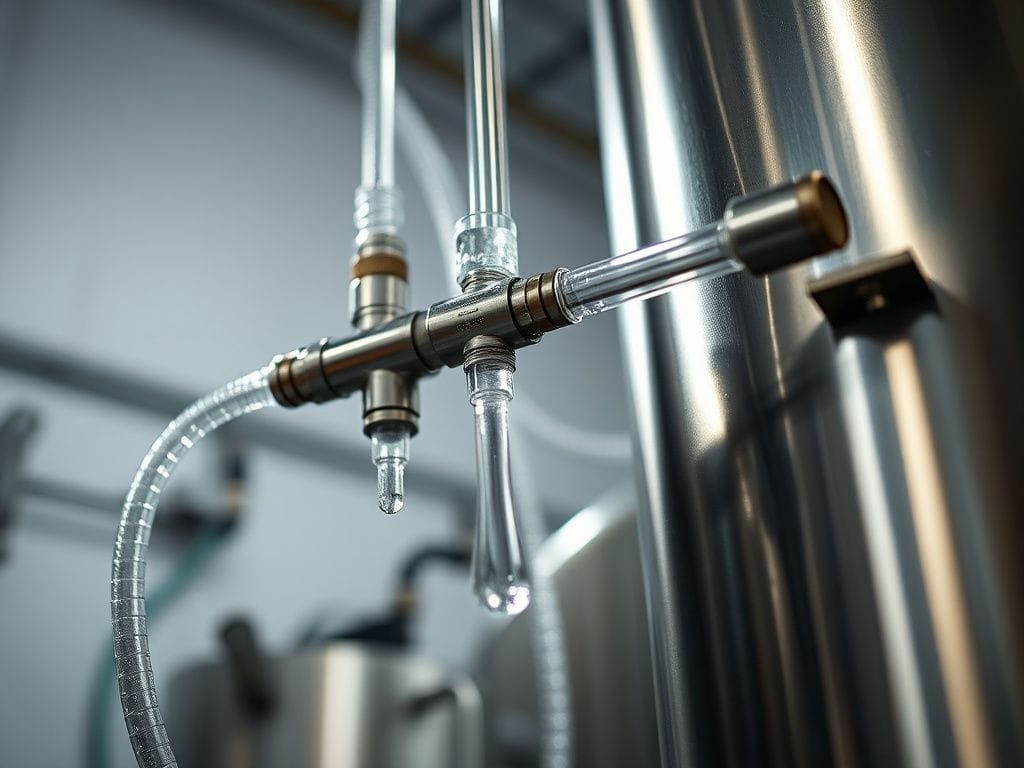
System Design & Component Selection: Engineering Your CIP
A robust DIY CIP system starts with meticulous component selection, balancing performance, cost, and material compatibility.
1. Pump Selection: The Heart of Your System
The pump dictates flow rate and pressure, which are vital for spray ball performance. For homebrew scale, a centrifugal pump is generally preferred over positive displacement pumps due to its simplicity, cost-effectiveness, and ability to handle entrained air without damage. Key specifications:
-
Flow Rate (GPM): Must meet or exceed the spray ball’s requirements. Typically 2-5 GPM for most homebrew conicals.
-
Head Pressure (PSI): Sufficient pressure is needed to overcome friction losses in hoses, fittings, and to drive the spray ball’s impingement. 10-25 PSI is a common target.
-
Material: The pump head, impeller, and seals must be food-grade (e.g., 304/316 Stainless Steel for the head) and chemically resistant to both caustic and acid solutions. Beware of pumps with brass or aluminum components in contact with the fluid.
-
Motor: A washdown-rated motor is ideal for brewing environments, though a standard TEFC (Totally Enclosed Fan Cooled) motor can suffice with careful placement and protection from splashes.
2. Spray Ball: Mechanical Action Catalyst
The spray ball is responsible for delivering the mechanical action (turbulence). For home conicals, a static spray ball is usually sufficient and more cost-effective than rotary variants.
-
Coverage Pattern: Ensure it’s a 360° pattern, designed for tank cleaning. Some are specifically designed for efficient low-flow operation.
-
Connection: Typically tri-clamp, which allows for easy removal and cleaning.
-
Material: 304 or 316 Stainless Steel is mandatory for chemical resistance and sanitation.
-
Sizing: The diameter of the spray ball is less critical than its orifice design and the pump’s ability to deliver the specified flow rate and pressure. Consult manufacturer data sheets.
3. Hosing & Tubing: The Arteries of Your System
Hoses must be food-grade, chemical-resistant, and pressure-rated for your pump.
-
Material: Reinforced silicone or EPDM (Ethylene Propylene Diene Monomer) are excellent choices due to their flexibility, temperature resistance, and chemical compatibility. PVC tubing is a lower-cost alternative but may have lower temperature ratings and chemical resistance, especially to strong caustics at elevated temperatures.
-
Diameter: 0.75″ to 1.5″ internal diameter is common. Larger diameters reduce friction loss, aiding pump efficiency, but can be unwieldy for smaller homebrew setups.
-
Length: Minimize hose length to reduce pressure drop.
4. Valves & Fittings: Controlling the Flow
Sanitary connections are paramount to prevent harborage sites for microorganisms.
-
Tri-Clamp Fittings: The gold standard for brewing. Easy to assemble/disassemble for cleaning, provides a smooth, crevice-free connection. You’ll need various tees, elbows, reducers, and clamps.
-
Ball Valves: Full-port 3-piece stainless steel ball valves are ideal for flow control and isolation. Their full-port design minimizes turbulence and dead spots. Ensure PTFE (Teflon) seats for chemical resistance.
-
Gaskets: Silicone, EPDM, or PTFE gaskets are common for tri-clamp fittings, chosen for chemical and temperature resistance.
5. Chemical Reservoir: The Solution Container
A dedicated reservoir is essential for preparing and holding cleaning solutions.
-
Material: High-density polyethylene (HDPE) or polypropylene (PP) tanks are robust, chemical-resistant, and relatively inexpensive.
-
Volume: Should be sufficient to hold the required volume of cleaning solution to completely fill your hoses and the fermenter’s cone and lower sections during circulation, usually 10-20 gallons.
-
Features: Consider a tight-fitting lid to minimize evaporation and chemical off-gassing, and a drain valve for easy emptying.
6. Heating Element (Optional but Highly Recommended): Optimizing Efficacy
Heating caustic solutions drastically improves their cleaning power.
-
Type: An immersion heater (e.g., a sturdy kettle element) coupled with a PID temperature controller can precisely heat your cleaning reservoir. Ensure the element is stainless steel and rated for immersion in corrosive liquids.
-
Safety: Integrate GFCI protection and over-temperature cutoffs. Never operate a heater without full immersion.
7. Control System (Basic to Advanced): Automation & Precision
For a basic DIY system, manual valve operation and a timer are sufficient. More advanced systems can incorporate:
-
Timers: For automated cycle durations.
-
Relay Switches: To control pump and heater operation.
-
Flow Meters: To verify adequate flow rates.
-
Conductivity Sensors: To monitor chemical concentration and ensure complete rinsing. While advanced for homebrew, commercial breweries rely on these for validation.
Chemical Management: The Art and Science of Cleaning
The sequence and precise concentration of chemicals are critical. Always wear appropriate Personal Protective Equipment (PPE): chemical-resistant gloves, eye protection, and a chemical apron.
1. Pre-Rinse: Removing Gross Soils
Purpose: To remove loose organic matter (trub, hop particulate, yeast) before chemical cleaning. This prevents chemical depletion and reduces the load on your main cleaning solutions.
Procedure: Circulate cold to lukewarm water (ambient to 100°F / 38°C) through the fermenter via the CIP spray ball for 5-10 minutes. Ensure all valves (sample, racking, dump) are cycled open and closed during this phase to flush out residual material. Drain thoroughly.
2. Caustic Cycle: The Primary Cleaning Agent
Purpose: To saponify fats, peptize proteins, and dissolve carbohydrates, effectively removing organic soils and biofilms.
Chemicals: Sodium Hydroxide (NaOH) or Potassium Hydroxide (KOH) based cleaners. Many brewing-specific caustic cleaners also contain sequestrants and surfactants to improve performance and prevent scale buildup.
Concentration: Typically 1-3% by weight or volume, depending on the specific product and soil load. Always consult the manufacturer’s directions.
Temperature: 120-160°F (49-71°C) significantly enhances caustic’s efficacy. Higher temperatures dissolve soils faster.
Contact Time: 15-30 minutes, or longer for heavily soiled fermenters or initial cleaning cycles. Ensure the solution circulates continuously.
Safety: Caustic is highly corrosive. Handle with extreme caution. Ensure adequate ventilation.
3. Intermediate Rinse: Eliminating Caustic Residue
Purpose: To thoroughly remove all caustic solution before introducing the acid cleaner. Mixing caustic and acid can neutralize both, produce heat, and create potentially hazardous fumes.
Procedure: Circulate cold water through the fermenter for 5-10 minutes. Visually inspect the drained water for clarity and foam reduction. A pH test strip can confirm neutrality (pH ~7). Cycle all valves.
4. Acid Cycle: Passivation and Scale Removal
Purpose: To remove mineral deposits (beer stone, water scale), condition stainless steel surfaces (passivation), and neutralize any residual alkalinity from the caustic.
Chemicals: Phosphoric acid, nitric acid, or a blend of both. Citric acid is a milder, less effective alternative for home use but can be considered for light scale.
Concentration: Typically 0.5-1.5%, depending on the acid product and severity of scale.
Temperature: Ambient to 140°F (60°C). Higher temperatures can improve scale removal but also increase corrosivity.
Contact Time: 10-20 minutes.
Safety: Acids are corrosive. Handle with caution, use PPE, and ensure ventilation.
5. Final Rinse: Potable Water Flush
Purpose: To completely remove all traces of acid cleaner.
Procedure: Circulate cold, potable water for 5-10 minutes. Test the drained water with pH strips to confirm neutrality. Ensure all valves are flushed.
6. Sanitization: Aseptic Conditions Achieved
Purpose: To eliminate viable microorganisms that could spoil the beer.
Chemicals:
-
Peracetic Acid (PAA): Highly effective, fast-acting, no-rinse sanitizer that decomposes into acetic acid, water, and oxygen. Concentrations typically 150-300 ppm. Learn more about PAA.
-
Iodophor: Another no-rinse option, effective at 12.5-25 ppm. Can stain plastics over time.
-
Star San (Phosphoric Acid blend): A popular acid-based no-rinse sanitizer, effective at 1-2 oz per 5 gallons. Requires a short contact time.
Temperature: Most sanitizers work effectively at ambient temperatures.
Contact Time: As per manufacturer instructions, typically 2-10 minutes for no-rinse sanitizers.
Procedure: Introduce the sanitizing solution via the CIP system. Ensure complete coverage. For no-rinse sanitizers, simply drain and allow to air dry (PAA/Star San) or leave a thin film (Iodophor). Do not rinse after sanitization unless specified.
CIP Procedure for Your Conical Fermenter: A Step-by-Step Guide
Assuming your CIP setup is plumbed, and your chemicals are prepared:
Pre-CIP Checklist:
-
Ensure fermenter is empty and all ports are clear.
-
Confirm spray ball is securely installed in the lid or top port.
-
Verify all connections are tight and leak-free.
-
Have PPE readily available.
CIP Steps:
1. Connection: Connect your pump discharge to the CIP inlet of your fermenter (typically via the blow-off arm or a dedicated CIP port). Connect the fermenter’s bottom dump valve or racking port to the suction side of your pump via your chemical reservoir, creating a closed loop.
2. Pre-Rinse:
-
Fill reservoir with sufficient cold water.
-
Open relevant valves to create a loop from reservoir -> pump -> fermenter -> reservoir.
-
Start pump. Circulate water for 5-10 minutes.
-
During circulation, briefly open and close all ancillary valves (sample port, racking arm) to flush dead legs.
-
Drain reservoir and fermenter thoroughly.
3. Caustic Wash:
-
Fill reservoir with hot water (120-160°F / 49-71°C).
-
Carefully add calculated amount of liquid caustic to the reservoir. Always add caustic to water, never water to caustic.
-
Start pump. Circulate caustic solution for 15-30 minutes.
-
Monitor temperature if using a heater. Briefly cycle ancillary valves.
-
Drain caustic solution to a designated waste receptacle. Do not drain to septic if not rated for chemicals.
4. Intermediate Rinse:
-
Fill reservoir with cold water.
-
Start pump. Circulate for 5-10 minutes.
-
Cycle ancillary valves. Check pH of drained water.
-
Drain water.
5. Acid Wash:
-
Fill reservoir with cold or lukewarm water.
-
Carefully add calculated amount of acid cleaner.
-
Start pump. Circulate acid solution for 10-20 minutes.
-
Cycle ancillary valves.
-
Drain acid solution.
6. Final Rinse:
-
Fill reservoir with cold, potable water.
-
Start pump. Circulate for 5-10 minutes.
-
Cycle ancillary valves. Check pH of drained water.
-
Drain water.
7. Sanitization:
-
Prepare sanitizer solution in the reservoir per manufacturer instructions.
-
Start pump. Circulate sanitizer for recommended contact time (e.g., 2-5 minutes for PAA/Star San).
-
Cycle ancillary valves to ensure all surfaces are sanitized.
-
Turn off pump, drain reservoir, and allow fermenter to drip dry or remain wet with no-rinse sanitizer until use. Do NOT rinse with water after this step.
Your conical fermenter is now meticulously cleaned and sanitized, ready for your next batch of fermenting goodness. This detailed approach, supported by quality brewing equipment and careful execution, significantly elevates your brewing hygiene and product quality. For all your advanced brewing needs and professional brewery supplies, BrewMyBeer.online offers comprehensive solutions.
Validation & Troubleshooting: Ensuring Efficacy
How do you know your CIP system is truly effective?
-
Visual Inspection: The simplest method. After CIP, disassemble and visually inspect the fermenter and all ports. There should be no visible residues, spots, or haze. Use a flashlight.
-
Smell Test: A clean fermenter should have no discernible odor other than perhaps a faint metallic smell of clean stainless steel or a very mild sanitizer smell (e.g., PAA). No sour, yeasty, or off odors.
-
ATP Bioluminescence Swabbing: (Advanced, but increasingly accessible for serious homebrewers) This rapid test measures Adenosine Triphosphate (ATP), a molecule present in all living organic matter. Swab a surface, insert into a luminometer, and get a relative light unit (RLU) reading. Lower RLUs (e.g., <30 RLU) indicate a cleaner surface. This provides objective sanitation validation.
-
Microbial Plating: The gold standard in professional breweries, involves swabbing surfaces and plating on agar to grow and count microbes. This is beyond most homebrew setups but is the ultimate verification of sterility.
Common Troubleshooting Scenarios:
-
Poor Coverage/Spots: Check pump pressure and flow. Ensure spray ball is not clogged or damaged. Verify proper orientation of the spray ball. Consider a higher flow pump or a different spray ball design.
-
Excessive Foaming: Often due to residual cleaner from a previous cycle or insufficient rinsing. Ensure adequate rinse times. Some sanitizers, like Star San, naturally foam, which is generally acceptable for no-rinse applications.
-
Chemical Residue: Inadequate rinsing. Extend rinse times and ensure all valves are cycled repeatedly.
-
Pump Cavitation/Loss of Prime: Ensure reservoir always has enough liquid covering the pump inlet. Check for air leaks in the suction line. Keep hoses short and minimize elevation changes on the suction side.
Safety Protocols: Prioritizing Your Well-being
Working with strong chemicals and pressurized systems demands unwavering attention to safety.
-
Personal Protective Equipment (PPE): Always wear chemical-resistant gloves, eye protection (safety glasses or goggles), and a chemical apron when handling or working with cleaning solutions.
-
Ventilation: Ensure adequate ventilation when mixing or circulating chemicals, especially caustic and acid, to disperse fumes.
-
Chemical Storage: Store chemicals in original, labeled containers in a cool, dry, secure location, away from incompatible materials and out of reach of children and pets.
-
Emergency Procedures: Know the location of your nearest eyewash station or clean water source. Have baking soda (for acid spills) and vinegar (for caustic spills) readily available for immediate, localized neutralization.
-
Pressure Safety: Ensure all connections are secure before starting the pump. Never exceed the pressure rating of your hoses, fittings, or fermenter. Periodically inspect hoses for wear and tear.
-
Electrical Safety: Use GFCI-protected outlets for your pump and heater. Ensure all electrical components are rated for damp environments.
Maintenance: Longevity and Reliability
Regular maintenance ensures your CIP system remains effective and reliable.
-
Pump Inspection: Annually check pump seals for leaks. Lubricate motor bearings if applicable. Clean any debris from the impeller.
-
Hose Inspection: Regularly inspect hoses for cracks, kinks, or signs of degradation. Replace as needed.
-
Spray Ball Cleaning: Periodically remove and inspect the spray ball for blockages or mineral buildup. Clean thoroughly.
-
Gasket Replacement: Tri-clamp gaskets can wear out or become compressed. Replace them proactively to prevent leaks and maintain sanitation.
-
Chemical Rotation: Store chemicals properly and respect their shelf life. Rotate stock to ensure efficacy.
Building a DIY CIP system for your home conical fermenter is a significant upgrade to your brewing operation. It represents a commitment to precision, safety, and ultimately, superior beer quality. By understanding the underlying principles, carefully selecting components, adhering to rigorous chemical protocols, and maintaining vigilance, you can achieve professional-grade sanitation, ensuring that every batch of beer you produce is a testament to your craft.