


Master the art of yeast propagation and elevate your homebrew. This guide details the precise, step-by-step construction of a high-performance magnetic stir plate using readily available PC components for under $15. Achieve optimal yeast viability and cell counts, drastically improving fermentation kinetics and overall beer quality for professional-grade results.
Component Breakdown: Magnetic Stir Plate Construction
| Component | Source (Typical) | Approx. Cost (USD) | Function | Technical Notes |
|---|---|---|---|---|
| PC Cooling Fan (80-120mm) | Salvaged PC, Electronics Store | $0-$5 | Provides rotational force for magnets. | 12V DC, Brushless motor. Ball-bearing fans are more durable and quieter than sleeve bearings. RPM typically 1200-2500. |
| Neodymium Magnets (N35-N52) | Online Retailer, Hobby Store | $5-$8 (4-6 units) | Induces rotation of the stir bar within the flask. | Disk magnets (10x2mm to 15x3mm) are ideal. Ensure strong gauss rating (N-grade) for effective coupling. EPI (Estimated Pull Force Index) is crucial. |
| 12V DC Power Supply | Old Router/Modem PSU, Wall Wart | $0-$3 | Provides regulated direct current to the fan. | Must be rated for 12V DC. Amperage rating should meet or exceed the fan’s requirement (typically 0.1A to 0.3A). Polarity is critical. |
| Potentiometer (10K Ohm, linear) | Electronics Store, Salvaged Audio Gear | $1-$3 | Varies voltage supplied to the fan, controlling speed. | Linear taper (B-type) for predictable speed control. Rated for sufficient wattage (e.g., 0.5W) to avoid overheating. Optional upgrade: PWM controller for efficiency. |
| Enclosure (Plastic/Wood) | Repurposed Food Container, Project Box | $0-$2 | Houses components, provides stable platform. | Non-ferrous material preferred. Adequate internal volume for wiring. Must allow for air circulation to prevent fan overheating. Clear top useful for visibility. |
Stir Plate Power & Cost Validation
Fan Power Consumption (Example)
For a typical 12V DC PC fan:
Voltage (V) = 12V
Amperage (A) = 0.2A (as printed on fan label)
Power (W) = Voltage (V) × Amperage (A)
Power (W) = 12V × 0.2A = 2.4W
This low wattage ensures minimal energy consumption during extended operation (24-72 hours for a starter).
Total Project Cost Calculation (Example)
Assuming budget-conscious sourcing:
Salvaged PC Fan: $0.00
Neodymium Magnets (6x N35, 10x2mm): $6.50
Salvaged 12V DC PSU: $0.00
Potentiometer (10K Ohm): $1.75
Repurposed Plastic Enclosure: $0.00
Misc. Wire, Solder, Hot Glue: $3.00
Stir Bar (PTFE-coated, 1-inch): $3.50 (Often considered separately, but crucial for function.)
Total Estimated Cost = $0.00 + $6.50 + $0.00 + $1.75 + $0.00 + $3.00 + $3.50 = $14.75
This calculation demonstrates achieving the $15 target, assuming strategic component sourcing. The stir bar, though critical, is often acquired as a separate brewing accessory rather than a build component for the stir plate itself. Removing the stir bar from the build cost keeps the stir plate itself under $12.
Deep Dive: Constructing the Definitive Magnetic Stir Plate
The magnetic stir plate is not a luxury, but a fundamental tool for any serious brewer aiming for consistency and quality. Its primary function is to continuously agitate a liquid, most critically, a yeast starter. This constant motion achieves two vital objectives: first, it maintains yeast cells in suspension, preventing flocculation and ensuring maximal nutrient and oxygen uptake; second, it incorporates atmospheric oxygen into the wort, promoting robust aerobic respiration essential for cell growth and replication during the initial lag phase. A poorly propagated yeast starter is a direct precursor to sluggish fermentations, off-flavors, and often, an attenuated final product. Building your own, specifically leveraging readily available and inexpensive PC components, is a cost-effective method to achieve professional-grade yeast management without significant capital outlay.
I. The Crucial Role of Yeast Health and Stir Plates
Understanding yeast physiology is paramount. Brewers frequently underpitch, leading to extended lag phases, increased ester production, diacetyl formation, and ultimately, suboptimal fermentation. A properly sized and vigorously aerated yeast starter mitigates these risks. The stir plate ensures the starter wort is constantly agitated by a PTFE-coated stir bar, creating a vortex that continuously draws in oxygen from the headspace and evenly distributes nutrients. This environment significantly enhances yeast vitality and cell counts, preparing a robust pitching slurry capable of quickly dominating the wort’s microbial landscape. For precise cell counts and pitching rates, refer to established guidelines on yeast propagation strategies, often detailed by organizations such as the Brewers Association. Optimal yeast health is the bedrock of consistent, high-quality beer. Furthermore, a stir plate can be instrumental in the propagation of specific yeast strains or the maintenance of a yeast bank, providing the precision needed to optimize your fermentation processes with diverse cultures.
II. Core Components: Selection and Technical Specifications
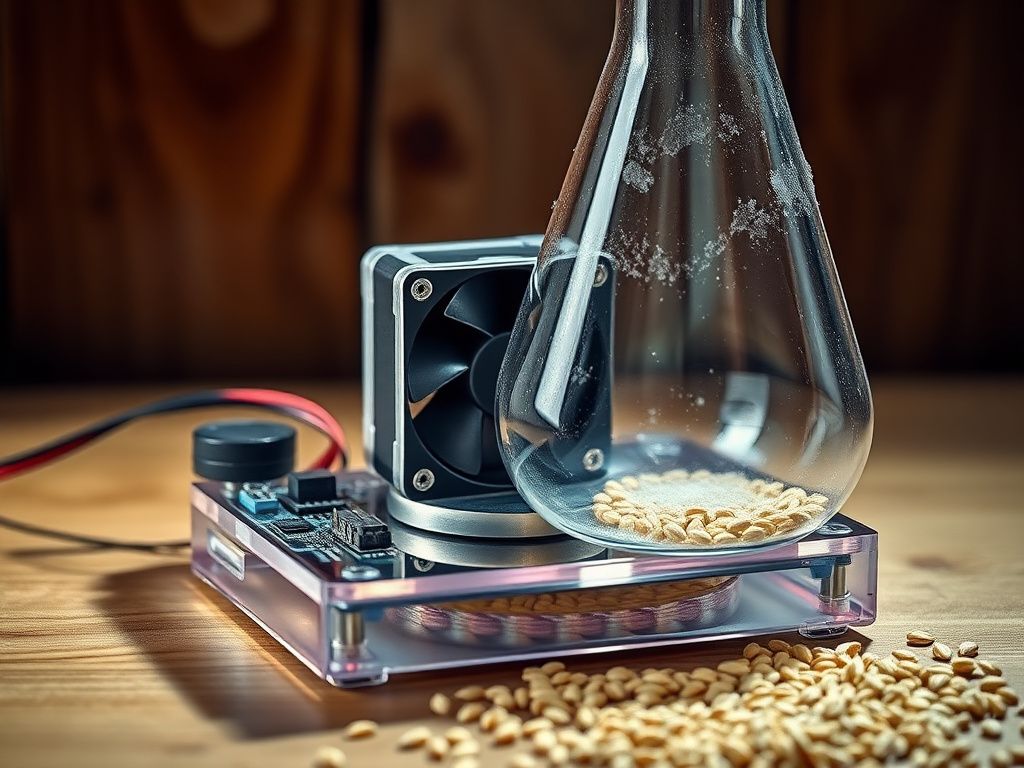
A. The PC Cooling Fan: The Rotary Engine
The brushless DC (BLDC) fan from a personal computer serves as the rotary mechanism. Size is important; 80mm or 120mm fans are common and offer good torque. Seek a fan with ball bearings over sleeve bearings. Ball-bearing fans exhibit superior longevity, quieter operation, and less friction, which translates to more consistent RPM and less heat generation, especially under continuous load. Verify the fan’s voltage (typically 12V DC) and current draw (mA). Higher amperage fans *may* offer more torque but will require a power supply with a matching or higher amperage rating. The fan’s RPM directly influences the maximum stirring speed. While airflow is irrelevant, the fan’s motor characteristics define its suitability. Ensure the fan is functional before disassembly, as salvaged components can be unreliable.
B. Neodymium Magnets: The Coupling Force
Neodymium (NdFeB) magnets are essential due to their exceptional magnetic strength (remanence). Avoid ferrite or ceramic magnets; their weak fields will lead to frequent stir bar decoupling. Obtain disk-shaped magnets, typically 10mm to 15mm in diameter and 2mm to 3mm thick. The ‘N’ rating (e.g., N35, N42, N52) indicates the magnet’s energy product, with N52 being the strongest commercially available. While stronger magnets are preferred, N35 or N42 will suffice for most starter volumes up to 2 liters. You’ll need two or four magnets. If using two, they must be diametrically opposed on the fan hub. If using four, place them symmetrically. Crucially, ensure their polarities are aligned to either attract or repel the stir bar consistently across the fan’s rotation. Testing with a stir bar before permanent attachment is advised to ensure smooth, stable rotation without wobbling or decoupling.
C. The 12V DC Power Supply: The Energy Source
A salvaged “wall wart” power supply from an old router, modem, or external hard drive enclosure is perfect. It must provide 12V DC output. The amperage rating on the power supply should ideally be equal to or greater than the fan’s current draw. For example, a 12V 500mA (0.5A) power supply can comfortably power a 12V 200mA (0.2A) fan. Using a power supply with a significantly lower amperage rating than the fan requires may result in inadequate fan speed or damage to the power supply. Confirm polarity before wiring; typically, the center pin is positive (+), and the outer barrel is negative (-) for barrel jack connectors, but always verify with a multimeter or the label on the PSU.
D. Speed Control: Potentiometer vs. PWM
A simple 10K Ohm linear potentiometer (rheostat) offers rudimentary speed control by varying the resistance in series with the fan, thus changing the voltage supplied. This method is effective but generates heat within the potentiometer and is less energy-efficient. A superior, though slightly more complex, alternative is a Pulse Width Modulation (PWM) controller. PWM varies the *duration* of the voltage pulse, not the voltage itself, leading to significantly higher efficiency, less heat, and more precise, stable speed control, especially at lower RPMs. Mini 12V DC PWM controllers are inexpensive online. For basic functionality and the $15 budget, a potentiometer is sufficient. Ensure the potentiometer’s wattage rating is adequate for the fan’s current (P=I^2*R). A 0.5W potentiometer is generally robust enough for typical PC fans.
E. Enclosure: Structure and Stability
The enclosure serves to protect the internal components, provide a stable platform for the flask, and often contributes to the device’s aesthetics. Common choices include small plastic project boxes, repurposed plastic food containers, or even custom-cut plywood. The material should be non-ferrous to avoid interfering with the magnetic field. Ensure the enclosure has adequate ventilation, especially if using a potentiometer that can generate heat, or if the fan itself generates heat. The top surface, where the flask sits, should be flat and robust enough to support the weight of a full starter flask (e.g., 2 liters of wort weighing ~2kg). Drilling precise holes for the fan, power jack, and potentiometer is critical for a professional finish.
III. Tools and Materials Required
Beyond the core components, you will require:
-
Soldering iron and solder (leaded or lead-free, 60/40 rosin core recommended)
-
Wire strippers/cutters
-
Heat shrink tubing or electrical tape for insulation
-
Hot glue gun or epoxy for magnet adhesion
-
Small Phillips head screwdriver
-
Drill with various bit sizes (for mounting screws, potentiometer, power jack)
-
Multimeter (for checking voltage, continuity, and polarity)
-
Permanent marker for marking drill points
-
Ruler or caliper for precise magnet placement
IV. Step-by-Step Construction Protocol
A. Enclosure Preparation
Select your enclosure. Determine the optimal placement for the fan, ensuring its center aligns with where the flask will sit. Mark the fan’s screw holes and the central cutout for the fan blades (if applicable, for top-mounting). Mark positions for the power input jack and the potentiometer. Drill pilot holes, then use appropriate bits to create the necessary openings. For the fan, a Dremel tool or utility knife can be used for the larger central cutout if the fan is to be recessed. Sand any rough edges.
B. Fan and Magnet Assembly
Mount the PC fan securely to the enclosure’s interior base using small screws or strong adhesive. The fan’s label side (where the airflow exits) should face upwards towards the flask. If using a top-mounted fan, the label side faces downwards into the enclosure. Now, for the critical magnet placement: power on the fan (briefly, using the 12V supply) to ensure it spins freely. With the fan spinning, carefully position the magnets on the central hub or blades. The key is balance and precise spacing. For two magnets, place them diametrically opposed. For four, place them at 90-degree intervals. Use a stir bar to test the coupling *before* gluing. The stir bar should spin smoothly without excessive wobble or decoupling. Once optimal positions are identified, use a drop of superglue or epoxy to permanently affix the magnets. Allow ample curing time.
C. Wiring Diagram and Execution
This is where electrical precision is key.
-
Power Jack Wiring: Connect the positive (+) wire from your power jack to one outer lug of the potentiometer. Connect the negative (-) wire from the power jack directly to the negative (-) lead of the fan (typically the black wire).
-
Potentiometer to Fan: Connect the center lug of the potentiometer to the positive (+) lead of the fan (typically the red wire). The remaining outer lug of the potentiometer is not used in this basic series circuit.
-
Insulation: All exposed wire connections should be soldered cleanly and insulated with heat shrink tubing or high-quality electrical tape to prevent short circuits.
-
Verification: Before sealing the enclosure, use a multimeter to verify continuity and correct voltage at various points. Ensure no stray wires could short circuit.
D. Final Assembly
Mount the potentiometer and power jack into their respective holes in the enclosure. Secure all internal wiring to prevent movement or contact with the fan blades. Use zip ties or hot glue to tidy up wires. Close the enclosure, ensuring all screws are tightened. Add rubber feet to the bottom of the enclosure for stability and vibration dampening if desired.
V. Testing, Calibration, and Troubleshooting
A. Initial Power-Up and Speed Calibration
Connect the 12V power supply. Slowly rotate the potentiometer. The fan should begin to spin, increasing in speed as you turn the knob. Place a flask containing water and a stir bar on the stir plate. Gradually increase the speed. The stir bar should couple with the magnetic field and begin to spin, forming a vortex. Adjust the speed to achieve a vigorous but stable vortex that does not eject the stir bar. Different stir bar sizes and liquid volumes will require different optimal speeds. A good vortex ensures maximum aeration and agitation.
B. Common Troubleshooting Scenarios
-
Fan Not Spinning:
-
Check power supply: Is it plugged in? Is it outputting 12V? Use a multimeter.
-
Check wiring: Confirm positive and negative connections are correct. Look for loose solder joints or breaks in the wire.
-
Potentiometer issue: Bypass the potentiometer temporarily to see if the fan spins at full speed. If it does, the potentiometer may be faulty or wired incorrectly.
-
Fan failure: Salvaged fans can be dead. Test with direct 12V power.
-
-
Stir Bar Not Coupling or Wobbling:
-
Magnet strength/placement: Neodymium magnets are crucial. Ensure they are strong enough and precisely spaced/aligned on the fan hub. Incorrect polarity (one magnet attracting, the other repelling) will cause wobbling or decoupling.
-
Fan wobble: If the fan itself is unbalanced or mounted loosely, it will cause the stir bar to wobble.
-
Flask base: Ensure the flask has a flat bottom. Some lab flasks or carboys have slight imperfections that can cause wobble.
-
Stir bar quality: A cheap or damaged stir bar can be unbalanced. PTFE coating helps reduce friction and wear.
-
Liquid viscosity: Very thick liquids can reduce coupling strength.
-
VI. Advanced Concepts and Optimization
For those seeking to further enhance their stir plate, several upgrades are possible:
-
PWM Controller: As mentioned, upgrading from a potentiometer to a PWM controller offers superior efficiency, cooler operation, and more granular speed control. This allows for precise tuning of the vortex, optimizing yeast growth without over-stressing the fan.
-
Temperature Control: Integrating a small heating element (e.g., reptile mat or aquarium heater) with a temperature controller can maintain an ideal yeast propagation temperature (e.g., 20-25°C), further enhancing cell growth and viability.
-
LED Indicator: A simple LED wired in parallel with the fan (with an appropriate current-limiting resistor) provides a visual indication that the unit is powered on and functioning.
-
High-Grade Magnets: Upgrading to N52 grade neodymium magnets, if not already used, can significantly improve coupling strength, especially for larger starter volumes or more viscous liquids.
VII. Yeast Starter Principles and Practical Application
A functional stir plate is only one part of the equation; understanding its application within yeast starter methodology is critical.
-
Starter Volume: The size of your starter should be appropriate for your target pitch rate and original gravity of the wort. Online calculators can provide precise recommendations. Typically, a 1-2 liter starter is sufficient for a 5-gallon batch of standard gravity beer. For high-gravity beers (e.g., >1.060 SG), multiple steps or larger volumes are required.
-
Wort Density: Use a low-gravity wort (1.030-1.040 SG or 7.5-10° Plato) for optimal yeast growth. Denser worts can inhibit rapid cell division. Dextrose or DME (Dry Malt Extract) can be used to achieve this.
-
Sterilization: Absolute sanitation is paramount. All equipment – flask, stir bar, stir plate surface, and especially the wort itself – must be sterilized to prevent contamination. Boil your starter wort for 10-15 minutes, then cool rapidly. Sanitize the flask and stir bar with a no-rinse sanitizer. Even minor contamination can ruin your starter and, subsequently, your beer.
-
Oxygenation: The stir plate provides continuous aeration, vital for the aerobic growth phase. However, initial, high-level oxygenation (e.g., with pure O2 or vigorous shaking) before pitching the yeast into the starter can further accelerate growth. Yeast require oxygen to synthesize sterols and unsaturated fatty acids, crucial components of healthy cell membranes.
-
Pitching Time: Allow the starter to ferment for 24-72 hours, depending on the yeast strain and initial cell count, until visible activity subsides or the krausen drops. Pitching at high krausen (peak activity) can be beneficial, but if you prefer to decant, cold crash the starter for 24 hours, then decant the spent beer, leaving only a concentrated yeast slurry.
For more detailed recipes and brewing guides, visit BrewMyBeer.online.
VIII. Safety Precautions
While a DIY stir plate is generally low-risk, observe electrical safety:
-
Electrical Isolation: Always work with the power supply disconnected from the mains. Insulate all exposed wiring thoroughly with heat shrink or electrical tape.
-
Proper Grounding: While low-voltage DC fans typically don’t require grounding, ensure your power supply itself is a reputable, CE or UL-certified unit.
-
Ventilation: Ensure the enclosure has adequate ventilation to prevent heat buildup, particularly if using a potentiometer, which dissipates energy as heat.
-
Stable Platform: Ensure the stir plate is on a stable, flat surface to prevent flasks from tipping during operation, especially when containing hot wort or active starters.
By following these detailed instructions, you will construct a reliable, high-performance magnetic stir plate for minimal cost, significantly upgrading your yeast management capabilities and, by extension, the quality of every batch you brew. This foundational piece of equipment empowers you to achieve the consistent, clean fermentations that define truly exceptional beer.