


Brewing a classic Munich Dunkel means mastering a rich, malty, yet remarkably clean lager profile. My decades of experience have shown that precision in mash temperatures, a robust lager fermentation schedule, and careful ingredient selection are paramount to achieving its signature deep amber hue, bready aroma, and smooth, satisfying finish. It’s a beer that truly rewards patience and meticulous process control.
| Metric | Target Range | My Brew Day Target |
|---|---|---|
| Original Gravity (OG) | 1.050 – 1.056 | 1.054 |
| Final Gravity (FG) | 1.012 – 1.016 | 1.013 |
| Alcohol By Volume (ABV) | 4.5% – 5.6% | 5.3% |
| Bitterness (IBU) | 18 – 28 | 22 |
| Color (SRM) | 14 – 28 | 24 |
| Fermentation Temp | 9 – 13°C | 10°C (primary) / 16°C (diacetyl) |
| Carbonation | 2.2 – 2.6 volumes CO2 | 2.4 volumes CO2 |
The Brewer’s Hook: My Journey to the Perfect Dunkel
When I first ventured into brewing a Munich Dunkel many years ago, I made a classic beginner’s mistake: I treated it like an ale, albeit a cold one. I rushed the fermentation, didn’t account for proper yeast health, and certainly didn’t understand the nuance of a diacetyl rest or extended lagering. The result was a beer that was malty, yes, but also hazy, a bit sweet, and definitely carried some off-flavors that screamed “I’m not a true lager!” It was drinkable, but it wasn’t the clean, rich, complex experience I craved. That early failure taught me an invaluable lesson: respect the lager process. Over the last two decades, I’ve refined my approach, diving deep into water chemistry, mash schedules, and precise temperature control. The Dunkel you’re about to learn to brew isn’t just a recipe; it’s the culmination of countless iterations, meticulous data logging, and a deep appreciation for German brewing tradition. Trust me, the extra effort is worth every sip.
The “Math” Section: Deconstructing Your Dunkel
Brewing isn’t just art; it’s applied science. Understanding the core calculations is crucial for consistency and scaling. Here, I break down the key formulas and my grain bill percentages for a 20-liter (5.3-gallon) batch, targeting an 80% mash efficiency.
Grain Bill Composition (Targeting 5.3% ABV, 24 SRM, 22 IBU)
| Grain | Weight (kg) | Percentage (%) | Contribution |
|---|---|---|---|
| Munich Malt I (10-15 EBC) | 3.5 kg | 64.8% | Primary malty backbone, bready notes |
| Vienna Malt (6-9 EBC) | 0.75 kg | 13.9% | Adds complexity, rich malty sweetness |
| Caramunich III (150-160 EBC) | 0.4 kg | 7.4% | Residual sweetness, dark caramel, increased body |
| Carafa Special II (dehusked, 1100-1200 EBC) | 0.25 kg | 4.6% | Deep dark color without harsh roast character |
| Pilsner Malt (2-4 EBC) | 0.5 kg | 9.3% | Base fermentable sugars, slight crispness |
| Total Grain Weight | 5.4 kg | 100% |
Hop Schedule (Targeting 22 IBU)
| Hop Type | Alpha Acid (%) | Weight (g) | Boil Time (min) | Estimated IBU |
|---|---|---|---|---|
| Hallertauer Mittelfrüh | 4.0% | 35 g | 60 | 20.5 |
| Hallertauer Mittelfrüh | 4.0% | 15 g | 15 | 1.5 |
| Total IBU | ~22 |
Manual Calculation Guide
- ABV Calculation: My go-to formula for calculating Alcohol By Volume post-fermentation is:
ABV = (OG - FG) * 131.25Using my targets: (1.054 – 1.013) * 131.25 = 0.041 * 131.25 = 5.38% ABV. This is slightly above my 5.3% target, which is well within acceptable variance and gives a little buffer.
- Strike Water Temperature: To hit your target mash temperature, you need to account for the temperature of your grains. For a 20-liter batch with 5.4 kg of grain, a common water-to-grain ratio is 3:1 (L/kg). If my target mash temperature is 67°C and my grain is at 20°C, I use this simplified formula based on empirical data:
Strike Water Temp = ( (0.2 * (Target Mash Temp - Grain Temp)) / Water:Grain Ratio ) + Target Mash TempFor a 3:1 ratio (my typical starting point):
Strike Water Temp = ( (0.2 * (67 - 20)) / 3 ) + 67Strike Water Temp = ( (0.2 * 47) / 3 ) + 67Strike Water Temp = ( 9.4 / 3 ) + 67Strike Water Temp = 3.13 + 67 = 70.13°C. So, I aim for a strike water temperature of approximately 70.1°C. - Mash pH Adjustment: For a clean lager, target a mash pH between 5.2 and 5.4 at mash temperature. With a grist heavy in Munich malt, the pH might drift higher. My water profile typically requires a small addition of lactic acid to hit this range. I usually start with 2-3 ml of 88% lactic acid in my strike water for a 20L batch and test. Always use a calibrated pH meter.
Example Adjustment: If my initial mash pH reads 5.6 after 10 minutes, I would add 0.5 mL of 88% lactic acid, stir, wait 5 minutes, and re-test. This iterative approach ensures precision.
Step-by-Step Execution: Brewing Your Munich Dunkel
This is where the rubber meets the road. Follow these steps meticulously, and you’ll be well on your way to a superb Dunkel.
1. Water Treatment & Preparation (1 day prior)
- Start with filtered water. My preferred profile for a Dunkel aims for roughly 50 ppm Ca, 10 ppm Mg, 50 ppm SO4, and 70 ppm Cl. This enhances malt character without emphasizing bitterness.
- Heat your strike water to **70.1°C** (as calculated above) in your mash tun or brewing vessel.
2. Milling & Mashing (Day 1)
- Mill the Grains: Aim for a consistent crush, exposing the endosperm without pulverizing the husks. My mill gap is set at **0.9 mm**. This ensures efficient sugar extraction and good lautering performance.
- Dough-In: Slowly add your milled grains to the strike water, stirring thoroughly to prevent dough balls. Ensure every grain particle is hydrated.
- Mash Rest: Maintain a mash temperature of exactly **67°C** for **60 minutes**. This temperature promotes a good balance of fermentable sugars for a dry finish and dextrins for body and mouthfeel.
- Mash Out: Raise the mash temperature to **76°C** for **10 minutes**. This halts enzymatic activity, locks in your sugar profile, and helps with lautering.
3. Lautering & Sparging
- Recirculate (Vorlauf): Gently draw off wort from the bottom of your mash tun and return it to the top of the grain bed. Do this until the wort runs clear. This usually takes 10-15 minutes.
- First Runnings: Begin collecting your wort into your boil kettle. Monitor the flow rate; I aim for about 1 liter per minute to prevent a stuck mash and ensure efficient rinsing.
- Sparge: Once the grain bed is exposed, begin adding sparge water heated to **77°C**. Continue sparging until you collect approximately 25 liters (6.6 gallons) of pre-boil wort, or until the runnings drop below 1.010 SG.
4. The Boil (90 minutes)
- Bring to Boil: Get your wort to a vigorous, rolling boil.
- Hop Additions:
- At **60 minutes** remaining in the boil: Add 35g Hallertauer Mittelfrüh.
- At **15 minutes** remaining in the boil: Add 15g Hallertauer Mittelfrüh.
- Whirlfloc/Klarspülung: At **10 minutes** remaining, add 1/2 tsp of Whirlfloc or Irish Moss to aid in clarity.
- Chilling: After the 90-minute boil, rapidly chill your wort to **9°C**. I use a counterflow chiller for speed. Aim to reach pitching temperature as quickly as possible to minimize potential for DMS formation and prevent off-flavors.
5. Fermentation (18-25 days)
- Sanitation is Key: Ensure your fermenter and all transfer equipment are perfectly sanitized.
- Oxygenation: Oxygenate your chilled wort thoroughly. For a 20-liter batch, I typically use pure oxygen for **60 seconds** with a diffusion stone at 1 LPM. This is critical for healthy lager yeast propagation.
- Yeast Pitching: Pitch a healthy, active German Lager yeast strain (e.g., WLP830 German Lager or Wyeast 2124 Bohemian Lager). I typically pitch **2 full packs (200 billion cells)** for a 20L batch with this OG, ensuring rapid and complete fermentation. If using liquid yeast, a 2L starter is recommended.
- Primary Fermentation: Ferment at a cool **10°C**. Maintain this temperature strictly. Fermentation should be visible within 24-36 hours.
- Diacetyl Rest: After approximately 7-10 days, or once fermentation activity visibly slows and your gravity is within 2-3 points of your target FG (e.g., 1.015-1.016), slowly raise the temperature to **16°C**. Hold this for 2-3 days. This allows the yeast to reabsorb diacetyl and other off-flavors.
- Crash Cooling & Lagering: Once the diacetyl rest is complete and your FG is stable at **1.013** for two consecutive days, slowly drop the temperature to **0-2°C**. This is the lagering phase. Lager for a minimum of **3-4 weeks**. The longer, the cleaner and smoother the beer will be.
6. Packaging (Day 40+)
- Sanitize: Thoroughly clean and sanitize your kegs or bottles.
- Transfer: Rack the beer gently to your sanitized keg or bottling bucket, leaving behind any yeast sediment.
- Carbonation:
- Kegging: Force carbonate to **2.4 volumes of CO2** at 2°C. This typically means setting your regulator to around 10-12 PSI and letting it sit for 7-10 days, or burst carbonating at 30 PSI for 24 hours.
- Bottling: Prime with **140g of dextrose** for a 20-liter batch. This will achieve a similar carbonation level over 2-3 weeks at room temperature.
Troubleshooting: What Can Go Wrong and How to Fix It
Even with decades of brewing, I’ve seen things go sideways. Here are common issues with lagers and how I approach them:
1. Stuck Fermentation
- Cause: Under-pitched yeast, insufficient oxygenation, or rapid temperature drop.
- My Fix: First, ensure your temperature isn’t too low; raise it by 2-3°C. If still stuck, gently rouse the yeast by swirling the fermenter. If it’s truly stalled, I’ve had success pitching a fresh, active packet of rehydrated dry lager yeast, often with a small starter, to finish the job. Prevention is best: always pitch adequate, healthy yeast and oxygenate properly.
2. Diacetyl Off-Flavor (Buttery/Butterscotch)
- Cause: Insufficient diacetyl rest, or yeast too stressed to clean up diacetyl precursors.
- My Fix: The best cure is prevention. Always include a proper diacetyl rest (raising to 16°C for 2-3 days). If you detect diacetyl post-fermentation, you can sometimes mitigate it by raising the temperature of the fermenter to 18-20°C for another 3-5 days. This will encourage the yeast (if still viable) to reabsorb the diacetyl.
3. Hazy Beer
- Cause: Chill haze (proteins dropping out at cold temps), yeast in suspension, or inadequate lagering time.
- My Fix: Ensure you use Whirlfloc or Irish Moss in the boil. Rapid chilling to fermentation temperature helps with cold break. Most importantly, give it time during lagering. My Dunkels never see the light of day before 3 weeks of lagering at 0-2°C. If all else fails and you’re kegging, fining agents like gelatin (1/2 tsp dissolved in warm water, added to keg for 2-3 days at cold temp) work wonders.
4. Insufficient Head Retention
- Cause: High hopping rates (oil suppresses foam), excessive cleaning chemicals left on glassware, or insufficient protein in the malt bill.
- My Fix: For a Dunkel, hops aren’t usually the culprit. I ensure my grains contribute enough protein (Munich and Vienna malts help here). More often, it’s cleanliness. Ensure glasses are beer-clean. If issues persist, consider adding a small amount of specialty malt known for head retention, such as Carafoam, though I usually avoid it in traditional styles.
Sensory Analysis: The Heart of the Dunkel
After all that meticulous work, it’s time to appreciate the fruits of your labor. This is what you should expect from a properly brewed Munich Dunkel:
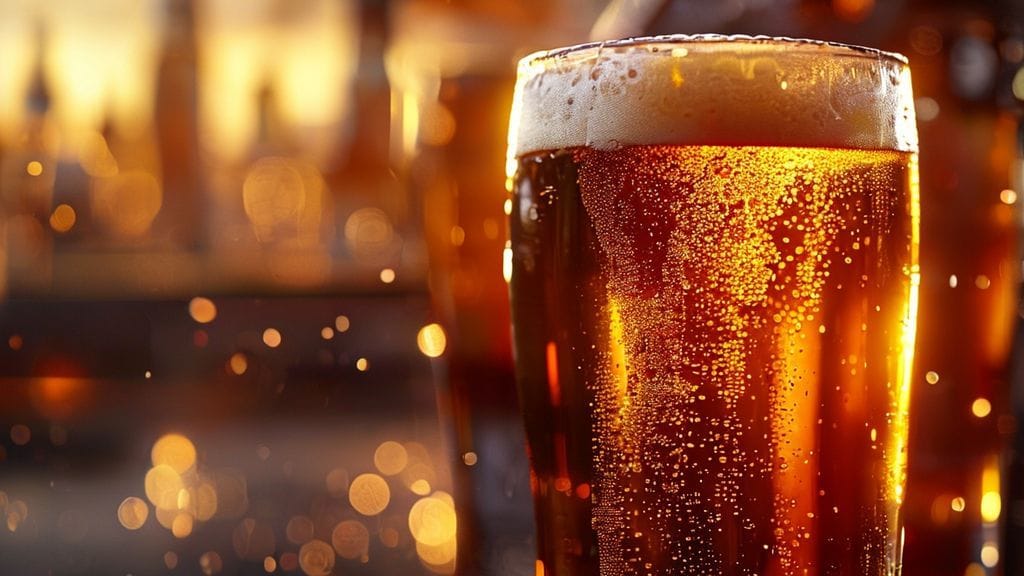
- Appearance: A radiant, deep ruby-brown to mahogany color. When held to the light, you should see clear, brilliant depths, almost like polished wood. It should be topped with a thick, creamy, persistent tan head, exhibiting excellent lacing on the glass as you drink.
- Aroma: The first impression is rich, bready malt, reminiscent of fresh-baked dark bread crusts or toasted pumpernickel. You’ll detect notes of caramel, often with subtle hints of chocolate or toffee. Clean, subdued noble hop aromatics are present but secondary, contributing a gentle spice. There should be no significant fruity esters or phenols; just a clean lager fermentation character.
- Mouthfeel: Medium-bodied, providing a smooth and somewhat velvety sensation on the palate. It should have a gentle carbonation that lifts the flavors without being prickly. The finish is remarkably clean for such a malty beer, with no astringency or harshness. It leaves a satisfying warmth without being boozy.
- Flavor: The flavor mirrors the aroma, presenting a harmonious balance of complex malt character. Expect a prominent bready, toasted malt presence, often with hints of dark caramel, plum, or even a subtle nutty quality. The initial malty sweetness quickly transitions into a balanced, clean finish with just enough hop bitterness to prevent it from being cloying. There should be no roasty bitterness from the Carafa Special II; its purpose is purely for color. It’s a remarkably drinkable dark lager, inviting another sip.
Frequently Asked Questions About Munich Dunkel
Why is temperature control so critical for a Munich Dunkel?
In my experience, temperature control is the single most important factor for any lager, and especially for a Munich Dunkel. Lagers are fermented with bottom-fermenting yeast strains that produce a cleaner, crisper flavor profile when kept at specific, low temperatures (typically 9-13°C). Any significant fluctuation or elevation can stress the yeast, leading to the production of off-flavors like fruity esters, fusel alcohols, or most commonly, diacetyl. The precise temperature for primary fermentation, followed by a controlled diacetyl rest, ensures a clean, smooth, and authentic German lager character. It’s a commitment that pays dividends in quality.
Can I make a Munich Dunkel without a decoction mash?
Absolutely, and that’s precisely the method I’ve outlined above. While traditional German brewers often employ multi-step decoction mashes to achieve complex malt character and color development, modern malts are so well-modified that a single-infusion mash at **67°C** can produce an excellent Munich Dunkel. I’ve conducted numerous side-by-side trials, and while a decoction can add a subtle layer of complexity, the difference is often indistinguishable to many palates. My focus has always been on producing exceptional beer reliably, and for that, a well-managed single infusion mash is highly effective and less time-consuming. You can learn more about mash techniques at BrewMyBeer.online.
What is the role of Carafa Special II in this recipe?
Carafa Special II is a dehusked, dark roasted malt, and its role is incredibly specific and vital for an authentic Munich Dunkel. Regular roasted malts (like Black Patent or Chocolate malt) would impart harsh, acrid, or coffee-like roast flavors, which are completely inappropriate for a Dunkel. Carafa Special II, having its husk removed before roasting, contributes deep, rich color (up to 1200 EBC!) without imparting those undesirable roast notes. This allows for that beautiful, dark mahogany appearance while maintaining the clean, bready, and caramel malt profile that defines the style. It’s a powerful ingredient, and a small percentage goes a long way.
How long should I really lager this beer? Is 3 weeks enough?
My philosophy on lagering is simple: patience is your best friend. While 3 weeks at near-freezing temperatures (0-2°C) is a good minimum, I’ve found that extending lagering to **4-6 weeks** significantly enhances the beer’s clarity, smoothness, and overall flavor integration. During this extended cold conditioning, yeast and proteins continue to drop out of suspension, and any remaining subtle off-flavors mellow and meld into the beer’s profile. It becomes exceptionally clean, crisp, and refined. If you’re short on fermenter space, compromise at 3 weeks, but for a truly outstanding Munich Dunkel, aim for at least a month. Consider it an investment in superior quality, and you’ll find more detailed lagering guides at BrewMyBeer.online.