
Cloning Kingfisher Ultra Lager at home requires meticulous temperature control and a precise grain bill to achieve its signature crispness and light body. I’ve found that leveraging a significant rice adjunct in the mash, coupled with a clean fermenting lager yeast and a dedicated lagering period, is absolutely essential. Aim for an Original Gravity of 1.045, ferment cold at 10°C, and allow a full four weeks of lagering at 0-2°C for optimal clarity and flavor profile.
| Metric | Target Value | Notes |
|---|---|---|
| Batch Volume | 20 Liters | Typical homebrew batch size. |
| Original Gravity (OG) | 1.045 | Light to moderate body, sessionable. |
| Final Gravity (FG) | 1.008 | Very dry, crisp finish characteristic. |
| Alcohol By Volume (ABV) | 4.8% | Calculated from OG and FG. |
| International Bitterness Units (IBU) | 15 | Low bitterness for a smooth profile. |
| Standard Reference Method (SRM) | 2.5 | Very pale, golden straw color. |
| Mash Temperature | 65°C (149°F) | Aids in high attenuation, crispness. |
| Fermentation Temperature | 10°C (50°F) | Critical for clean lager profile. |
| Lagering Temperature | 0-2°C (32-36°F) | For clarity and flavor mellowing. |
The Brewer’s Hook: Chasing That Elusive Crispness
I’ve been brewing for two decades, and in that time, I’ve chased many commercial beer profiles. Some are easier than others. When I first attempted to clone a popular crisp, light lager, I made the classic mistake of underestimating the power of adjuncts and the absolute necessity of cold fermentation and extensive lagering. My early attempts were often too malty, a touch hazy, and lacked that distinctive dry, snappy finish. I remember one batch vividly: I thought I could get away with just Pilsner malt and a shorter lagering time. The result was a decent enough beer, but it wasn’t the clone I was aiming for. It taught me a valuable lesson: to truly replicate a beer like Kingfisher Ultra, you have to embrace the specific techniques that define its style, even if they seem counter-intuitive to a malt-forward brewer.
My journey to nail this clone led me through various experiments with different proportions of rice and corn, various lager yeast strains, and a lot of meticulous temperature logging. What I present here isn’t just a recipe; it’s the culmination of years of trial and error, designed to save you the headaches I endured. This isn’t a beer where you can cut corners; precision is your best friend. But trust me, the reward of a perfectly clear, incredibly crisp, and refreshing lager is worth every bit of effort. Let’s get to brewing something truly special.
The Math Behind the Ultra Lager: Formulating Your Grain Bill and Hop Schedule
To truly understand how to brew this lager, you need to understand the underlying calculations that dictate its character. It’s not just about throwing ingredients together; it’s about engineering the beer’s profile. Here’s how I break down the key numerical aspects for a 20-liter batch:
Grain Bill Calculation for a 20L Batch (Target OG 1.045)
Achieving that clean, dry profile requires a specific blend of fermentables. My approach centers on a high percentage of low-color Pilsner malt and a substantial adjunct.
| Ingredient | Weight (kg) | Percentage (%) | Contribution |
|---|---|---|---|
| Pilsner Malt (2-row, ~1.8 SRM) | 3.80 kg | 79.2% | Base fermentable, provides light malt character. |
| Flaked Rice (~1.0 SRM) | 0.90 kg | 18.8% | Adds crispness, dryness, lightens body, aids clarity. |
| Carafoam/Carapils Malt (~1.5 SRM) | 0.10 kg | 2.0% | Improves head retention and mouthfeel without adding sweetness. |
| TOTAL MALT | 4.80 kg | 100% |
Calculation Notes: Assuming an average brewhouse efficiency of 75%, 4.80 kg of fermentables will yield an OG of approximately 1.045 for a 20L batch. The high percentage of flaked rice is critical here; it provides highly fermentable sugars that lead to a very dry finish, a hallmark of this commercial lager.
Hop Schedule and IBU Contribution
The bitterness in this lager is restrained, allowing the clean malt and crispness to shine. I target a modest IBU of 15 using a single bittering addition of a classic German noble hop.
| Hop | Weight (g) | Alpha Acid (%) | Boil Time (min) | Estimated IBU Contribution |
|---|---|---|---|---|
| Hallertau Mittelfrüh Pellets | 25 g | 4.0% | 60 | ~15 IBU |
IBU Calculation Formula (Simplified): IBU = (Hop Weight (g) * Alpha Acid % * Utilization Factor * 1000) / (Batch Volume (L) * 1.34). For 60-minute additions, I use a utilization factor around 0.25 for pellets in a typical wort. My 25g Hallertau at 4% AA yields approximately 15 IBU for a 20L batch. This provides just enough bitterness to balance the malt without overwhelming the palate.
Yeast Selection and Pitch Rate
A clean fermenting lager yeast is paramount. I typically use:
- Liquid Yeast: Wyeast 2124 Bohemian Lager or White Labs WLP830 German Lager. For these, I recommend making a 1.5-liter starter to ensure a robust pitch of at least 300 billion cells for 20L at 1.045 OG.
- Dry Yeast: Two packets of SafLager W-34/70. Rehydrate according to manufacturer instructions, which typically means in 10 times its weight in sterile water at 25-27°C for 30 minutes. This provides roughly 230 billion cells, which is sufficient for a good fermentation at lager temperatures.
Pitching a healthy amount of yeast is critical for lagers to avoid off-flavors (like acetaldehyde) and ensure complete attenuation at cold temperatures.
Step-by-Step Execution: Brewing Your Ultra Lager Clone
Precision and temperature control are non-negotiable for this beer. Follow these steps meticulously, and you’ll be rewarded.
- Water Treatment (Day Before):
- Start with 28 liters of good quality brewing water. For a crisp lager, I aim for a very low mineral profile. My target is typically Calcium: 50 ppm, Magnesium: 10 ppm, Sodium: 20 ppm, Chloride: 30 ppm, Sulfate: 50 ppm. This ensures a clean base.
- Add 2g Gypsum (CaSO4) and 1g Calcium Chloride (CaCl2) to your mash water to adjust for optimal mash pH and a subtle mineral balance that enhances crispness.
- If your water is hard, consider cutting it with distilled or reverse osmosis water. I always check my pH; a target mash pH of 5.2-5.4 at mash temperature is ideal. Lactic acid can be used cautiously if pH is too high.
- Mash (90 minutes):
- Heat your strike water to achieve a mash temperature of 65°C (149°F). I aim for this single-infusion rest because it balances fermentability and body, leaning towards a drier beer. Maintain this temperature precisely for 90 minutes.
- Stir thoroughly to avoid dough balls and ensure even temperature distribution. After 90 minutes, perform an iodine test to confirm starch conversion.
- Mash Out & Sparge (60-75 minutes):
- Raise the mash temperature to 76°C (169°F) for 10 minutes to halt enzymatic activity and reduce wort viscosity.
- Begin sparging using water heated to 77°C (170°F). Collect approximately 25-26 liters of wort. Be gentle to avoid compacting the grain bed and aim for a run-off rate that allows proper extraction without turbidity.
- Boil (60 minutes):
- Bring your collected wort to a vigorous boil. As soon as a rolling boil is achieved, add 25g Hallertau Mittelfrüh hops (4.0% AA) for your 60-minute bittering addition.
- At 15 minutes remaining in the boil, add 1 tsp Irish Moss or 1/2 tablet Whirlfloc to aid in protein coagulation and promote clearer wort.
- At 5 minutes remaining, add your yeast nutrient (e.g., 1/2 tsp Wyeast Yeast Nutrient). This helps ensure healthy fermentation.
- Chilling & Aeration:
- Immediately after the boil, rapidly chill the wort to 10°C (50°F). I use an immersion chiller, and speed here is crucial to minimize DMS formation and “cold break” proteins settling out effectively.
- Once chilled, transfer to a sanitized fermenter. Aerate thoroughly by shaking the fermenter vigorously for 5 minutes or using an oxygenation stone for 60 seconds. Lagers require more oxygen at pitching than ales due to their longer fermentation times and lower temperatures.
- Fermentation (2-3 Weeks):
- Pitch your rehydrated dry yeast or liquid yeast starter at 10°C (50°F).
- Maintain the fermentation temperature at 10°C (50°F) for 7-10 days, or until gravity drops to about 1.015-1.020.
- Diacetyl Rest: Raise the temperature to 16°C (61°F) for 2-3 days. This allows the yeast to clean up any diacetyl (buttery off-flavor) or acetaldehyde (green apple flavor) byproducts.
- After the diacetyl rest, confirm final gravity is reached (target 1.008). If not, hold at 16°C for a few more days.
- Lagering (4-6 Weeks):
- Once FG is stable, drop the temperature to 0-2°C (32-36°F). This is the lagering phase, critical for clarifying the beer and mellowing harsh flavors.
- Hold at this temperature for a minimum of 4 weeks. I personally prefer 6 weeks for optimal results. You can transfer to a secondary fermenter or serving keg for lagering if you wish to get it off the yeast cake, though I often just leave it in the primary for this period.
- Packaging & Carbonation:
- For Kegging: Transfer the clear, cold lager to a sanitized keg. Force carbonate to 2.6-2.8 volumes of CO2. This typically means setting your regulator to 12-14 PSI at 2°C (36°F) for several days, or using a higher pressure for quicker carbonation.
- For Bottling: Gently rack the beer to a bottling bucket. Add priming sugar. For 20 liters, I use about 110-120g of dextrose (corn sugar) dissolved in boiled water. Bottle into sanitized bottles and condition at 18-20°C (64-68°F) for 2-3 weeks, then chill thoroughly before serving.
And there you have it – a perfectly crafted clone. Remember, consistency is key, and every single temperature fluctuation can impact the final product. Don’t be afraid to invest in good temperature control equipment; it’s the best money you’ll spend for lagers.
For more detailed guides on yeast starters and water chemistry, check out the extensive resources available on BrewMyBeer.online.
What Can Go Wrong? Troubleshooting Common Lager Issues
Lagers are unforgiving mistresses, and even with the best intentions, things can sometimes stray. Here’s a rundown of common issues I’ve encountered and how to address them:
- Diacetyl (Buttery/Butterscotch Flavor): This is the most common lager fault. It usually indicates insufficient diacetyl rest, underpitching of yeast, or too rapid temperature drops.
- Fix: If detected, raise the beer temperature back to 16-18°C (61-64°F) for an additional 3-5 days to allow the yeast to reabsorb and metabolize the diacetyl. Prevention is key: ensure adequate pitch rate and a proper diacetyl rest.
- Acetaldehyde (Green Apple/Grassy Flavor): Another common off-flavor indicating yeast stress or premature removal from the yeast.
- Fix: Similar to diacetyl, warm the beer up to 16-18°C (61-64°F) and give the yeast more time. Adequate oxygenation at pitching and proper yeast nutrition help prevent this.
- Hazy Beer: Despite all your efforts, your lager might still be cloudy. This can be due to chill haze, yeast in suspension, or protein haze.
- Fix: Ensure a good cold crash and extended lagering period. Use kettle finings like Irish Moss/Whirlfloc during the boil. Gelatin fining during lagering (adding 1 tsp of dissolved gelatin per 20L after 2 weeks of lagering, holding at 0°C for another week) can work wonders for stubborn haze. Filtering is also an option for commercial clarity.
- Stuck Fermentation: Your gravity won’t drop to the target FG.
- Fix: This is often due to underpitching, too low fermentation temperature, or nutrient deficiency. Gently rouse the yeast by swirling the fermenter, raise the temperature slightly (e.g., to 12-14°C), or pitch more fresh, healthy yeast. Ensure your mash temperature wasn’t too high, producing unfermentable sugars.
- Lack of Crispness/Too Malty: The beer feels heavier than expected, or has residual sweetness.
- Fix: This usually points to a mash temperature that was too high (above 66°C), converting more unfermentable dextrins. For your next batch, ensure precise mash temperature control at 65°C and consider slightly increasing your rice adjunct percentage to enhance dryness.
Sensory Analysis: What You’re Aiming For
After all that meticulous work, here’s what your Kingfisher Ultra clone should deliver to your senses:
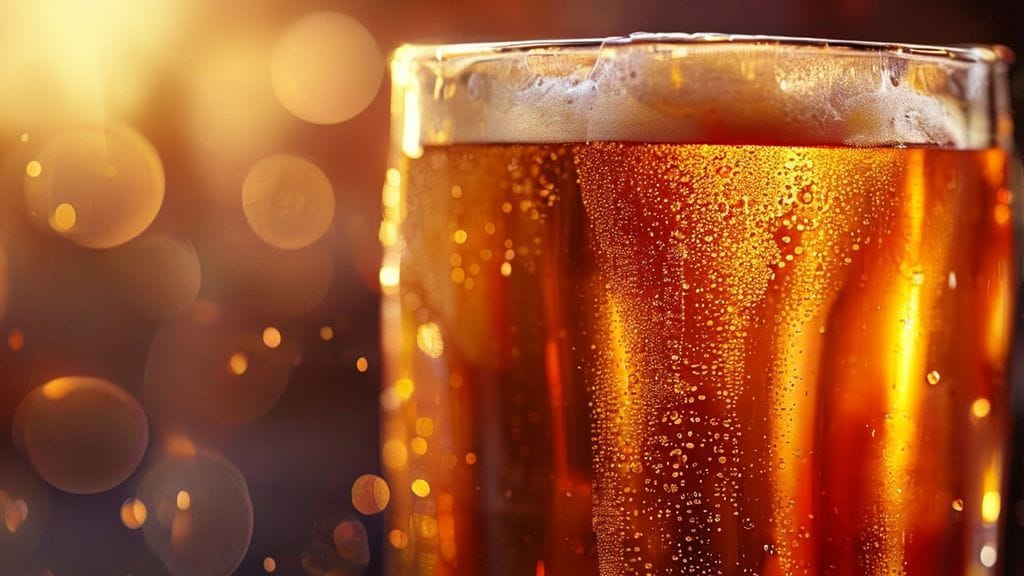
- Appearance: It should be brilliantly clear, with a pale straw to light gold color (SRM 2-3). Expect a moderate, persistent white head with fine, clingy bubbles that lace the glass elegantly. Any haziness means more lagering or fining is needed.
- Aroma: The nose should be clean and subtle. Dominant notes will be a light, bready malt character from the Pilsner, perhaps a whisper of cracker or corn from the rice. There should be no significant hop aroma, just a faint, noble hop spice or floral background. Absence of fruity esters or sulfur indicates a clean fermentation.
- Mouthfeel: Light in body, exceptionally crisp and refreshing. It should have a clean finish with minimal residual sweetness. Carbonation will be medium to high, contributing to the snappy feel. It should feel smooth, almost watery in its ease of drinking, but without being thin.
- Flavor: The taste mirrors the aroma: a delicate balance of clean, very subtle malt sweetness and a balanced, low bitterness. The rice adjunct contributes to a remarkably dry, almost sharp finish that leaves the palate refreshed. No harshness, no lingering flavors, just pure, clean lager character. It should be utterly quaffable.
Frequently Asked Questions About Ultra Lager Cloning
Why is rice adjunct so important for this clone?
My experience has shown that rice adjunct, specifically flaked rice, is critical for achieving the characteristic crispness and dry finish of commercial light lagers like Kingfisher Ultra. Rice contributes highly fermentable sugars, which means the yeast converts more of the wort’s sugars into alcohol, leaving very little residual sweetness. It also lightens the body and contributes no discernible flavor, allowing the clean malt and hop character to shine through, and aids significantly in achieving brilliant clarity. Without it, you’ll likely end up with a heavier, sweeter, and potentially hazier beer.
Can I skip the lagering phase to save time?
While you *can* technically ferment a lager and drink it young, skipping the lagering phase will result in a beer that is significantly different from your target clone. The lagering phase (cold conditioning) is essential for two main reasons: firstly, it allows yeast and protein particulates to drop out of suspension, leading to that signature brilliant clarity. Secondly, and equally important, it provides time for the yeast to “clean up” any subtle off-flavors (like acetaldehyde or diacetyl) that may still be present after primary fermentation, resulting in a much smoother, cleaner, and more refined flavor profile. For an Ultra Lager clone, I wouldn’t recommend it. Patience is a virtue here, and it’s well worth the wait.
How critical is my water profile for this specific lager?
Water profile is incredibly critical for this style, perhaps more so than for many other beers. For a light, crisp lager, you want a very clean, low-mineral water profile. High levels of sulfates or chlorides can push the balance towards bitterness or a cloying finish, respectively, which is not what we’re after. I aim for water that is relatively soft, with balanced calcium, chloride, and sulfate levels as detailed in my water treatment section. If your local water supply is hard or has a strong mineral character, I strongly recommend treating it with reverse osmosis or distilled water, then building up your desired profile with precise mineral additions. It’s a subtle adjustment, but it makes a huge difference in the final product’s crispness and drinkability. You can find more resources on water chemistry for lagers at BrewMyBeer.online.