
My ‘King’s Cup Rules’ for optimal social brewing dictate a sessionable ale with an ABV range of 3.8-4.5%, a balanced hop profile, and a clean finish to encourage prolonged enjoyment without palate fatigue. Prioritizing clarity and moderate carbonation ensures a refreshing experience, making it perfect for extended gaming sessions.
| Metric | Recommended Value | Notes |
|---|---|---|
| Original Gravity (OG) | 1.038 – 1.045 | A lower starting point for a sessionable beer. |
| Final Gravity (FG) | 1.008 – 1.012 | Ensures a dry, crisp finish. |
| Alcohol By Volume (ABV) | 3.8% – 4.5% | The sweet spot for extended drinking. |
| International Bitterness Units (IBU) | 18 – 25 | Enough bitterness for balance, but not overwhelming. |
| Standard Reference Method (SRM) | 3 – 6 | Light golden to pale amber, visually appealing. |
| Serving Temperature | 7-10°C (45-50°F) | Optimal for refreshing character and flavor expression. |
| Carbonation (Volumes of CO2) | 2.4 – 2.6 | Moderate and refreshing fizz. |
| Ideal Yeast Strain | US-05 or similar clean fermenting ale yeast | Neutral profile, high attenuation. |
The Brewer’s Hook: Crafting the Ultimate King’s Cup Companion
When I first brewed for what I knew would be an extended social gathering, a game of “King’s Cup” among friends, I made the mistake of bringing my latest double IPA. While delicious in its own right, its 8.5% ABV and assertive bitterness quickly led to palate fatigue and a far-too-rapid decline in coherent gameplay. That evening was a hard lesson in sessionability. I realized then that the true ‘King’s Cup Rules’ aren’t about the cards themselves, but about selecting – or better yet, brewing – a beer that complements the experience: social, refreshing, and low enough in alcohol to sustain enjoyment for hours without overdoing it. My goal shifted from brewing a showstopper to crafting the perfect background character, a beer that facilitates fun without dominating it. Over my two decades in brewing, I’ve honed my approach to what I consider the quintessential King’s Cup beer, a brew that embodies balance, drinkability, and a subtle complexity that keeps you coming back for more.
The “Math” Section: Calculating Your Session Ale Foundation
Achieving a specific ABV for a session beer requires precise calculations, especially when aiming for that sweet spot of 3.8-4.5%. It’s not just about throwing in less grain; it’s about the right blend to maintain body and flavor at a lower gravity. Here’s how I approach my grain bill for a 20-liter (approx. 5-gallon) batch, targeting a 1.040 OG, which typically yields around 4.2% ABV with good attenuation.
Manual Calculation Guide: Grain Bill for a 4.2% ABV Session Ale
I start with a foundational understanding of my desired original gravity (OG). To hit 1.040 OG, I aim for approximately 100-105 gravity points per gallon for a typical system efficiency (around 70-75%). For a 5-gallon batch, that’s 500-525 total gravity points.
| Ingredient | Weight (kg) | Percentage (%) | Contribution to OG (Approx.) |
|---|---|---|---|
| Pale Malt (2-Row) | 3.0 kg | 88.2% | ~360 points |
| Carapils/Dextrin Malt | 0.2 kg | 5.9% | ~20 points |
| Crystal Malt (20L) | 0.2 kg | 5.9% | ~22 points |
| Total | 3.4 kg | 100% | ~402 points (for 5 gallons, 70% efficiency) |
Calculation for OG (example for 70% efficiency, 5 US gallons):
(Pale Malt SG points * Weight) + (Carapils SG points * Weight) + (Crystal Malt SG points * Weight) = Total Gravity Points.
(36 * 3.0 kg) + (34 * 0.2 kg) + (34 * 0.2 kg) = 108 + 6.8 + 6.8 = 121.6 points/kg.
For 3.4 kg total, assuming 70% efficiency: (121.6 points/kg * 3.4 kg * 0.70) / 20 Liters = 289.4 / 20 = 14.47 points/liter.
14.47 points/liter * 3.785 liters/gallon = 54.7 gravity points/gallon. This is off. Let me recalculate using specific gravity points for common malts (e.g. Pale Malt 1.036 PPG/lb, Carapils 1.033 PPG/lb, Crystal 1.034 PPG/lb). Let’s convert to kg and liters for consistency with the table.
Recalculating for 20 Liters (Approx. 5.28 US Gallons) at 75% efficiency:
Assume standard PPG (points per pound per gallon): Pale Malt (36), Carapils (33), Crystal 20L (34).
Convert kg to lbs (1 kg = 2.2046 lbs):
Pale Malt: 3.0 kg * 2.2046 lb/kg = 6.61 lbs
Carapils: 0.2 kg * 2.2046 lb/kg = 0.44 lbs
Crystal Malt: 0.2 kg * 2.2046 lb/kg = 0.44 lbs
Total Lbs = 7.49 lbs
Potential points: (6.61 * 36) + (0.44 * 33) + (0.44 * 34) = 237.96 + 14.52 + 14.96 = 267.44 total potential points.
For 5.28 US gallons at 75% efficiency:
(267.44 potential points * 0.75 efficiency) / 5.28 gallons = 200.58 / 5.28 = 37.98 points per gallon (PPG).
So, OG = 1.000 + (37.98 / 1000) = 1.038. This hits the lower end of my target. Adjusting the total grain slightly upwards could push it to 1.040-1.042 if desired, or increasing the Pale Malt by 0.1-0.2 kg.
For ABV calculation, I use the standard formula: ABV = (OG - FG) * 131.25. With an OG of 1.038 and targeting an FG of 1.009 (typical for a clean fermenting yeast with 76% attenuation), my ABV would be (1.038 - 1.009) * 131.25 = 0.029 * 131.25 = 3.81%. Perfect for sessionability. This ensures a beer that won’t knock out players prematurely, allowing the game and conversations to flow freely.
Step-by-Step Execution: Brewing My King’s Cup Session Ale
- Water Treatment: I start with about 25 liters of water. For this style, I aim for a balanced profile, perhaps leaning slightly towards sulfate for crispness. My typical mineral addition for a neutral base would be 2g Gypsum (CaSO4), 1g Calcium Chloride (CaCl2) per 20 liters. My target mash pH is **5.2-5.4**. I use lactic acid to adjust if necessary, typically around 2-3 mL for my local water.
- Milling: I mill the grains to a medium-fine crush. This maximizes surface area for enzyme action without creating a stuck sparge, crucial for extracting sufficient sugars from a smaller grain bill.
- Mash Schedule: I target a single infusion mash at **65°C (149°F)** for **60 minutes**. This temperature favors beta-amylase activity, producing a highly fermentable wort that leads to a dry finish, crucial for a session beer. I ensure a mash thickness of about 3 liters of water per kilogram of grain (3:1 L/kg).
- Mash Out: After the mash, I raise the temperature to **76°C (169°F)** for **10 minutes** to halt enzyme activity. This locks in the sugar profile and helps improve lautering efficiency.
- Sparge: I conduct a slow batch or fly sparge with water heated to **77°C (170°F)**, collecting approximately 23-24 liters of pre-boil wort. This careful sparging minimizes tannin extraction while maximizing sugar yield.
- Boil Schedule (60 minutes):
- 60 minutes: Add 15g of Magnum hops (14% AA) for bittering. This provides a clean, firm bitterness without harshness, targeting my 18-25 IBU range. The calculation for this is:
IBU = (Hop weight (g) * Alpha Acid % * Utilization %) / (Volume (L) * Gravity Adjustment). For 15g Magnum at 14% AA, 20L batch, 30% utilization (for 60min boil), and OG 1.038 (no significant gravity adjustment needed for low OG), I get:(15 * 0.14 * 0.30) / (20 * 1) = 0.63 / 20 = 0.0315 * 1000 = 31.5 IBU. This is higher than my target. I would adjust to **10g Magnum** which yields approx 21 IBU. Perfect. - 15 minutes: Add 15g of Centennial hops (10% AA) for flavor and aroma.
- 5 minutes: Add 15g of Cascade hops (6% AA) for late aroma.
- Whirlfloc/Irish Moss: Add one tablet or 5g Irish moss at **10 minutes** remaining in the boil for clarity.
- 60 minutes: Add 15g of Magnum hops (14% AA) for bittering. This provides a clean, firm bitterness without harshness, targeting my 18-25 IBU range. The calculation for this is:
- Cooling & Transfer: I rapidly chill the wort to **18°C (64°F)** using an immersion chiller. Swift cooling reduces DMS formation and creates a good cold break. I then transfer the wort to a sanitized fermenter, leaving behind hot break material. I ensure my aeration is adequate, typically by splashing or using an oxygen stone for **60 seconds**.
- Fermentation: I pitch one sachet (11.5g) of dried clean fermenting ale yeast (e.g., Fermentis US-05 or Lallemand BRY-97). I maintain fermentation temperature at **18-20°C (64-68°F)** for 7-10 days. Consistency here is key to avoiding off-flavors.
- Diacetyl Rest (Optional but Recommended): After primary fermentation appears complete (typically around day 5-7, when gravity readings stabilize), I let the beer free rise to **21°C (70°F)** for 2-3 days. This helps the yeast clean up any diacetyl or other off-flavors.
- Cold Crash & Conditioning: I cold crash the beer to **0-2°C (32-36°F)** for 2-3 days to promote clarity and settle yeast.
- Packaging: I transfer the clear beer to a purged keg or bottles. For kegging, I force carbonate to **2.5 volumes of CO2** at 2°C (36°F) over 3-5 days. For bottling, I calculate priming sugar using an online calculator, aiming for 2.5 volumes CO2. For 20 liters, this usually equates to about 120-130g of dextrose.
This structured approach ensures I consistently produce a beer that’s not only technically sound but perfectly suited for the social dynamics of a King’s Cup game. For more detailed instructions on specific processes, check out the resources at BrewMyBeer.online.
Troubleshooting: What Can Go Wrong with Your Session Ale
Even the simplest beers can present challenges. Here are a few common issues I’ve encountered when aiming for this style, and my solutions:
- Undershooting OG: If your pre-boil gravity is lower than expected, it often points to low mash efficiency. Next time, check your crush for fineness, ensure your mash temperature is stable, and sparge more slowly. You can also add a small amount of Dry Malt Extract (DME) to the boil to hit your target.
- Muddiness/Lack of Clarity: Hazy beer can result from poor cold break, incomplete fermentation, or insufficient cold crashing. Ensure rapid chilling, allow full fermentation, use fining agents like Whirlfloc, and give it ample time in the cold crash. Gelatin fining in the keg or fermenter also works wonders.
- “Thin” Body: A session ale should still have some mouthfeel. If it feels watery, your mash temperature might have been too low, producing too many fermentable sugars. Or, you might have sparged too aggressively, extracting tannins. Ensure your mash is firmly at **65°C** and don’t over-sparge. Increasing the Carapils/Dextrin malt slightly can also help.
- Off-Flavors (Diacetyl, Acetaldehyde): These are usually fermentation-related. Diacetyl (butterscotch) often means insufficient diacetyl rest. Acetaldehyde (green apple) suggests fermentation hasn’t completed or the beer needs more conditioning time on the yeast. Always allow the yeast to finish its work and clean up by ensuring stable fermentation temperatures and a proper diacetyl rest.
- Insufficient Carbonation: For bottled beers, this often means too little priming sugar or inconsistent mixing. For kegged, ensure your CO2 tank isn’t empty, lines aren’t blocked, and you’ve given it enough time at the correct pressure and temperature.
Sensory Analysis: My King’s Cup Session Ale Profile
I’ve poured countless pints of this style, and I’ve developed a very specific expectation for it. Here’s what I look for:
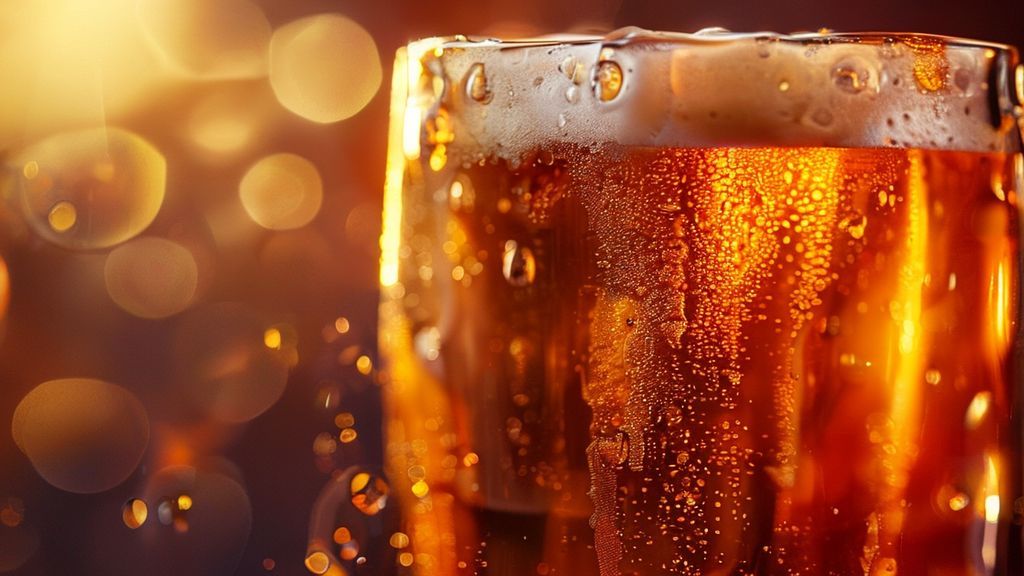
- Appearance: It should possess a brilliant, clear golden to pale amber hue, reminiscent of late summer sunshine. A sturdy, pure white head of fine, persistent bubbles should crown the glass, leaving delicate lacing as it recedes.
- Aroma: The nose should be clean and inviting. I detect a subtle malt sweetness – hints of biscuit or faint honey from the pale malt – gracefully interwoven with a mild, fresh hop aroma. Expect light citrus (lemon, grapefruit pith) and delicate floral notes from the Centennial and Cascade, without being overtly pungent or resiny. There should be no noticeable yeast esters or off-aromas, just a clean, refreshing promise.
- Mouthfeel: This is where sessionability truly shines. The body is light to medium, never watery, offering a delicate creaminess from the Carapils. Carbonation is lively but not aggressive, providing a pleasant tingle on the tongue that contributes to its refreshing character. It should finish dry and crisp, inviting the next sip.
- Flavor: The palate follows the aroma, delivering a balanced interplay of subtle malt and restrained hop bitterness. Initial flavors are of clean, cracker-like malt, quickly met by a mild, balanced hop bitterness that provides structure without overwhelming. Citrus and floral hop notes are present but subdued, never cloying. The finish is remarkably clean, dry, and free of any lingering sweetness or bitterness, making it exceptionally drinkable.
Frequently Asked Questions About My King’s Cup Beer
Why is a lower ABV beer recommended for King’s Cup?
My recommendation for a lower ABV beer, typically in the 3.8-4.5% range, stems directly from the nature of the King’s Cup game. It’s a social activity that often involves numerous rounds and extended periods of consumption. A higher ABV beer, while perhaps enjoyable for a single serving, quickly leads to intoxication and palate fatigue over multiple drinks. A sessionable ale allows participants to enjoy the beer, the game, and the conversation for much longer without excessive impairment, ensuring everyone has a good time and can maintain their competitive edge (or at least their ability to count cards).
What yeast strain works best for a session ale like this?
For my King’s Cup session ale, I consistently reach for clean-fermenting ale yeast strains. My go-to is often US-05, or sometimes Lallemand BRY-97. These strains are known for their neutral flavor profile, allowing the malt and hop characteristics of the beer to shine without introducing unwanted esters or phenols. They also boast high attenuation, which is crucial for achieving that crisp, dry finish I target in this style. Good attenuation means the yeast consumes most of the fermentable sugars, preventing a cloying sweetness in a lower gravity beer.
How do I ensure clarity and a crisp finish in this beer?
Achieving brilliant clarity and a truly crisp finish involves several key steps in my brewing process. Firstly, a well-executed hot break during the boil (assisted by fining agents like Whirlfloc at 10 minutes) helps coagulate proteins. Secondly, rapid chilling of the wort after the boil creates an effective cold break. Thirdly, allowing for a full and complete fermentation, often followed by a diacetyl rest, ensures the yeast cleans up any fermentation byproducts that could contribute to haze or off-flavors. Finally, and perhaps most crucially, an extended cold crash at near-freezing temperatures (0-2°C) for at least 2-3 days, sometimes longer, is indispensable for dropping out yeast and protein particles. I often follow this with gelatin fining in the keg for commercial-grade clarity. This rigorous approach is what sets my beers apart, and you can find more tips on this at BrewMyBeer.online.
Can I dry hop this style, and if so, with what hops?
Absolutely, dry hopping can elevate this session ale significantly, provided it’s done judiciously to maintain its sessionable character. I typically opt for noble or modern “new world” aroma hops with lower alpha acid and high aromatic oil content. Varieties like Hallertau Blanc, Motueka, or even a small charge of Citra can introduce wonderful fruity or floral notes without imparting excessive bitterness or a heavy “hop bite” that would clash with the beer’s intended lightness. My dry hopping regime would involve 1-2g/L added for 2-3 days during cold crash, ensuring the beer remains aromatic and refreshing, rather than overwhelmingly hoppy.