

Learn how mash temperature impacts your beer’s body, sweetness, and fermentability with our interactive chart. Discover optimal temperature ranges for different beer styles and master the science of enzyme activity to craft perfectly balanced homebrew every time.
Of all the variables in brewing, mash temperature might be the most powerful yet underappreciated tool at a brewer’s disposal. Shift your temperature just a few degrees in either direction, and you can transform a thin, bone-dry beer into a full-bodied, malty masterpiece—or vice versa—all while using identical ingredients.
I’ve witnessed this phenomenon firsthand on countless occasions, both in my home brewery and during my time working at commercial breweries. During one particularly illuminating experiment, I brewed three identical batches of pale ale with the exact same grain bill, hop schedule, and yeast strain. The only difference? Mash temperatures of 148°F, 152°F, and 158°F. The resulting beers were so dramatically different that blind tasters routinely identified them as entirely different recipes.
In this guide, I’ll explain the science behind mash temperature effects, show you how to leverage this knowledge for precise control over your beer’s character, and share practical techniques for hitting your targets consistently. Whether you’re aiming for a bone-dry Brut IPA or a luscious Imperial Stout, understanding mash temperature is the key to achieving your brewing goals.
The Science Behind Mash Temperature Effects
To understand why mash temperature has such profound effects on beer character, we need to explore the primary enzymatic reactions that occur during mashing.
The Key Players: Alpha and Beta Amylase
During mashing, two main enzymes work to convert starches into fermentable and unfermentable sugars:
Beta-amylase operates in the temperature range of 131-149°F (55-65°C), with optimal activity around 145-148°F (63-64.5°C). This enzyme creates highly fermentable maltose sugars by cleaving two-glucose units from the ends of starch chains. Beta-amylase is quite heat-sensitive and becomes increasingly denatured at higher temperatures.
Alpha-amylase works best between 154-167°F (67-75°C), with optimal activity around 158-162°F (70-72°C). This enzyme creates a mixture of fermentable and unfermentable sugars by randomly breaking starch chains into smaller fragments. Alpha-amylase is more heat-stable than beta-amylase.
According to research published in the Journal of the Institute of Brewing, the ideal temperature for beta-amylase is about 15°F (8°C) lower than for alpha-amylase, which creates a crucial “decision point” for brewers.
- Lower (144-149°F / 62-65°C): Beta-amylase dominant, highly fermentable wort, drier/thinner beer
- Medium (150-154°F / 65.5-67.8°C): Balanced enzyme activity, moderate fermentability and body
- Higher (155-162°F / 68-72°C): Alpha-amylase dominant, more unfermentable sugars, fuller-bodied beer
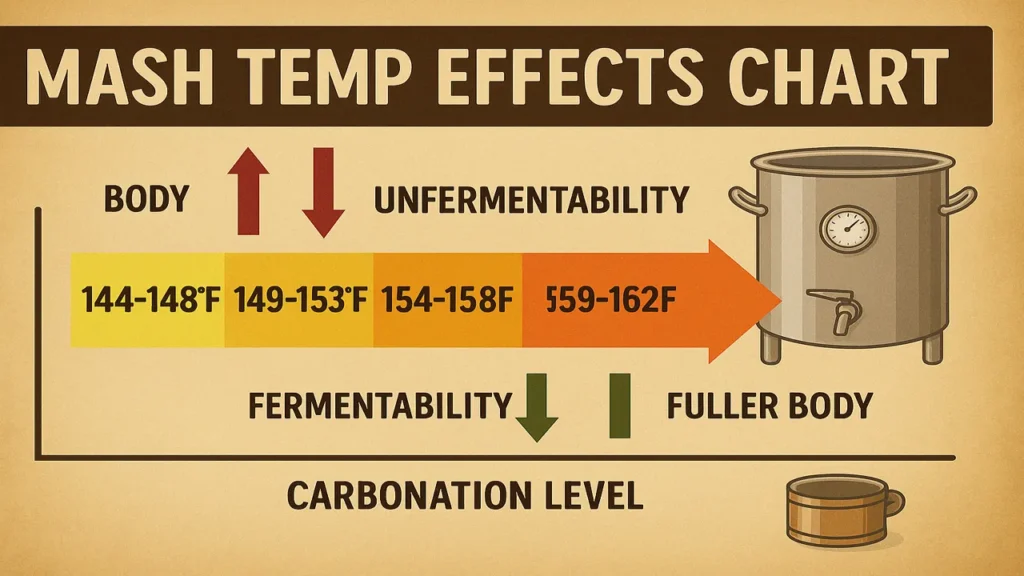
| Temperature Range | Best For Beer Styles | Characteristics |
|---|---|---|
| 144-148°F (62-64.4°C) | Brut IPA, Belgian Tripel, Saison, Dry Stout | Very dry finish, crisp mouthfeel, higher attenuation, more alcohol from same OG |
| 149-153°F (65-67.2°C) | American IPA, Pale Ale, Amber Ale, Helles | Balanced body and fermentability, versatile for most styles |
| 154-158°F (67.8-70°C) | Brown Ale, Porter, English ESB, Stout | Fuller body, more residual sweetness, lower attenuation |
| 159-162°F (70.5-72.2°C) | Imperial Stout, Wee Heavy, Sweet Stout | Very full body, significant mouthfeel, pronounced maltiness |
Temperature Ranges and Their Effects
Different mash temperature ranges create distinctly different wort compositions:
Low Temperature Range (144-149°F / 62-65°C)
At these lower temperatures, beta-amylase dominates while alpha-amylase works more slowly. This creates a highly fermentable wort with a high percentage of maltose sugar, which yeast can easily convert to alcohol.
Resulting beer characteristics:
- Lower final gravity
- Thinner body
- Higher alcohol content (from the same starting gravity)
- Drier finish
- Less residual sweetness
- Crisper mouthfeel
Mid Temperature Range (150-154°F / 65.5-67.8°C)
This range represents the "sweet spot" where both enzymes are active simultaneously, with beta-amylase still working effectively while alpha-amylase activity increases. This creates a balanced mixture of fermentable and unfermentable sugars.
Resulting beer characteristics:
- Moderate final gravity
- Medium body
- Balanced mouthfeel
- Moderate residual sweetness
- Versatile profile suitable for many styles
High Temperature Range (155-162°F / 68-72°C)
At higher temperatures, beta-amylase quickly denatures while alpha-amylase continues working efficiently. This creates a wort higher in unfermentable dextrins (chains of 3+ glucose units).
Resulting beer characteristics:
- Higher final gravity
- Fuller body
- Lower alcohol content (from the same starting gravity)
- More residual sweetness
- Richer mouthfeel
- Increased perception of maltiness
Real-World Impact: A Practical Example
To illustrate these effects concretely, consider the following example from my brewing experiments:
I brewed a standard American Pale Ale with an original gravity of 1.052, using identical ingredients for each batch:
- Low-temperature mash (148°F/64.4°C): Final Gravity: 1.008, ABV: 5.8%, thin body, very dry finish
- Mid-temperature mash (152°F/66.7°C): Final Gravity: 1.012, ABV: 5.2%, medium body, balanced finish
- High-temperature mash (158°F/70°C): Final Gravity: 1.016, ABV: 4.7%, full body, malt-forward with noticeable sweetness
Notice how the ABV decreases as the mash temperature increases, even though we started with identical original gravities. This demonstrates the power of mash temperature to control the fermentability of your wort.
As Brewing Science Institute founder Dr. Bryan Rabe notes: "A 5°F difference in mash temperature can change a beer's final gravity by as much as 4-5 points, which is enough to completely transform its character."
Choosing the Right Mash Temperature for Your Beer Style
Different beer styles traditionally call for different mash temperature ranges. Understanding these relationships helps you craft beers that meet style expectations:
Low Temperature Mashing (144-149°F / 62-65°C)
Best for styles where dryness and high attenuation are prized:
- Brut IPA
- Belgian Tripel
- Saison
- West Coast IPA
- Czech Pilsner
- Belgian Golden Strong Ale
Mid Temperature Mashing (150-154°F / 65.5-67.8°C)
Ideal for balanced styles with moderate body:
- American Pale Ale
- American IPA
- British Bitter
- Amber Ale
- American Brown Ale
- Oktoberfest/Märzen
High Temperature Mashing (155-162°F / 68-72°C)
Perfect for styles where body and malt character should dominate:
- Oatmeal Stout
- Imperial Stout
- Scotch Ale / Wee Heavy
- Doppelbock
- English Barleywine
- Sweet Stout
The specific mash temperature you choose should depend not only on the style but also on your personal preferences and the specific character you're aiming for.
For example, an award-winning homebrewer I know creates his highly-regarded New England IPAs with a slightly higher than typical mash temperature (154-155°F instead of the 150-152°F many use). This creates a fuller body that supports the style's characteristic hazy, juicy profile without making it too sweet.
Beyond Basic Mash Temperatures: Advanced Techniques
While single-temperature infusion mashing is the most common approach for homebrewers, there are several advanced techniques that offer even more control over your beer's characteristics:
Step Mashing
Step mashing involves resting at multiple temperature points to leverage different enzyme activities. A common step mash profile might include:
- Beta-glucanase rest (113-122°F / 45-50°C): Breaks down gums and improves runoff, especially useful for wheat, rye, and oats
- Protein rest (122-131°F / 50-55°C): Breaks down proteins, though rarely needed with modern well-modified malts
- Beta-amylase rest (146-148°F / 63-64.5°C): Maximizes fermentability
- Alpha-amylase rest (158-162°F / 70-72°C): Ensures complete starch conversion while creating body
- Mash-out (168-170°F / 75.5-76.5°C): Halts enzyme activity and improves efficiency
According to the German Brewing Institute, step mashing can lead to more complete starch conversion and better attenuation control compared to single-infusion mashing. However, with today's highly-modified malts, the benefits are often subtle for most beer styles.
Mash Thickness Considerations
The water-to-grain ratio (known as mash thickness) can also influence enzyme activity:
- Thick mash (1-1.25 quarts water per pound of grain): Tends to favor alpha-amylase activity, potentially resulting in less fermentable wort
- Medium mash (1.25-1.5 quarts per pound): Balanced enzyme activity
- Thin mash (1.75-2 quarts per pound): Tends to favor beta-amylase activity, potentially increasing fermentability
Research published in MBAA Technical Quarterly found that a difference of 0.5 quarts per pound in mash thickness can alter final gravity by 1-2 points, though temperature has a more significant impact.
Decoction Mashing
Decoction mashing, a traditional German technique, involves removing a portion of the mash, boiling it, and then returning it to raise the main mash temperature. This process:
- Creates deeper malt flavors through Maillard reactions
- Increases extraction efficiency
- Contributes to rich melanoidin development
While largely unnecessary with modern malts, decoction can still produce unique flavor profiles that are difficult to achieve by other means. Many traditional German breweries, such as Weihenstephaner, still use this method for their classic styles.
Practical Tips for Mash Temperature Control
Understanding the theory is important, but practical application is what makes for great beer. Here are my tips for achieving precise mash temperature control:
1. Account for Thermal Mass
Grain is cold and will lower your strike water temperature. The standard formula for calculating strike water temperature is:
Strike Water Temp = (0.2 × (Target Mash Temp - Grain Temp)) + Target Mash Temp
For example, if your grain is at 65°F and you want a mash temperature of 152°F: Strike Water Temp = (0.2 × (152 - 65)) + 152 = (0.2 × 87) + 152 = 17.4 + 152 = 169.4°F
2. Consider Your Equipment's Thermal Properties
Different mash tuns have different heat retention capabilities:
- Insulated coolers: Excellent heat retention, often losing only 1-2°F over an hour
- Stainless steel: Moderate heat retention, may lose 3-5°F without additional heat
- Aluminum or thin metal: Poor heat retention, requiring additional heat to maintain temperature
During my early brewing days, I made the mistake of using a thin stainless pot without insulation, and my mash temperature would routinely drop 7-8°F during a 60-minute rest. This unexpected temperature drop created beers that were more fermentable (and thus drier) than planned. I eventually wrapped my mash tun with a thermal blanket, which dramatically improved temperature stability.
3. Use the Right Thermometer
Temperature accuracy is critical for mash control. Invest in a high-quality digital thermometer with:
- At least 0.1°F resolution
- Quick reading capability
- Waterproof design
- Calibration feature
I recommend thermometers from ThermoWorks or similar professional-grade options. Avoid inexpensive dial thermometers, which can be off by 5°F or more.
4. Measure in Multiple Locations
Mash temperature isn't necessarily uniform throughout the grain bed. I've measured differences of up to 4°F between the top and bottom of the mash in my cooler-based system. Take readings from multiple locations to ensure uniformity, or stir gently before measuring.
5. Be Prepared for Adjustments
Even with careful calculations, you may miss your target temperature. Have both boiling water and cold water ready to make quick adjustments:
- Add boiling water in small increments to raise temperature
- Add ice or cold water to lower temperature
Remember to stir thoroughly after any adjustment to ensure even temperature distribution.
6. Consider Direct Heat for Precision
For ultimate control, especially with step mashing, a system that allows for direct heating offers significant advantages. HERMS (Heat Exchanged Recirculating Mash System) and RIMS (Recirculating Infusion Mash System) setups provide exceptional temperature control through continuous recirculation.
7. Account for Mash pH
Mash pH can influence enzyme activity. The optimal pH range for amylase enzymes is 5.2-5.6, with beta-amylase favoring the lower end of that range. According to Brewer's Friend, proper pH adjustment can improve enzyme efficiency by up to 10%.
Common Mash Temperature Problems and Solutions
Even experienced brewers encounter mash temperature issues. Here's how to troubleshoot common problems:
Problem 1: Consistently Missing Target Temperature
Solution: Create a calibration factor for your system. After several brews, you might notice a pattern—perhaps your calculated strike temperature consistently results in a mash 2°F below target. Add this as an adjustment factor to your calculations.
In my brewing setup, I found I needed to add 3°F to my calculated strike water temperature to hit my target consistently, likely due to heat loss during transfer.
Problem 2: Temperature Stratification
Solution: Use a mash paddle to gently stir the mash periodically, being careful not to introduce oxygen. Some advanced brewers employ recirculation systems that maintain uniform temperature throughout the mash.
Problem 3: Rapid Temperature Drop
Solution: Pre-heat your mash tun with hot water before adding your strike water and grain. Additionally, wrap your mash tun with insulation material such as a sleeping bag or purpose-made thermal jacket.
When I brew in winter, I pre-heat my cooler with boiling water for 10 minutes, then discard that water before starting my mash. This simple step eliminates the initial temperature drop that occurs when the cold container absorbs heat from the mash.
Problem 4: Difficulty Hitting Exact Temperatures for Step Mashing
Solution: Rather than trying to hit exact temperatures with infusions, use a heat source to slowly raise the temperature to each target step. This provides much greater control. If direct heat isn't available, use smaller, more frequent infusions of boiling water.
Mash Temperature and Modern Brewing Innovation
Modern brewing science continues to refine our understanding of mash temperature effects, leading to innovative techniques:
The "Mash Hop" Technique
Some brewers are now adding a small portion of their hop bill during the mash, claiming that different enzymes extract different compounds at various temperatures. Research by Oregon State University's brewing program has shown that lower mash temperatures (144-148°F) can extract different hop oils than higher temperatures.
Hybrid Approaches for Special Ingredients
For beers with significant portions of specialty grains, some commercial brewers are adopting hybrid approaches:
- Mash base malts at lower temperatures (148°F) for high fermentability
- Mash specialty malts separately at higher temperatures (158°F) to maximize flavor extraction
- Combine both mashes for the remainder of the brewing process
New Belgium Brewing uses this technique for some of their specialty beers, allowing them to create complex malt character without excessive sweetness.
Diastatic Power Considerations
Diastatic power—a measure of a malt's enzymatic potential—has become an important consideration for modern brewers pushing the boundaries with adjunct-heavy recipes.
When working with high proportions of unmalted or specialty grains, you may need to adjust your mash temperature to account for reduced enzymatic potential. Briess Malt & Ingredients recommends using slightly lower mash temperatures (2-3°F lower than normal) when working with low-enzyme grists to ensure adequate conversion.
Style-Specific Mash Temperature Recommendations
Here are specific mash temperature recommendations for popular beer styles, based on my experience and conversations with professional brewers:
New England IPA (NEIPA)
Recommended Range: 152-156°F (66.7-68.9°C)
NEIPAs benefit from a slightly higher mash temperature to promote body and mouthfeel that supports the style's characteristic juicy profile. This helps create the soft, pillowy texture that complements the fruity hop character.
As Scott Janish, author of The New IPA: Scientific Guide to Hop Aroma and Flavor, notes: "A higher mash temperature creates the rounded mouthfeel that consumers expect from the style, while supporting the perception of 'juiciness' from the hops."
West Coast IPA
Recommended Range: 148-151°F (64.4-66.1°C)
These IPAs traditionally showcase a drier finish that allows the hop bitterness to shine without being muddled by excessive malt sweetness. The lower mash temperature increases fermentability and reduces final gravity.
Oatmeal Stout
Recommended Range: 154-158°F (67.8-70.0°C)
The higher mash temperature preserves the silky mouthfeel contributed by oats while ensuring sufficient body and residual sweetness to balance the roasted character.
Belgian Tripel
Recommended Range: 144-148°F (62.2-64.4°C)
Despite being a strong beer, Belgian Tripels should finish quite dry. The low mash temperature creates highly fermentable wort that allows the yeast to attenuate fully, resulting in a deceptively drinkable high-alcohol beer.
Munich Helles
Recommended Range: 150-152°F (65.6-66.7°C)
This clean lager requires a moderate mash temperature to achieve the subtle balance between malt character and drinkability. Going too high creates excessive sweetness, while going too low eliminates the style's characteristic subtle malt character.
Measuring Success: Evaluating Your Mash Temperature Control
The ultimate test of your mash temperature control comes not during the brew day but during fermentation and tasting. Here are the key metrics to evaluate:
1. Conversion Efficiency
An ideal mash should convert virtually all starches to sugars within 60 minutes. You can check this with an iodine test:
- Place a drop of wort on a white plate
- Add a drop of iodine
- If the drop turns black/blue, starch remains unconverted
- If there's no color change, conversion is complete
If you're consistently failing the iodine test after 60 minutes, your mash temperature might be too high or too low for optimal enzyme activity.
2. Expected vs. Actual Final Gravity
Creating a log of your target mash temperatures and resulting final gravities helps build predictability into your brewing process. Over time, you'll develop a personal database of how your system and procedures translate mash temperature to final gravity.
In my brewing logs, I've observed that each degree Fahrenheit increase in mash temperature (within the saccharification range) results in approximately a 0.001 increase in final gravity. This relationship isn't perfectly linear, but it provides a useful rule of thumb.
3. Sensory Evaluation
Technical measurements are valuable, but your palate is the ultimate judge. Develop a formal tasting protocol that evaluates:
- Body/mouthfeel (thin, medium, full)
- Perceived sweetness
- Finish (dry, balanced, sweet)
- Overall balance
The Beer Judge Certification Program (BJCP) provides excellent guidelines for sensory evaluation that can help you assess how effectively your mash temperature control is achieving your desired beer characteristics.
Temperature as a Creative Tool
Mash temperature control is far more than a technical necessity—it's a creative tool that allows brewers to shape beer character with remarkable precision. By understanding the science behind mash temperature effects and applying careful control techniques, you can create dramatically different beers from identical ingredients.
Whether you're brewing a bone-dry Brut IPA that finishes at 1.002 or a luscious Imperial Stout with a substantial 1.020 final gravity, mastering mash temperature puts you in control of your beer's destiny. Small adjustments—sometimes just a few degrees—can transform a good beer into an exceptional one.
The next time you brew, consider treating mash temperature as the critical design choice it truly is. Experiment with temperatures a few degrees higher or lower than your standard, keeping all other variables constant. The results might surprise you and open new dimensions in your brewing creativity.
About the Author:
Mark Kegman is a product tester and review expert who has evaluated homebrew equipment, fermentation tools, and beer gadgets for more than a decade. After working in quality control for several regional craft breweries, Mark now runs an independent brewing consultancy focusing on process optimization for small commercial breweries. His methodical approach to equipment testing and brewing technique refinement has made him a sought-after advisor for breweries looking to improve consistency and efficiency.