
Diving into no-boil raw ale brewing is a smart move for budget-conscious homebrewers, offering significant energy savings and a unique, full-bodied beer profile. By skipping the traditional boil, I’ve found it’s possible to craft delicious, safe beer by carefully managing mash temperatures, enzyme activity, and hop stand conditions to achieve pasteurization and desired bitterness.
| Metric | Target Value |
|---|---|
| Batch Size | 19 Liters (5 US Gallons) |
| Original Gravity (OG) | 1.052 |
| Final Gravity (FG) | 1.012 |
| Alcohol By Volume (ABV) | 5.2% |
| Bitterness (IBU) | 15-20 (Estimated from Hop Stand) |
| Color (SRM) | 5 |
| Mash Temperature | 68°C (154°F) |
| Hop Stand Temperature | 80-85°C (176-185°F) |
| Fermentation Temperature | 28-32°C (82-90°F) for Kveik |
| Brew House Efficiency | 75% |
The Allure of the No-Boil Raw Ale
When I first started dabbling with brewing beyond the traditional German Lagers and British Ales, I was looking for ways to cut corners without sacrificing quality. My initial foray into no-boil brewing was, honestly, a bit of a disaster. I underestimated the critical role of the hop stand and ended up with a beer that lacked any real hop character beyond a muted earthiness. It taught me a valuable lesson: “no-boil” doesn’t mean “no attention to detail.” It means *different* attention to detail. Over the years, I’ve refined my approach, learning how to leverage the inherent efficiencies and unique characteristics of this ancient brewing method to produce exceptionally flavorful beer on a budget. This raw ale technique, reminiscent of older Nordic farmhouse traditions, saves energy, reduces equipment wear, and produces a wonderfully hazy, full-bodied beer that’s far from a compromise.
The Math Behind Your No-Boil Brew
Understanding the underlying calculations is paramount for consistent results, especially when deviating from conventional methods. Here’s how I approach the numbers for my no-boil raw ale.
Grain Bill Formulation
For a 19-liter (5 US Gallon) batch targeting an OG of 1.052, with a 75% brewhouse efficiency, my typical grain bill looks like this:
| Grain | Weight (kg) | Weight (lbs) | Percentage | Estimated PPG (Gravity Units per Pound per Gallon) |
|---|---|---|---|---|
| Pale Malt (e.g., Maris Otter, Pilsner) | 4.5 kg | 9.9 lbs | 90% | 36 |
| Flaked Oats | 0.5 kg | 1.1 lbs | 10% | 30 |
| Total | 5.0 kg | 11.0 lbs | 100% |
Mash Water & Sparge Calculations
For a single infusion mash, I typically aim for a mash ratio of 3.0 liters of water per kilogram of grain (approx. 1.5 quarts/lb). This ensures good extraction without excessive thinning.
- Mash Water Volume: 5.0 kg * 3.0 L/kg = 15 Liters (approx. 4.0 US Gallons)
- Sparge Water Volume: To reach a final batch size of 19 Liters, accounting for grain absorption (approx. 1.0 L/kg or 0.125 US Gallon/lb) and dead space.
- Grain absorption: 5.0 kg * 1.0 L/kg = 5.0 Liters.
- Pre-fermentation volume target (post-mash tun loss, kettle trub): I usually aim for around 20-21 Liters to account for losses.
- Total water required: 20.5 Liters (Target Pre-Ferment) + 5.0 Liters (Grain Absorption) = 25.5 Liters (approx. 6.7 US Gallons).
- Sparge water: 25.5 Liters (Total) – 15 Liters (Mash Water) = 10.5 Liters (approx. 2.7 US Gallons).
Gravity and ABV Calculation
The standard formula for ABV is simple and reliable:
ABV = (OG - FG) * 131.25
Using my target values:
ABV = (1.052 - 1.012) * 131.25 = 0.040 * 131.25 = 5.25%
Hop Bitterness (IBU) – No-Boil Context
In no-boil brewing, hop utilization for bitterness (isomerization of alpha acids) is significantly lower than in a traditional boil. IBU calculations become more estimations based on hop stand temperature and duration. I don’t rely on standard IBU formulas here. Instead, I approach it experimentally, knowing that a 20-minute hop stand at **80-85°C (176-185°F)** with moderate alpha acid hops (like Fuggle or East Kent Goldings) will yield a soft bitterness in the 15-20 IBU range, with a strong emphasis on aroma and flavor. I typically use around 60-90g (2-3 oz) of lower alpha acid hops for a 19-liter batch.
Water Profile Adjustment
For a clean, soft raw ale, I target a water profile similar to what I’d use for a British or Nordic ale, avoiding excessive mineral harshness. I start with reverse osmosis (RO) water or low-mineral tap water and build it up.
| Ion | Target (ppm) | Typical Addition (per 20L) |
|---|---|---|
| Calcium (Ca²⁺) | 50-70 | 5g Gypsum (CaSO₄·2H₂O) |
| Magnesium (Mg²⁺) | 5-15 | 1g Epsom Salt (MgSO₄·7H₂O) |
| Sodium (Na⁺) | 5-20 | — (monitor source water) |
| Chloride (Cl⁻) | 80-100 | 8g Calcium Chloride (CaCl₂) |
| Sulfate (SO₄²⁻) | 50-80 | 5g Gypsum (CaSO₄·2H₂O) |
I also target a mash pH of 5.2-5.4 for optimal enzyme activity and mouthfeel. Lactic acid is my usual go-to for small adjustments.
Step-by-Step Execution: Brewing Your No-Boil Raw Ale
This is where the magic happens, and precision ensures safety and quality.
1. Prepare Your Water
- Start with 25.5 Liters of brewing water. If using tap water, treat it with 1/4 Campden tablet per 20 Liters to neutralize chlorine/chloramines.
- Add your calculated brewing salts (e.g., 5g Gypsum, 1g Epsom, 8g Calcium Chloride) to the full water volume. Stir thoroughly.
- Heat 15 Liters of this treated water to achieve a mash-in temperature of 70-72°C (158-162°F) to hit your target mash temperature after grain addition.
2. Mill Your Grains
- Mill 5.0 kg (11.0 lbs) of your grain bill. For raw ale, I opt for a slightly finer crush than usual to maximize extraction efficiency in the absence of a long boil.
3. Mash In and Hold
- Carefully add the milled grains to the heated mash water, stirring vigorously to avoid dough balls.
- Once fully mixed, check the temperature. Adjust with small additions of hot or cold water until you reach precisely 68°C (154°F). This single-infusion temperature promotes a balanced sugar profile, leaving enough unfermentable sugars for body while providing fermentable ones for alcohol.
- Maintain 68°C (154°F) for 60 minutes. Insulate your mash tun well.
4. Mash Out / Pasteurization
This step is CRITICAL for raw ale as it halts enzyme activity and provides a pasteurization step. It also prevents wort from turning into glue during lautering due to enzyme activity with starches, especially from flaked grains.
- After 60 minutes, slowly raise the mash temperature to 78°C (172°F). You can do this by direct heat if using a kettle, or by adding boiling water if using an insulated mash tun. If adding boiling water, recalculate the added volume to avoid over-dilution, or ensure your initial strike water was calculated to allow for this. For my setup, I typically direct-fire slowly, stirring continuously for about 10 minutes to ensure even heating.
- Hold at 78°C (172°F) for 10-15 minutes. This is your primary pasteurization step, killing off most wild yeast and bacteria that might have survived the mash, and denaturing residual enzymes.
5. Lauter and Sparge
- Recirculate your wort until it runs clear, typically 15-20 minutes.
- Begin collecting your first runnings.
- As the grain bed becomes exposed, slowly add your remaining 10.5 Liters of sparge water, heated to 78°C (172°F). Maintain a slow, steady flow to optimize sugar extraction.
- Collect a total of approximately 20 Liters (5.3 US Gallons) of wort into your sanitized fermenter or a holding kettle.
- Take a gravity reading (pre-hop stand gravity). It should be close to your target OG of 1.052 if your efficiency is on point.
6. Hop Stand for Flavor and Aroma (and Further Pasteurization)
Since there’s no boil, this is where you get your hop character.
- If you collected wort into a holding kettle, bring it up to 80-85°C (176-185°F). If you collected directly into a fermenter, ensure it’s a fermenter suitable for hot liquids and has been sanitized.
- Add 60-90g (2-3 oz) of your chosen hop variety (e.g., East Kent Goldings, Fuggle, or a noble hop for a softer profile).
- Allow the hops to steep at 80-85°C (176-185°F) for 20 minutes. This temperature range is high enough to extract volatile oils and a little bitterness but low enough to preserve delicate aroma compounds and prevent excessive grassy flavors.
- After 20 minutes, remove hops (if using a hop bag) or prepare for cooling.
7. Chill Your Wort
Speed is essential here to prevent off-flavors and minimize infection risk.
- Rapidly chill the wort to your target fermentation temperature using an immersion chiller or counterflow chiller. For Kveik yeast, I aim for around 30-32°C (86-90°F). If using a traditional ale yeast, target 18-20°C (64-68°F).
- Once chilled, transfer the wort to your primary fermenter if it isn’t already there. Ensure everything that touches the chilled wort is meticulously sanitized. I always remind myself: “cold side is the infection side.”
8. Pitch Yeast and Ferment
- Aerate the wort thoroughly. This is crucial for healthy yeast. I typically use an aeration stone connected to an oxygen tank for 60 seconds, or vigorously shake the fermenter for 5 minutes.
- Pitch your yeast. For this raw ale, I highly recommend a Kveik strain (e.g., Voss Kveik, Hornindal Kveik) at a lower-than-normal pitch rate (e.g., 5g dry yeast for 19 Liters or 1/2 of a liquid Kveik pack) because of its high-temperature tolerance and robust performance.
- Maintain your desired fermentation temperature. For Kveik, I let it free rise to 30-32°C (86-90°F) and keep it there.
- Fermentation will typically be vigorous and quick with Kveik, often finishing in 3-5 days. For other yeasts, it may take 7-14 days.
- Monitor gravity with a hydrometer. Once gravity stabilizes (e.g., two identical readings 24 hours apart), your fermentation is complete. Aim for an FG of around 1.012.
9. Packaging
- Transfer your finished beer to a sanitized keg or bottle with priming sugar. If bottling, target 2.2-2.4 volumes of CO2.
- Condition for at least 1-2 weeks (for bottle conditioning) or 3-5 days (for forced carbonation in a keg) at serving temperature.
- Enjoy your unique, budget-friendly raw ale! For more advanced techniques and troubleshooting, visit BrewMyBeer.online.
Troubleshooting: What Can Go Wrong
Even with experience, brewing can throw curveballs. Here are common issues I’ve encountered with no-boil raw ales:
- Sourness/Infection: This is the biggest risk without a full boil.
- Cause: Inadequate sanitization post-mash out/hop stand.
- Solution: Be absolutely fanatical with sanitation on the cold side. Use a reliable sanitizer (e.g., Star San) and ensure contact time.
- Poor Attenuation (High FG): Beer tastes too sweet, or gravity doesn’t drop enough.
- Cause: Mash temperature too high (producing unfermentable sugars), unhealthy yeast, or insufficient aeration.
- Solution: Ensure precise mash temperature control at 68°C (154°F). Pitch healthy, viable yeast with proper aeration. If stuck, rouse the yeast or re-pitch with a more attenuative strain.
- Lack of Hop Aroma/Flavor: Beer tastes flat despite hop additions.
- Cause: Hop stand temperature too low, too short, or using old hops.
- Solution: Stick to the 80-85°C (176-185°F) for 20 minutes range. Use fresh, high-quality hops. Dry hopping can salvage some aroma if needed.
- Vegetal/Grassy Flavors: An unpleasant green, tea-like taste.
- Cause: Over-extraction of polyphenols, particularly from leaf hops, or extended contact time with hops at too high a temperature.
- Solution: Keep hop stand within recommended parameters. Consider using pellet hops which are less prone to this. Ensure proper sparging and avoid compacting the grain bed.
- Haze Issues Beyond Desired: While raw ale is often hazy, excessive, unappealing haze.
- Cause: High protein content, insufficient mash out, or chill haze.
- Solution: A good mash out at 78°C (172°F) helps. Using a little rice hulls in the mash can aid filtration. Some haze is inherent and part of the style, so embrace it to a degree.
Sensory Analysis: The Raw Ale Experience
A well-made no-boil raw ale offers a distinct sensory profile that sets it apart. It’s an experience I truly enjoy sharing.
Appearance
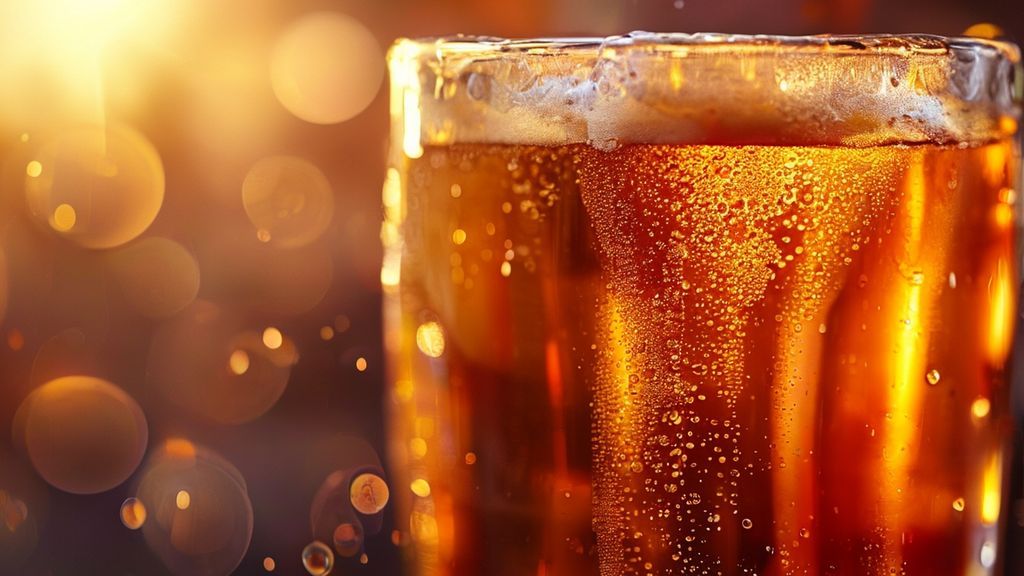
I always expect a vibrant, often opaque haze, ranging from a pale straw to a light golden hue, typical of beers that haven’t experienced a harsh boil. It’s often unfiltered and full-bodied, lacking the crisp clarity of a fully boiled beer but possessing an inviting, rustic charm. Lacing on the glass is usually thick and persistent.
Aroma
The aroma is a complex interplay. I find dominant notes of fresh grain, sometimes slightly bready or biscuity from the malt. The hop character is typically softer, more akin to a hop tea – bright, floral, citrusy, or even earthy, depending on the hops used, without the sharp, resinous edge often found in boiled IPAs. If Kveik is used, expect tropical fruit esters (mango, pineapple, orange) and sometimes a subtle phenolic spice. It’s often wonderfully clean, despite its rustic origins.
Mouthfeel
This is where raw ale truly shines for me. It’s almost always exceptionally full-bodied, often velvety and smooth, with a pronounced richness that belies its moderate ABV. The lack of a long boil means more proteins and dextrins remain, contributing to a luxurious, creamy texture. Carbonation is usually medium, lifting the richness without becoming thin or watery.
Flavor
On the palate, it mirrors the aroma, with a soft, rounded malt profile leading the charge. Expect a balanced sweetness, not cloying, but a pleasant, slightly malty backbone. The hop flavor is integrated, providing a gentle bitterness that balances the sweetness, rather than dominating it. I often pick up notes of tropical fruit or stone fruit from Kveik yeast, complementing the clean grain flavor. The finish is typically smooth, clean, and surprisingly refreshing, often with a lingering hint of the unique yeast character.
Frequently Asked Questions
Why choose a no-boil method over traditional brewing?
I choose no-boil primarily for its energy efficiency, which significantly reduces utility costs. It also preserves more volatile hop compounds and delicate malt character, leading to a unique flavor and aroma profile often described as ‘fresher’. Furthermore, the process is generally quicker on brew day, as you eliminate the 60-90 minute boil time. For homebrewers on a budget, this is a game-changer for regular brewing.
Is brewing a raw ale safe without boiling the wort?
Absolutely, when proper steps are followed. The “pasteurization” in raw ale comes from two critical stages: the mash out at 78°C (172°F) for 10-15 minutes and the subsequent hop stand at 80-85°C (176-185°F) for 20 minutes. These temperatures and durations are sufficient to denature most spoilage organisms and enzymes, making the wort safe for fermentation. Rigorous sanitization of all cold-side equipment is paramount to prevent post-pasteurization infection.
What type of yeast is best suited for no-boil raw ales?
From my experience, robust and highly attenuative yeast strains work best. Kveik yeasts (like Voss, Hornindal, or Ebbegarden) are excellent choices due to their ability to ferment cleanly at high temperatures (up to 35°C / 95°F), their robust nature, and their unique ester profiles that complement the raw ale character. Some traditional English ale strains can also work well, particularly those known for their flocculation and ability to handle more complex wort compositions. You can find more yeast insights at BrewMyBeer.online.
How does hop utilization and flavor differ in a no-boil raw ale compared to a boiled beer?
In a no-boil raw ale, hop utilization for bitterness (alpha acid isomerization) is significantly reduced. This means you’ll get a softer, more integrated bitterness, even with larger hop additions. The primary focus shifts to hop aroma and flavor, which are extracted during the hot hop stand. Volatile aromatic compounds are preserved more effectively, resulting in a more vibrant and nuanced hop character that leans towards fresh, herbaceous, or fruity notes rather than the sharp, resinous bitterness typically associated with long boils.