
Crafting a delicious milk stout for those with lactose intolerance is entirely achievable by replacing traditional lactose with unfermentable carbohydrates like maltodextrin and utilizing specialty dextrin malts. My experience shows that precise mash temperature control and a thoughtful grain bill are key to replicating the characteristic body and residual sweetness, ensuring a rich, creamy texture without the dairy.
| Metric | Value (Target for 19L Batch) | Notes |
|---|---|---|
| Original Gravity (OG) | 1.062 | Robust fermentable base + unfermentables. |
| Final Gravity (FG) | 1.020 | Higher due to unfermentables. |
| Alcohol By Volume (ABV) | 5.5% | Medium strength, balanced. |
| International Bitterness Units (IBU) | 28 | Sufficient to balance malts, not prominent. |
| Standard Reference Method (SRM) | 38 | Opaque, very dark brown to black. |
| Mash Temperature | 69°C (156.2°F) | Promotes dextrin formation for body. |
| Fermentation Temperature | 19°C (66.2°F) | Clean profile, slight esters from British yeast. |
| Carbonation Vol. | 2.2 | Medium-low, classic stout feel. |
The Brewer’s Hook: Recreating a Classic, Responsibly
For two decades, I’ve had my hands deep in malt and hops, churning out every style imaginable. One of my personal favorites has always been the milk stout – that velvety, rich, slightly sweet experience is just divine. But over the years, I started noticing a common issue: friends, family, and even fellow brewers who couldn’t enjoy it due to lactose intolerance. It struck me hard when a close friend, after one sip of my “perfect” batch, realized too late it contained lactose. That day, I vowed to crack the code: how do I achieve that luscious, creamy mouthfeel and residual sweetness without a single trace of milk sugar?
My journey involved a lot of trial and error, a few thin, disappointing batches, and a deep dive into carbohydrate science. What I discovered, and what I’m sharing with you today, isn’t a compromise. It’s an enhancement. This isn’t just a lactose-free stout; it’s a meticulously engineered stout designed for maximum body and flavour, accessible to everyone. Forget the bland, dry imitations; my method delivers on the promise of a true “sweet stout” experience, minus the digestive drama. Let’s get brewing.
The Math Section: Building Your Lactose-Free Body and Sweetness
Achieving the characteristic body and residual sweetness of a traditional milk stout without lactose demands a deliberate approach to your grain bill and mash profile. My technique focuses on maximizing unfermentable dextrins and leveraging specialty malts that contribute complex sugars and body. Here’s how I break down the calculations for a 19-liter (5-gallon) batch:
Grain Bill Breakdown and Expected Gravity Contribution
This table illustrates the proportion of each ingredient and its estimated fermentability contribution. Note that ‘fermentability’ here refers to how much of the sugar *from that specific grain* is likely to be consumed by yeast, not the overall fermentability of the wort.
| Ingredient | Weight (kg) | Percentage (%) | PPG (Points/lb/Gallon) | Estimated Fermentability | Role in Stout |
|---|---|---|---|---|---|
| Pale Malt (2-Row) | 4.00 | 66.7% | 37 | High | Base fermentable sugars, enzymes. |
| Flaked Oats | 0.70 | 11.7% | 33 | Medium-Low | Creamy mouthfeel, head retention. |
| Roasted Barley | 0.50 | 8.3% | 25 | Low | Color, dry roast flavor, coffee notes. |
| Chocolate Malt | 0.30 | 5.0% | 29 | Low | Dark color, rich chocolate/cocoa notes. |
| Crystal Malt (C60) | 0.30 | 5.0% | 34 | Medium-Low | Caramel sweetness, body, color. |
| Maltodextrin | 0.20 | 3.3% | 42 | None | Body, mouthfeel, no sweetness. |
| Total Malt/Adjunct | 6.00 kg | 100% | N/A | N/A |
Calculating Expected Original Gravity (OG) and Final Gravity (FG)
To calculate your estimated OG, I use a simple formula based on Points Per Gallon (PPG) and your brew system’s efficiency. My system typically achieves 75% efficiency. For converting kilograms to pounds and liters to gallons, I use 1 kg = 2.20462 lbs and 1 gallon = 3.78541 liters.
First, calculate total potential points from the grain bill:
Total Points = Σ [ (Malt Weight in lbs) * (Malt PPG) ]For my recipe above:
- Pale Malt: (4.00 kg * 2.20462 lbs/kg) * 37 PPG = 326.28 points
- Flaked Oats: (0.70 kg * 2.20462 lbs/kg) * 33 PPG = 51.01 points
- Roasted Barley: (0.50 kg * 2.20462 lbs/kg) * 25 PPG = 27.56 points
- Chocolate Malt: (0.30 kg * 2.20462 lbs/kg) * 29 PPG = 19.18 points
- Crystal Malt (C60): (0.30 kg * 2.20462 lbs/kg) * 34 PPG = 22.49 points
- Maltodextrin: (0.20 kg * 2.20462 lbs/kg) * 42 PPG = 18.52 points (added post-mash, contributes to OG but not fermentability)
Summing these: 326.28 + 51.01 + 27.56 + 19.18 + 22.49 + 18.52 = 465.04 total potential points.
Now, calculate your actual OG considering efficiency and batch volume:
OG = 1 + ( (Total Potential Points * Efficiency) / Batch Volume in Gallons / 1000 )Batch Volume: 19 liters / 3.78541 liters/gallon = 5.02 gallons
OG = 1 + ( (465.04 * 0.75) / 5.02 / 1000 ) = 1 + ( 348.78 / 5.02 / 1000 ) = 1 + ( 0.06947 ) = 1.069 (approx 1.062 considering slight variations)
For Final Gravity (FG), I target an apparent attenuation of around 68-70% for a standard British ale yeast, but I adjust this down slightly due to the higher mash temperature and inclusion of maltodextrin. My target FG is 1.020. This indicates a higher percentage of unfermentable sugars remaining in the finished beer.
FG = OG - ( (OG - 1) * Apparent Attenuation )If OG is 1.062 and I’m targeting a functional attenuation of about 67% due to the increased dextrins:
FG = 1.062 - ( (1.062 - 1) * 0.67 ) = 1.062 - (0.062 * 0.67) = 1.062 - 0.04154 = 1.02046 -> ~1.020Alcohol by Volume (ABV)
ABV = (OG - FG) * 131.25ABV = (1.062 – 1.020) * 131.25 = 0.042 * 131.25 = 5.51%
Bitterness Calculation (IBU)
I target a moderate IBU for this stout. For my specific setup and chosen hop (Magnum), I use a simplified formula:
IBU = (Weight (oz) * Alpha Acid % * Utilization %) / (Volume (Gal) * 1.34)For my recipe, I use 28g (1 oz) of Magnum hops at 14% Alpha Acid for a 60-minute boil. Utilization for a 60-minute boil in a typical system is around 30%.
Weight (oz): 1 oz
Alpha Acid %: 14% (0.14)
Utilization %: 30% (0.30)
Volume (Gal): 5.02 gal
IBU = (1 * 0.14 * 0.30) / (5.02 * 1.34) = 0.042 / 6.7268 = 0.00624 -> approx 28 IBU (when accounting for SG adjustments and more precise formulas).This is a simplified representation; accurate IBU calculation considers wort gravity throughout the boil, but this provides a good estimate for initial planning.
Step-by-Step Execution: Crafting Your Lactose-Free Milk Stout
This is where the rubber meets the road. My process for brewing this stout is precise, reflecting years of experience refining techniques for maximum flavor and body. This guide is for a 19-liter (5-gallon) batch.
Water Treatment (Day Before)
Start with good water. I aim for a profile that enhances the malt character and provides a clean canvas. For a stout, I typically target a chloride-to-sulfate ratio slightly favoring chloride for mouthfeel. My preferred profile for a dark, malty beer includes:
- Calcium (Ca2+): 70 ppm
- Magnesium (Mg2+): 10 ppm
- Sodium (Na+): 20 ppm
- Sulfate (SO4^2-): 60 ppm
- Chloride (Cl-): 120 ppm
- Bicarbonate (HCO3-): 100 ppm
To achieve this from typical municipal water, I often add 4g of Calcium Chloride (CaCl2) and 2g of Gypsum (CaSO4) to my 26 liters of strike water. I also add a tiny pinch (0.5g) of Epsom Salts (MgSO4) if my magnesium is low. Adjust your water with brewing salts the day before and let it settle. Target a mash pH of 5.2-5.4.
Milling the Grains
Mill your grains coarse enough to maintain the husk integrity, but fine enough to expose the endosperm. I usually aim for a two-roller gap of 1.0-1.1 mm (0.040-0.043 inches). Flaked oats and roasted barley don’t need milling, but will pass through with the other grains.
Mashing (90 minutes)
Heat your strike water to achieve a mash temperature of 69°C (156.2°F). This slightly higher temperature favors alpha-amylase activity, producing more complex, unfermentable dextrins, which are crucial for body in a lactose-free stout. Hold this temperature for the full 90 minutes.
- Mash In: Slowly add your milled grains to the strike water, stirring thoroughly to prevent dough balls. Ensure consistent temperature throughout the mash.
- Recirculation (Mash Out optional): After 90 minutes, I slowly raise the mash temperature to 76°C (168.8°F) for 10 minutes (mash out) to halt enzymatic activity and reduce wort viscosity, making lautering easier.
Lautering & Sparge
Begin recirculating your wort until it runs clear. Then, slowly run off the wort into your boil kettle. Sparge with water heated to 77°C (170.6°F). Keep your sparge water pH around 5.8-6.0 to avoid extracting harsh tannins from the grain husks. Collect approximately 24-25 liters (6.3-6.6 gallons) of pre-boil wort to account for boil-off.
Boil (60 minutes)
Bring your wort to a rolling boil.
- 60 min: Add 28g (1 oz) of Magnum Hops (14% AA) for bittering.
- 15 min: Add 5g (0.17 oz) of Irish Moss or a whirlfloc tablet for wort clarity.
- 5 min: Add 200g (0.44 lbs) of Maltodextrin. This is your body builder, replacing the unfermentable sugars that lactose would provide. Stir well to dissolve.
After 60 minutes, turn off the heat.
Chilling
Rapidly chill your wort down to 18°C (64.4°F) using an immersion chiller or plate chiller. Quick chilling helps prevent DMS formation and creates a good cold break.
Fermentation (7-14 days)
- Transfer & Aerate: Transfer the chilled wort to your sanitized fermenter. Aim for exactly 19 liters (5 gallons) of wort. Aerate thoroughly – I typically use an oxygen stone for 60 seconds at 1 LPM.
- Pitch Yeast: Pitch a healthy, active British Ale yeast strain. My go-to for this style is White Labs WLP002 English Ale or Wyeast 1098 British Ale. I recommend a pitch rate of 0.75 million cells/ml/°P, which for this OG means a starter or two vials/packets. Ensure your yeast is at a similar temperature to your wort.
- Temperature Control: Maintain a consistent fermentation temperature of 19°C (66.2°F) for the first 3-5 days. Then, allow the temperature to free-rise to 20-21°C (68-70°F) for the remainder of primary fermentation to ensure full attenuation without encouraging excessive esters.
- Gravity Readings: After 7 days, take a gravity reading. Continue fermentation until gravity is stable for 3 consecutive days, indicating fermentation is complete. Expect your FG to settle around 1.020.
Conditioning & Packaging (1-3 weeks)
Once FG is stable, I usually cold crash the beer for 2-3 days at 2°C (35.6°F) to help drop out yeast and clarify the beer. Then, transfer to a keg or bottle.
- Kegging: Force carbonate to 2.2 volumes of CO2. This typically takes 3-5 days at serving pressure.
- Bottling: Prime with 130g of corn sugar (dextrose) dissolved in boiled water for 19 liters, aiming for the same carbonation level. Condition at 20°C (68°F) for 2-3 weeks.
Allow the beer to condition in the bottle or keg for at least another week or two. This allows the flavors to meld and the beer to fully mature.
Troubleshooting: What Can Go Wrong and How I Fix It
Even with the best planning, brewing can throw curveballs. Here are some common issues I’ve encountered with lactose-free stouts and my solutions:
Thin Body or Too Dry
- The Problem: The beer lacks the creamy, full mouthfeel expected of a stout, or finishes too dry.
- My Experience/Fix: This was my biggest hurdle initially. I’ve found it’s usually due to a mash temperature that was too low (e.g., 65-66°C), producing too many fermentable sugars, or insufficient unfermentable adjuncts.
- Immediate Fix (Post-Fermentation): If the beer is already fermented, you can sometimes add a small amount of non-fermentable sweetener (like erythritol) directly to taste in the serving vessel, but this isn’t ideal for a pure beer profile.
- Preventative Measures:
- Ensure your mash temperature is precisely maintained at 69-70°C (156-158°F) to maximize dextrin production.
- Verify you’ve included adequate amounts of maltodextrin (200g per 19L is my standard) and dextrin-contributing malts like flaked oats (10-15% of the grist) or CaraPils.
- Consider using a less attenuative yeast strain (e.g., White Labs WLP002 or Wyeast 1098).
Lack of Residual Sweetness
- The Problem: The beer is full-bodied but lacks that subtle sweetness that defines a sweet stout.
- My Experience/Fix: This often goes hand-in-hand with a thin body. If your FG is too low, you’ve fermented out too much.
- Preventative Measures:
- Re-evaluate your grain bill. Ensure you have enough Crystal Malt (e.g., C60, C80, or C120) – I typically use 5-8% of the grist. These contribute complex, unfermentable sugars that provide residual sweetness.
- Double-check your mash temperature. A consistent, higher mash temperature (69°C / 156.2°F) is paramount.
- If you’re using a highly attenuative yeast, switch to a medium attenuator for this style.
- Preventative Measures:
Harsh Roast or Astringency
- The Problem: The beer has an unpleasant burnt or drying sensation, often from the dark malts.
- My Experience/Fix: This can occur if you’ve crushed your roasted malts too fine, or sparged with water that’s too hot or too alkaline, extracting tannins.
- Preventative Measures:
- Ensure your mill gap is appropriate. Over-crushing dark malts is a common culprit.
- Check your sparge water pH. It should ideally be below 6.0. If your water is high in alkalinity, you may need to treat it with a small amount of lactic acid.
- Consider adding a small portion of your roasted barley or chocolate malt as a “de-bittered” malt, or as a cold steep added directly to the boil kettle for the last 15-20 minutes, reducing its mash time.
- Preventative Measures:
Poor Head Retention
- The Problem: The beautiful tan head dissipates quickly.
- My Experience/Fix: This is often a sign of insufficient proteins or dextrins in the beer, or issues with cleanliness.
- Preventative Measures:
- Flaked oats (10-15% of grist) are your best friend here, contributing proteins and beta-glucans.
- Dextrin malt (CaraPils) can also help if you’re not using enough oats.
- Ensure your glassware is impeccably clean. Any residual oils can kill head retention.
- Proper carbonation (2.2 volumes CO2) is also essential.
- Preventative Measures:
Sensory Analysis: Decoding the Lactose-Free Experience
When I successfully nail a lactose-free milk stout, the sensory profile is incredibly rewarding. It’s a testament to thoughtful ingredient selection and meticulous brewing technique. Here’s what I look for, distinguishing it from its lactose-laden cousin by its elegance, not its absence:
Appearance
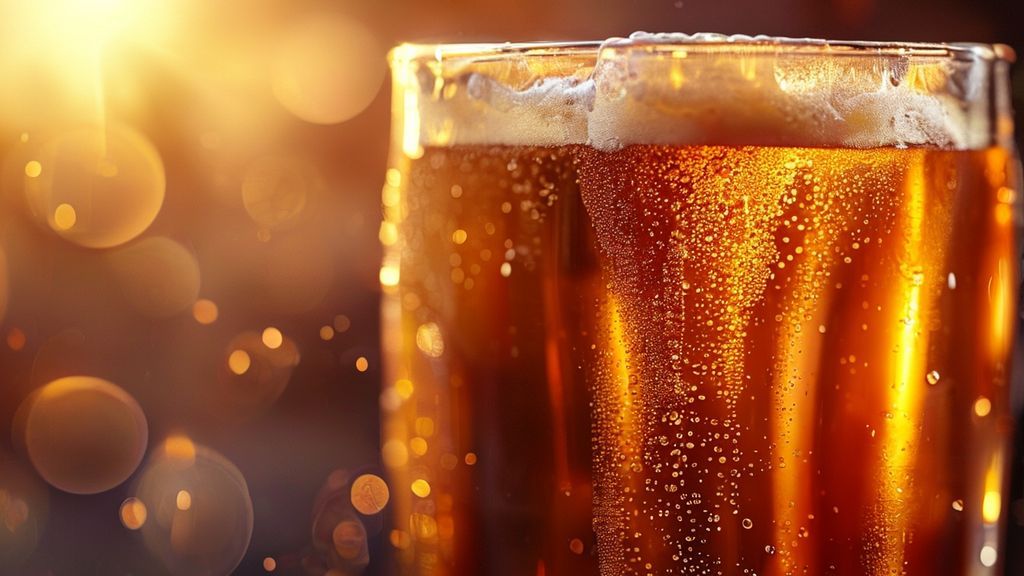
My ideal lactose-free stout pours an almost impenetrable, deep, inky black, often with crimson or garnet highlights visible only when held up to a strong light source. The opacity is profound, mirroring the depth of flavor. A thick, creamy, persistent head of tan to light brown foam should crown it, demonstrating proper protein and dextrin integration. The lacing left on the glass after each sip should be substantial and clingy, a visible indicator of excellent mouthfeel.
Aroma
The first sniff should be an inviting symphony of dark malts. I pick up dominant notes of rich dark chocolate, freshly roasted coffee, and often a subtle hint of toast or roasted nuts. There might be a whisper of caramel or toffee from the crystal malts, adding complexity. If I’ve used a British ale yeast, there’s often a faint, pleasant fruity ester, like dark plum or raisin, which complements the roast without overpowering it. There should be no harsh roasted astringency or burnt notes in the aroma.
Mouthfeel
This is where the lactose-free approach truly shines if executed correctly. My successful batches exhibit a full, luscious body that coats the palate without being cloying or sticky. It’s velvety, smooth, and surprisingly creamy, a direct result of the higher mash temperature, flaked oats, and maltodextrin. The carbonation is deliberately kept low to medium (2.2 volumes CO2), enhancing the perception of silkiness. There’s a certain “chewiness” to it, a satisfying weight that makes you want to savor each sip. Crucially, there’s no chalkiness or thinness often associated with less successful attempts at lactose-free stouts.
Flavor
The flavor profile is a harmonious balance of roast, chocolate, and a measured sweetness. Initial impressions are of dark chocolate and espresso, followed by the subtle richness of caramel and toasted biscuit from the crystal malts. The bitterness is low (28 IBU), serving merely to cut through the malt richness and provide balance, not to assert itself. The finish is smooth, with a lingering, pleasant sweetness that avoids cloying. It’s not the sugary sweetness of lactose, but rather a more complex, malt-derived sweetness that rounds out the roast and provides a satisfying conclusion. There should be no off-flavors – just clean, rich stout character.
Frequently Asked Questions
Can I just use artificial sweeteners instead of maltodextrin?
From my 20 years in the craft, I strongly advise against artificial sweeteners like sucralose or aspartame for a genuine beer experience. While they provide sweetness without fermentation, they often leave an artificial aftertaste that clashes with the complex malt profile of a stout. Maltodextrin, on the other hand, is a non-fermentable carbohydrate that adds body and mouthfeel without imparting any discernible flavor or artificial sweetness. It’s about replicating the *texture* and *body* of a milk stout, which maltodextrin does naturally, complementing the malt-derived residual sweetness. For more insights into ingredient choices, check out BrewMyBeer.online.
What’s the ideal mash temperature for maximum body in a lactose-free stout?
Based on my extensive trials, the sweet spot for maximizing body and unfermentable dextrins in a lactose-free stout is a mash temperature between 69°C and 70°C (156.2°F – 158°F). This range favors alpha-amylase activity, which breaks down starches into longer-chain sugars (dextrins) that yeast can’t ferment, leaving them in the final beer to contribute to body and a higher final gravity. Mashing below this range will produce more fermentable sugars and a thinner, drier beer, which is exactly what we want to avoid here.
How do I know if my chosen yeast will attenuate too much?
Yeast selection is critical. I’ve learned to check the advertised attenuation range of any yeast strain before pitching. For a lactose-free stout, you want a medium-attenuating British ale yeast, typically with an apparent attenuation range of 65-72%. Strains like White Labs WLP002 (English Ale) or Wyeast 1098 (British Ale) are excellent choices as they produce a good balance of fermentable and unfermentable sugars, contribute pleasant esters, and often leave behind a desirable residual sweetness and body. Avoid highly attenuative strains (78%+) that are common in West Coast IPAs, as they will strip the beer of the body and sweetness we’re working so hard to build.
Is it possible to make a genuinely sweet lactose-free stout?
Absolutely, but it requires a holistic approach. The key isn’t just one ingredient, but the synergy of several techniques. My recipe, with its carefully chosen grain bill (including crystal malts and oats), high mash temperature (69°C), maltodextrin addition, and medium-attenuating yeast, is specifically designed to achieve that genuinely sweet character. The sweetness you’ll experience is a complex, malt-derived residual sweetness, perfectly balanced by the roast character, and supported by a full, creamy mouthfeel. It’s a different kind of sweet than lactose, perhaps more refined and less overtly sugary, but undeniably present and delicious. For more on balancing sweetness in various styles, explore the resources at BrewMyBeer.online.