
Brewing a coffee stout with beans from the renowned coffee-producing regions of Chikmagalur and Coorg offers distinct flavor profiles. Chikmagalur beans lend rich chocolate and nutty notes, while Coorg varieties introduce brighter, fruitier acidity. Mastering precise coffee extraction, contact time, and temperature control ensures a balanced, complex stout that truly showcases these unique bean characteristics.
| Metric | Chikmagalur Stout | Coorg Stout |
|---|---|---|
| Original Gravity (OG) | 1.068 | 1.070 |
| Final Gravity (FG) | 1.018 | 1.019 |
| Calculated ABV | 6.56% | 6.70% |
| SRM (Color) | 38 | 39 |
| IBU (Bitterness) | 40 | 42 |
| Mash Temperature | 68°C (154.4°F) | 68°C (154.4°F) |
| Fermentation Temp | 18°C (64.4°F) | 18°C (64.4°F) |
| Coffee Addition Rate | 150g / 20L (cold brew) | 120g / 20L (cold brew) |
| Coffee Contact Time | 36 hours | 24 hours |
When I first ventured into brewing coffee stouts, my primary mistake wasn’t in the beer recipe itself, but in the coffee addition technique. I’d simply dump coarsely ground beans directly into the fermenter, thinking “more contact, more flavor.” The result? Often a harsh, tannic bitterness that obscured the delicate nuances of the beans. My pivotal lesson came after ruining a batch brewed with some exceptional beans from these verdant coffee-producing areas: cold extraction is paramount. It pulls the aromatic oils and soluble solids without the aggressive acids and unwanted bitterness hot water extracts. It’s a game-changer, allowing the true character of the Chikmagalur and Coorg beans to shine, transforming a good stout into an extraordinary one.
The Great Coffee Bean Divide: Chikmagalur vs. Coorg
For years, I’ve experimented with various coffee beans in my stouts, searching for that perfect symbiosis. It wasn’t until I started focusing on specific origins, particularly those from these rich coffee-growing regions, that I unlocked new dimensions of flavor.
Chikmagalur Coffee: The Robust Foundation
Chikmagalur beans, often grown at slightly lower altitudes, tend to be more robust and earthy. My experience consistently reveals prominent chocolate, toasted nut, and sometimes subtle spice notes. They often have a lower perceived acidity, making them an ideal candidate for integration into a darker, richer stout where you want to emphasize a harmonious, grounding coffee presence. I find they meld seamlessly with the roasted malts, enhancing the perception of chocolate and providing a comforting, full-bodied coffee character without overwhelming the base beer.
Coorg Coffee: The Bright Counterpoint
Coorg beans, frequently from higher elevations, typically present a brighter, more complex profile. When I brew with Coorg, I consistently pick up on fruity notes—think citrus peel, dark berries, or even a wine-like acidity. They tend to have a more pronounced, vibrant acidity and a lighter body compared to Chikmagalur. In a stout, Coorg beans can cut through the beer’s inherent sweetness and roast, adding a layer of sophisticated brightness and an almost sparkling complexity that I find incredibly engaging. It’s a coffee that demands attention, providing a beautiful counterpoint to the stout’s darker elements.
The Math of the Brew: Recipe Calculations for a 20-Liter Batch
Precision in brewing starts with the numbers. I’ve formulated a robust base stout recipe that serves as an excellent canvas for both Chikmagalur and Coorg beans. This section details the grain bill and key calculations for a 20-liter (approx. 5.3-gallon) batch at 75% brewhouse efficiency. Remember, your efficiency might vary, so adjust accordingly.
Grain Bill Breakdown (Percentage & Kilograms)
| Malt Type | Percentage | Weight for 20L (kg) | Lovibond (SRM equiv.) |
|---|---|---|---|
| Pale Malt (e.g., Maris Otter) | 65.0% | 3.90 kg | 3L |
| Flaked Oats | 10.0% | 0.60 kg | 1L |
| Crystal Malt (60L) | 8.0% | 0.48 kg | 60L |
| Chocolate Malt | 7.0% | 0.42 kg | 350L |
| Roasted Barley | 5.0% | 0.30 kg | 500L |
| Black Patent Malt | 5.0% | 0.30 kg | 500L+ |
| Total | 100.0% | 6.00 kg |
Manual Calculation Guide
- Target Original Gravity (OG): For 6.0 kg of grain at 75% efficiency for 20L, my target OG is around 1.068. I achieve this by ensuring my mash temperature and sparge volume are dialed in.
- Approximate Final Gravity (FG): With a typical attenuating yeast (e.g., US-05, WLP001), I expect an FG between 1.018-1.020.
- Alcohol by Volume (ABV): My preferred formula for quick estimation is ABV = (OG – FG) * 131.25.
- For Chikmagalur Stout: (1.068 – 1.018) * 131.25 = 0.050 * 131.25 = 6.56% ABV.
- For Coorg Stout: Assuming a slightly higher OG of 1.070 and FG of 1.019 (as per my Brew Sheet for a slightly denser body to balance the brighter coffee): (1.070 – 1.019) * 131.25 = 0.051 * 131.25 = 6.70% ABV.
- Bitterness (IBU): I target around 40 IBU for this stout, using Magnum hops for a clean bitterness that doesn’t clash with the coffee.
- 60-minute addition: 20g Magnum (14% AA) provides ~36 IBU.
- 10-minute addition: 10g Fuggle (4.5% AA) provides ~4 IBU (for a hint of earthy aroma).
- Note: IBU calculation is complex and dependent on hop utilization, wort gravity, and boil vigor. I rely on brewing software for precise numbers, but this provides a good approximation.
- Mash Water Volume: I generally use a 2.8 L/kg grist ratio for my primary mash. For 6.0 kg of grain, that’s 6.0 kg * 2.8 L/kg = 16.8 liters of strike water. I adjust this slightly for my equipment’s dead space.
Step-by-Step Execution: Brewing Your Coffee Stout
This is my tried-and-true method for brewing this base stout, with critical notes on integrating the coffee. Consistency is key, and I’ve refined these steps over many brews.
- Water Treatment (Pre-Brew Day): My target water profile for stouts aims for a residual alkalinity of around 150-200 ppm CaCO3. I typically add 5g Calcium Chloride and 3g Magnesium Sulfate to my 25 liters of total brewing water (mash + sparge) to enhance malt character and provide necessary yeast nutrients. Check your water report and adjust accordingly.
- Milling the Grains: Mill your 6.0 kg of grains to a medium-fine crush. I look for minimal flour and intact husks. This ensures good extraction without a stuck mash.
- Mash In: Heat your strike water to 73°C (163.4°F) to hit your target mash temperature. Slowly add the milled grains, stirring thoroughly to eliminate dough balls. My goal is a consistent mash temperature of 68°C (154.4°F). Maintain this temperature for 60 minutes. This temperature promotes a fuller body and helps retain some unfermentable sugars, which balance the coffee.
- Mash Out: After 60 minutes, raise the mash temperature to 76°C (168.8°F) for 10 minutes. This stops enzymatic activity and reduces wort viscosity for better sparging.
- Lautering and Sparge: Begin recirculating until your wort runs clear. Then, slowly sparge with water heated to 77°C (170.6°F). Collect approximately 26-27 liters of pre-boil wort. My target pre-boil gravity is usually around 1.058.
- Boil: Bring the wort to a vigorous boil.
- 60 minutes: Add 20g Magnum hops (14% AA).
- 10 minutes: Add 10g Fuggle hops (4.5% AA).
- 5 minutes: Add a yeast nutrient (e.g., 1/2 tsp Wyeast Beer Nutrient Blend).
- Flameout: Add a wort chiller and begin cooling.
Boil for a total of 60 minutes.
- Cooling and Transfer: Chill the wort rapidly to 17°C (62.6°F). Transfer the cooled wort to a sanitized fermenter, aiming for a final volume of 20 liters. Take an Original Gravity (OG) reading. My readings typically come in around 1.068-1.070.
- Pitching Yeast: Hydrate and pitch your chosen yeast. I consistently use SafAle US-05 or WLP001 California Ale Yeast for this style, pitching two packets (11.5g each) or a healthy starter for 20L. Maintain fermentation temperature at 18°C (64.4°F) for the primary fermentation phase.
- Primary Fermentation: Allow fermentation to proceed for 7-10 days, or until gravity is stable for 3 consecutive days.
- Coffee Preparation (During Fermentation): This is where the magic happens.
- Cold Brew Method: Grind your chosen coffee beans (Chikmagalur or Coorg) coarsely. For Chikmagalur, I use 150g per 20L. For Coorg, due to its brighter acidity, I often reduce it slightly to 120g per 20L to prevent over-extraction of sharp notes.
- Combine the coarse-ground coffee with 1.5 liters of cold, filtered, and boiled (then cooled) water in a sanitized vessel. Stir well.
- Steep in a refrigerator at 4°C (39.2°F). For Chikmagalur, I find 36 hours is ideal for deep chocolate-nut extraction. For Coorg, 24 hours is usually sufficient to capture its fruitiness without excessive tartness.
- After steeping, filter the cold brew concentrate through a coffee filter or fine mesh strainer to remove all solids. You should have approximately 1.2-1.3 liters of concentrate.
- Coffee Addition and Conditioning (Post-Fermentation):
- Once primary fermentation is complete and FG is stable (1.018-1.020), carefully rack the beer off the yeast cake into a secondary fermenter or directly into a purged keg.
- Add the cold brew concentrate directly to the beer. Gently stir to ensure even distribution. I like to let it sit for another 3-5 days in contact with the beer at fermentation temperature, allowing the flavors to meld.
- Packaging: Keg or bottle as usual. For bottling, prime with 140g dextrose (corn sugar) dissolved in 250ml boiled water for typical carbonation. Aim for 2.2-2.4 volumes of CO2. Allow for 2-3 weeks of conditioning in bottles at 20°C (68°F).
Troubleshooting: What Can Go Wrong
Even with meticulous planning, brewing can throw curveballs. Based on my two decades of experience, here are common pitfalls and how I address them:
- Harsh, Astringent Coffee Flavor: This is almost always due to hot extraction or over-steeping. If I get this, I know I either used hot water for my coffee or left it in contact with the beer too long. The fix? For future batches, strictly adhere to cold brew and monitor contact time diligently. If a current batch is too astringent, sometimes blending with an un-coffeed stout can save it, but it’s a hard flavor to remove.
- Weak Coffee Aroma/Flavor: Usually, I find this means insufficient coffee was used or the beans weren’t fresh. I always use freshly roasted (within 2-3 weeks) and freshly ground beans. If a batch tastes weak, I might make a small, very concentrated additional cold brew to add directly to the keg or bottling bucket, tasting as I go.
- Stuck Fermentation: If my gravity stalls above target FG, I first ensure the temperature is consistent. If not, I raise it slightly to 20°C (68°F) for a few days to rouse the yeast. If it’s still stuck, a fresh pitch of active yeast or a little yeast nutrient can sometimes kickstart it. Always check your mash temperature accuracy; a too-high mash can create unfermentable sugars.
- Sour or Off-Flavors: My number one suspect is always sanitation. Every piece of equipment that touches cooled wort or beer must be scrupulously clean and sanitized. If off-flavors appear, I review my cleaning regimen and sanitize everything with extra vigilance for the next brew.
- Chlorine/Chloramine Flavors: If my beer tastes like medicine or band-aids, I immediately suspect chlorine or chloramine in my brewing water. I always treat my water with Campden tablets (Potassium Metabisulfite) – 1/4 tablet per 20 liters of water at least an hour before mashing – to neutralize these compounds. This is a non-negotiable step for me now.
Sensory Analysis: The Brewmaster’s Tasting Notes
This is where the art meets the science. After careful brewing and conditioning, this stout offers a truly rewarding experience, whether you chose the Chikmagalur or Coorg path.
Appearance
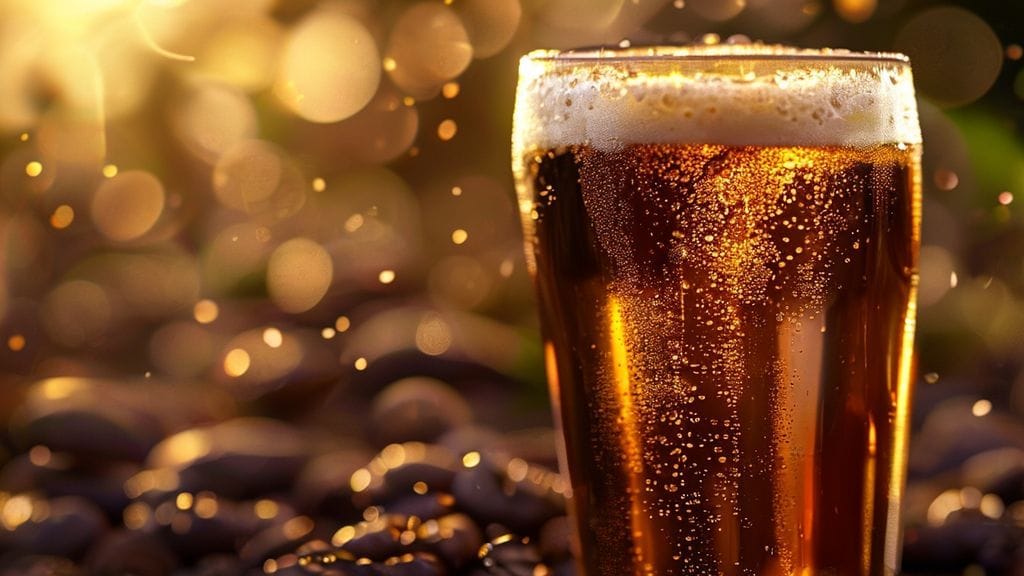
Both versions present a strikingly opaque, jet-black body with glints of deep ruby at the edges when held to light. A dense, creamy, persistent tan head forms upon pouring, lacing beautifully down the glass as it’s consumed. My target SRM for this base is around 38-40.
Aroma
- Chikmagalur Coffee Stout: Dominated by a rich, inviting bouquet of dark chocolate, roasted coffee beans, and hints of toasted hazelnut. There’s a subtle undertone of caramel and dark fruit from the malt bill, seamlessly blending with the coffee’s inherent sweetness. I often detect a faint earthy or spiced note, characteristic of Chikmagalur beans.
- Coorg Coffee Stout: The aroma is brighter and more complex. I pick up a vibrant citrus zest, dark berry (like blackcurrant or plum), and a distinct, almost wine-like acidity layered over the roasted malt and coffee base. The chocolate and roast are present but play a supporting role to the brighter, more nuanced coffee characteristics.
Mouthfeel
Regardless of the coffee used, this stout delivers a full, velvety mouthfeel thanks to the flaked oats and dextrins from the higher mash temperature. Carbonation is moderate (2.2-2.4 volumes CO2), providing a gentle prickle that lifts the flavors. There’s a pleasant warmth from the alcohol, and a balanced dryness on the finish that invites another sip. The slight acidity from the Coorg version can make its mouthfeel feel marginally crisper, which I find quite refreshing.
Flavor
- Chikmagalur Coffee Stout: The flavor mirrors the aroma, leading with a bold yet harmonious blend of decadent dark chocolate and freshly brewed coffee. Notes of toffee, dark bread crust, and a subtle roasted bitterness from the specialty malts provide complexity. The finish is long, dry, and clean, with the coffee and chocolate lingering beautifully. I find it incredibly comforting and cohesive.
- Coorg Coffee Stout: This version offers a more dynamic flavor journey. Initial sips reveal the robust stout character—roast, chocolate, and dark fruit—but it’s quickly lifted by the distinct fruity and tangy notes of the Coorg coffee. I often taste notes of orange peel, dried cherries, or even a subtle floral quality. The acidity is well-integrated, providing a bright counterpoint to the stout’s richness, leading to a complex, refreshing, and surprisingly clean finish. It’s a stout that keeps you exploring with each sip.
Frequently Asked Questions
Can I use espresso-ground coffee for cold brewing?
I strongly advise against it. Espresso-ground coffee is too fine and will result in over-extraction, leading to a harsh, bitter, and overly tannic cold brew. The fine particles are also very difficult to filter completely, leading to a muddy beer. Always use a coarse grind, similar to French press coffee, for cold brewing. This allows for optimal flavor extraction without introducing undesirable compounds. I’ve made this mistake myself, and the resulting beer was almost undrinkable.
What if I don’t have fresh roasted coffee beans from these specific regions?
While I highly recommend sourcing the specific beans to truly appreciate the distinct profiles, don’t let it stop you from brewing! The core stout recipe is solid. If you can’t get Chikmagalur or Coorg, look for single-origin, medium-dark roasted beans with tasting notes that appeal to you. For a Chikmagalur substitute, seek out beans with chocolate, nut, or caramel notes. For Coorg, look for brighter, fruitier, or more acidic profiles. The key is quality, freshness, and a cold brew extraction process. You can find more general coffee stout tips at BrewMyBeer.online.
Can I add the coffee beans directly to the mash or boil?
In my experience, adding coffee beans (or ground coffee) directly to the mash or boil is a recipe for disaster. The heat of the mash extracts undesirable tannins and astringency from the coffee, while boiling destroys delicate coffee aromatics and can also lead to harshness. I’ve tried it, and the results were consistently disappointing. The cold brew method, added post-fermentation, is the only technique I endorse for a clean, aromatic, and flavorful coffee stout. It’s the most controlled way to capture the true essence of the beans without their bitter baggage. For more comprehensive brewing guides and techniques, remember to visit BrewMyBeer.online.