
Spunding is an advanced natural carbonation technique that harnesses the CO2 produced during the final stages of fermentation. By sealing the fermenter and using a spunding valve to maintain a precise pressure, I trap volatile compounds while producing a finer, more stable carbonation. This method eliminates the need for post-fermentation CO2 injection, resulting in superior head retention, a creamy mouthfeel, and a cleaner flavor profile in my beers.
| Metric | Recommendation/Typical Value | Notes |
|---|---|---|
| Fermenter Type | Pressure-rated Conical or Unitank | Must withstand target PSI |
| Target CO2 Volumes (V/V) | 2.2 – 2.8 V/V | Adjust based on beer style (e.g., Lager: 2.4-2.7, IPA: 2.2-2.5) |
| Spunding Start SG (Ale) | 1.010 – 1.006 (or 2-5 points above FG) | Crucial for yeast activity & sugar conversion |
| Spunding Start SG (Lager) | 1.012 – 1.008 (or 3-6 points above FG) | Allow for slower fermentation kinetics |
| Fermentation Temp (during spunding) | 18-22°C (Ale), 10-14°C (Lager) | Consistent temperature is paramount for pressure calculation |
| Typical Spunding Pressure | 10-25 PSI (0.69-1.72 Bar) | Depends on target V/V and temperature |
| Spunding Duration | 3-7 days (Ale), 7-14 days (Lager) | Until final gravity is stable and pressure holds |
| Estimated CO2 Scrubbing | ~1.5 – 2.0 V/V | Volume of CO2 generated before sealing fermenter |
When I first ventured into brewing, the idea of perfectly carbonated beer felt like chasing a mythical beast. Bottle conditioning was slow and inconsistent, and forced carbonation often left my beers with an artificial bite, a coarse bubble, or a frustrating lack of head stability. I remember one particular batch of dry-hopped IPA that tasted fantastic pre-carb, only to fall flat or gush uncontrollably after CO2 injection. It was maddening. That’s when I dug deep into the science of CO2 solubility and discovered spunding. My first naturally carbonated German pilsner, spunded to perfection, was a revelation. The fine, creamy head, the delicate lacing, the complete absence of that harsh carbonic tang – it convinced me this was the way. I’ve been refining my spunding technique for years, and now I’m sharing my accumulated knowledge to help you achieve that same level of carbonation mastery.
The Math of Natural Carbonation: Spunding Pressure Calculations
Spunding isn’t guesswork; it’s a precise application of Henry’s Law, which states that the amount of gas dissolved in a liquid is directly proportional to the partial pressure of that gas above the liquid. For homebrewers, this means correlating fermentation temperature, desired CO2 volumes, and the resulting pressure in the headspace.
Understanding Residual CO2
Even before you seal your fermenter, your beer already contains dissolved CO2 from the initial stages of fermentation. The amount of this “residual CO2” depends primarily on the temperature of the beer when it was unsealed. At atmospheric pressure (1.0 V/V at 0 PSI gauge), beer holds approximately 0.8 V/V of CO2 at 20°C. For accurate spunding, I always account for this. My typical approach is to assume 0.8-1.0 V/V is already dissolved at typical ale fermentation temperatures (18-22°C) when I set my spunding valve. For colder lager fermentations, this value can be slightly higher.
Calculating Target Spunding Pressure
The core of spunding success lies in setting the correct pressure on your spunding valve. This pressure depends on your desired CO2 volumes (V/V) and the temperature at which the beer will finish fermenting under pressure. I use a CO2 solubility chart or calculator to determine this. Below is a simplified table I often reference, assuming you want to achieve a total of 2.5 V/V CO2 in your finished beer, and approximately 0.8 V/V is already dissolved at fermentation temperature (meaning you need to generate an additional 1.7 V/V through pressure).
| Fermentation Temp (°C) | Required Pressure (PSI) for 2.5 V/V Total CO2 (approx.) | Required Pressure (Bar) for 2.5 V/V Total CO2 (approx.) | Notes (Assumes ~0.8 V/V residual) |
|---|---|---|---|
| 10 | 15-17 | 1.03-1.17 | Ideal for Lagers, precise temp control is key |
| 15 | 18-20 | 1.24-1.38 | Good for Kolsch, some Hybrids |
| 18 | 20-22 | 1.38-1.52 | Common Ale fermentation temp |
| 20 | 22-24 | 1.52-1.65 | Higher end of Ale fermentation |
| 22 | 24-26 | 1.65-1.79 | Higher temperature yields higher pressure |
Example Calculation: If I’m brewing an American Pale Ale and I want 2.4 V/V CO2, and my fermentation will finish at 20°C, I’d first account for the ~0.8 V/V already dissolved. This means I need to generate 1.6 V/V through spunding pressure. Looking at a detailed chart, for 1.6 V/V at 20°C, I’d need approximately 18-20 PSI (1.24-1.38 Bar) of headspace pressure.
Refining with Plato/Brix Data
For even greater precision, especially with high-gravity beers, some brewers track the CO2 generated per degree Plato (or Brix) fermented. Roughly, 1° Plato fermented generates 0.44g of CO2 per liter. This is largely theoretical for homebrew spunding, as the primary goal is capturing the *final* CO2 for desired V/V at a given temperature, not tracking cumulative production. My focus remains on the temperature/pressure relationship.
Step-by-Step Spunding Execution
This is where the rubber meets the road. Precision and sanitation are your best friends here.
Sanitation is Non-Negotiable: Before anything touches your fermenter, I ensure every component – the fermenter itself, airlock/blow-off arm, pressure relief valve (PRV), spunding valve, and gauge – is meticulously cleaned and sanitized. A little oversight here can lead to disaster, turning your perfectly spunded beer into an infected mess. I always use a no-rinse sanitizer, ensuring ample contact time.
Fermenter and Equipment Prep: You absolutely need a pressure-rated fermenter. This can be a stainless steel conical, a unitank, or even a robust plastic pressure fermenter. Never attempt spunding in a glass carboy. I connect my spunding valve directly to my fermenter’s gas post or an auxiliary port. My setup includes a dedicated spunding valve with a precise gauge (calibrated, if possible) and a separate PRV set to a slightly higher pressure than my target spunding pressure as a safety net. For most homebrew setups, a PRV set to 25-30 PSI (1.7-2.1 Bar) is sufficient for safety.
Primary Fermentation: Begin your primary fermentation as usual, ensuring good yeast health and proper temperature control. Let the krausen rise and fall, allowing the bulk of the initial, volatile CO2 to escape naturally. This “scrubs” away undesirable compounds. I typically wait until fermentation is about 75-85% complete, usually when the specific gravity is about 1.010-1.006 for ales, or 1.012-1.008 for lagers (2-5 points above your estimated final gravity). This is the critical window; too early, and you risk excessive pressure, yeast stress, and off-flavors; too late, and you might not have enough fermentable sugar left to generate the required CO2.
Attach and Set Spunding Valve: Once you hit your target SG, remove your airlock or blow-off hose and attach your sanitized spunding valve. Set the valve to your calculated target pressure (e.g., 20 PSI / 1.38 Bar if aiming for 2.5 V/V at 18°C). Ensure the connection is tight and leak-free. I often do a quick leak check with a spray of Star San solution.
Maintain Stable Temperature: This is paramount. Fluctuations in temperature will directly affect the pressure reading and CO2 solubility. I maintain my fermentation temperature precisely throughout the spunding phase using a temperature controller. If my beer is at 18°C when I set the valve, I keep it at 18°C until fermentation is complete and the carbonation is achieved.
Monitor Pressure and Fermentation: Over the next few days, the pressure inside the fermenter will gradually rise until it reaches the set point on your spunding valve. At this point, excess CO2 will escape through the valve. Simultaneously, I continue to take gravity readings (aseptically, of course) to confirm that fermentation reaches its final gravity (FG). The pressure should hold stable once FG is reached and the yeast has finished its work.
Conditioning and Absorption: Allow the beer to sit under pressure at fermentation temperature for an additional 3-7 days (ales) or 7-14 days (lagers) after FG is reached. This ensures the CO2 fully dissolves into the beer. For lagers, after this period, I slowly drop the temperature over a few days (lagering) while maintaining pressure. This cold conditioning aids in clarification and further CO2 absorption.
Carbonation Check: Once conditioning is complete, I transfer a small sample to a glass to assess carbonation, appearance, aroma, and flavor. If under-carbonated, I might increase the pressure slightly and give it another day or two. If over-carbonated, I can vent a small amount of pressure, but this is less ideal as it removes aromatic compounds.
What Can Go Wrong: Troubleshooting Spunding
Even with my experience, I’ve run into hiccups. Here’s a rundown of common issues and my solutions:
Under-Carbonated Beer:
- Leak in the System: This is the most common culprit. I meticulously check all connections, gaskets, and valve seats with soapy water (Star San solution works great) for bubbles indicating a leak. A tiny leak will prevent pressure from building.
- Insufficient Fermentable Sugars: If you spund too late, there might not be enough sugar remaining for the yeast to produce the necessary CO2 to hit your target pressure. My solution: add a small amount of priming sugar (e.g., 50g dextrose for a 20L batch) to kickstart CO2 production under pressure.
- Temperature Fluctuations: If the temperature drops significantly during spunding, the dissolved CO2 will remain in solution, but the headspace pressure will drop, leading to under-carbonation if you just rely on the gauge. Always maintain stable temperature.
- Incorrect Pressure Setting: Double-check your calculations and ensure your spunding valve gauge is accurate.
Over-Carbonated Beer:
- Too High Pressure Setting: The most obvious cause. Re-evaluate your desired V/V for the style and recalibrate your pressure setting.
- Faulty Spunding Valve/Gauge: A sticky valve or an inaccurate gauge can lead to over-pressurization. I periodically calibrate my gauges or have a known good one for comparison.
- Fermenting Too Warm Under Pressure: Higher temperatures require higher pressures for the same CO2 volumes. If your temperature spiked, your beer might have absorbed more CO2 than intended at your set pressure once it cools.
Off-Flavors (Especially Diacetyl):
- Spunding Too Early / Premature Cold Crash: If you seal the fermenter and crash cool too early, yeast might drop out before fully cleaning up diacetyl precursors. I always ensure the beer has reached its stable FG under pressure for at least 3-5 days (for ales) or longer (for lagers) at fermentation temperature before initiating any cold crashing. Diacetyl rests are still important, even with spunding.
- Yeast Stress: While spunding pressures are typically not high enough to severely stress yeast, extremely high pressures *could* inhibit yeast activity. This is rare for standard beer styles and typical spunding.
Krausen in Spunding Valve:
- Spunding Too Early / Aggressive Fermentation: If you attach the spunding valve when the krausen is still very active and high, it can clog the valve. My fix: use a blow-off tube initially and only switch to the spunding valve once the krausen has started to subside, usually a few points before target SG. Alternatively, use a “blow-off arm” that exits higher on the fermenter.
Sensory Analysis: The Spunding Difference
This is where spunding truly shines and sets your beer apart. My experiences consistently show distinct improvements:
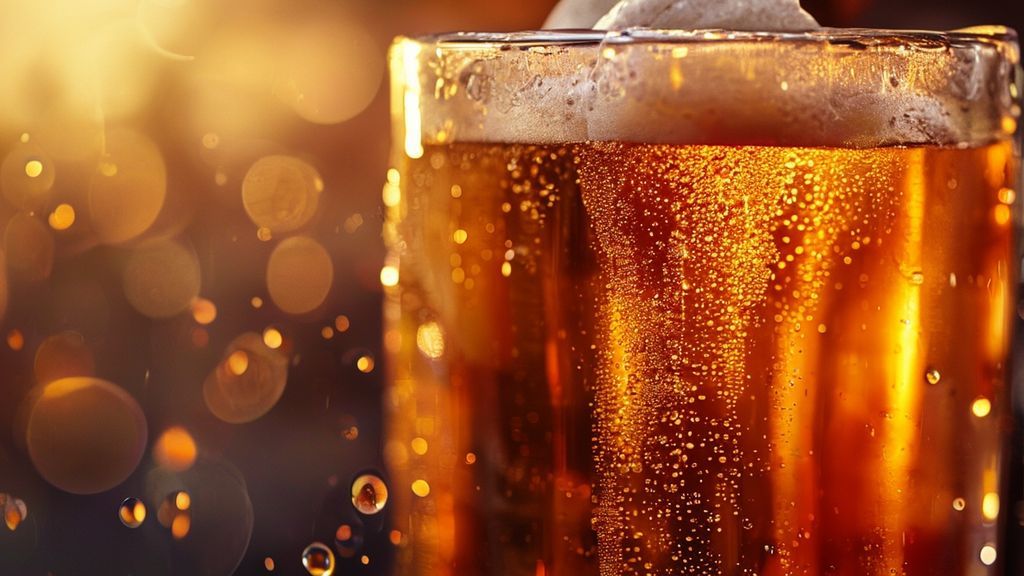
Appearance: I consistently observe a finer, denser bubble structure compared to force-carbonated beers. The head retention is markedly superior, forming a persistent, creamy cap that laces beautifully down the glass. The clarity can also be improved as the yeast remains under pressure for longer, aiding flocculation, especially during cold crashing.
Aroma: This is one of the most compelling aspects for me. The process of retaining naturally produced CO2 under pressure helps scrub certain volatile compounds, particularly some sulfur compounds (e.g., H2S from lagers). More importantly, it keeps delicate hop aromas and other nuanced fermentation esters within the beer, preventing them from blowing off during vigorous open fermentation or aggressive CO2 purging. My IPAs burst with fresher hop character when spunded.
Mouthfeel: The fine, effervescent bubbles contribute to a smoother, creamier, and often fuller mouthfeel. There’s a certain elegance to the texture that you just don’t get with coarser, forced carbonation. It feels more integrated with the beer’s body.
Flavor: The most significant improvement I’ve noticed is the complete absence of the “carbonic bite” often associated with rapidly forced carbonation. Spunded beers taste cleaner, rounder, and more naturally integrated. The natural CO2 acts as a gentle solvent, enhancing the overall flavor profile without introducing any harshness. Furthermore, the reduction of specific off-flavors, as mentioned in the aroma section, contributes to a purer, more defined flavor perception. For more insights into optimal flavor development, check out BrewMyBeer.online.
How long does spunding typically take to fully carbonate a beer?
The time required for spunding depends heavily on the beer style and temperature. For ales, once your target pressure is reached and stable, I usually allow an additional 3-7 days at fermentation temperature for full CO2 absorption. Lagers, due to their colder fermentation, can take longer, typically 7-14 days after reaching target pressure and before cold conditioning.
Can I spund in any fermenter?
Absolutely not. You MUST use a pressure-rated fermenter. This includes stainless steel conical fermenters, unitanks, and certain robust plastic fermenters designed for pressure. Never attempt to spund in glass carboys or standard plastic buckets, as they are not designed to withstand pressure and can explode, posing extreme safety risks. Safety first, always!
Does spunding impact yeast health or create off-flavors from pressure?
In my experience, typical spunding pressures (10-25 PSI / 0.69-1.72 Bar) do not negatively impact yeast health or create off-flavors. In fact, by keeping yeast active for longer under pressure, it can often lead to a cleaner fermentation profile due to better diacetyl reduction and scrubbing of sulfur compounds. The key is to spund at the correct stage, not too early, to avoid excessive pressure buildup that *could* theoretically stress yeast, though this is rare in practical homebrewing applications. For more technical guides on yeast health, visit BrewMyBeer.online.