
Hazy yeasts primarily lack flocculation due to specific genetic markers that impair the production and interaction of cell surface proteins (flocculins). This prevents yeast cells from aggregating and settling out effectively. My experience shows environmental factors like low calcium, hop acids, and high protein/polyphenol content further stabilize these colloidal suspensions, crucial for achieving persistent, desired turbidity in styles like NEIPAs.
| Characteristic | High-Flocculating Ale Yeast (e.g., Wyeast 1056) | Low-Flocculating Hazy Ale Yeast (e.g., Wyeast 1318) |
|---|---|---|
| Flocculation Rating (1-5, 5=high) | 4-5 (High) | 1-2 (Low) |
| Apparent Attenuation (%) | 73-77% | 72-76% |
| Optimal Fermentation Temp (°C) | 18-22°C | 19-23°C |
| Ester Production | Medium | High (Tropical) |
| Diacetyl Production | Low | Low-Medium (requires proper diacetyl rest) |
| Typical Haze Contribution | Minimal (clears well) | Significant (persistent haze) |
The Brewer’s Hook: Embracing the Opaque Truth
For years, like many brewers, I was obsessed with clarity. My early batches of pale ale and lager were judged by how brilliantly clear they poured. I remember meticulously cold crashing, fining with gelatin, and even attempting rudimentary filtration, all in pursuit of that sparkling, translucent liquid. It was a badge of honor. Then, the haze craze hit, and I admit, I was skeptical. My instinct screamed “infection!” or “poor brewing practices!” when I first saw an intentionally cloudy beer. My biggest mistake was assuming flocculation was always a desirable yeast trait.
My journey into the world of turbid beers, particularly the rise of New England IPAs, forced a re-evaluation of everything I thought I knew about yeast behavior. I discovered that embracing low flocculation wasn’t a compromise; it was a deliberate choice, backed by sophisticated yeast genetics and brewing science. It opened up a whole new realm of flavor and mouthfeel. What I learned, through countless trials and detailed analysis, transformed my brewing approach. Now, I understand that stable haze is a complex interplay of biology, chemistry, and physics, and harnessing it requires a deep understanding of why certain yeasts simply refuse to drop out of suspension. Let’s delve into the science behind the beautiful cloudiness that’s changed the beer world, and how you can master it for your own brews on BrewMyBeer.online.
The Math of Haze: Quantifying Turbidity and Yeast
Achieving stable turbidity isn’t guesswork; it’s a calculated art. Understanding the underlying math helps predict and control haze, whether you’re aiming for it or trying to avoid it. My approach integrates yeast pitching rates with an appreciation for colloidal stability.
Manual Calculation Guide for Haze Management
| Metric | Description and Formula/Methodology | Hazy Beer Target |
|---|---|---|
| Yeast Pitching Rate (Cells/mL) |
Calculated based on desired cell density, wort gravity, and yeast viability. Formula (approximate): Yeast Cells (billions) = (Desired Cells/mL * Volume in mL) / (1,000,000,000 cells/billion) Example: For 20L (20,000 mL) at 1.060 OG requiring 0.75 million cells/mL/°P (or 1.875M cells/mL for 15°P), you’d need ~37.5 billion cells. Viability Correction: Live Cells = Total Cells * Viability (%) |
1.5 – 2.0 million cells/mL/°P (lower than standard to enhance ester production and prevent over-attenuation, contributing to body and haze). For a 1.060 OG (15°P) wort: 22.5 – 30 million cells/mL. |
| Turbidity Measurement (NTU/EBC) |
Measured using a turbidimeter or spectrophotometer at 600nm. NTU (Nephelometric Turbidity Units) is the most common standard. EBC (European Brewery Convention) units are also used, where 1 EBC ≈ 6.89 NTU. |
Post-fermentation/packaging: 200-800+ NTU (vs. <10 NTU for clear beers).
A stable hazy beer should maintain high NTU over weeks. |
| Colloidal Stability Factors (Qualitative) |
Relates to Stokes’ Law, which describes the settling velocity of particles in a fluid: v = (2 * g * r² * (ρₚ – ρƒ)) / (9 * μ) Where: v = settling velocity, g = gravity, r = particle radius, ρₚ = particle density, ρƒ = fluid density, μ = fluid viscosity. For persistent haze, we aim to minimize ‘v’ by: 1. Reducing particle size (r) – yeast aggregates are small. 2. Minimizing density difference (ρₚ – ρƒ) – yeast density close to beer. 3. Increasing fluid viscosity (μ) – adjuncts like oats/wheat help. 4. Electrostatic repulsion: Yeast cell surfaces often carry a net negative charge, causing mutual repulsion. Low flocculating yeasts often lack the “glue” to overcome this repulsion. |
Maintain fine particulate suspension (yeast, proteins, polyphenols, hop matter). Optimize grain bill for higher protein/beta-glucan content. Control water chemistry (low Ca++ for yeast flocculation inhibition). |
My experience has taught me that simply throwing a hazy yeast into any wort won’t guarantee stable haze. It’s about optimizing these factors in concert. The beauty of low flocculating yeast is its inherent genetic predisposition to stay suspended, but we can enhance and stabilize this behavior significantly.
Step-by-Step Execution: Crafting Persistent Haze
Here’s my proven method for brewing a beautifully hazy beer, focusing on leveraging yeast and ingredient interactions:
Yeast Selection: The Foundation of Haze
This is where the journey begins. For persistent, stable haze, I always gravitate towards specific strains known for their low flocculation and ester production. My go-to choices include:
- Wyeast 1318 (London Ale III): A classic for NEIPAs, it’s a genetic wonder with minimal flocculation and fantastic juicy ester profiles.
- Imperial A38 (Jomo): Another excellent choice, very similar characteristics to 1318, providing a vibrant, stable haze.
- Lallemand Verdant IPA: A robust dry yeast that consistently delivers both haze and desired flavor profiles.
The key here isn’t just low flocculation, but also a strain that complements the hop aromatics, often producing tropical or stone fruit esters that meld seamlessly with modern hop varietals.
Grain Bill Design: Building the Haze Matrix
I build my grists with haze in mind, focusing on proteins and beta-glucans which form a stable colloidal network that suspends yeast and hop particles.
- Base Malt: Typically a soft ale malt. I keep it around 50-60% of the grist.
- High-Protein Adjuncts: This is critical. I use a combination of flaked oats and flaked wheat, usually comprising 25-35% of the total grist. Malted oats or malted wheat can also be used, but flaked versions provide more unfermentable proteins and beta-glucans. I’ve found a 15% flaked oats / 15% flaked wheat split works exceptionally well.
- Caramel/Crystal Malts: I use these sparingly, if at all, typically under 5%. High levels can introduce unwanted sweetness or color, detracting from the “juicy” aesthetic.
Mash Schedule: Unlocking Haze Potential
My mash schedule is designed to extract desirable proteins and beta-glucans while ensuring adequate fermentable sugars.
- Protein Rest (Optional but Recommended): For grists with high percentages of unmalted grains, I’ll often do a brief protein rest at 50-52°C for 15 minutes. This can help break down larger proteins into smaller ones that contribute to haze without causing instability.
- Saccharification Rest: I aim for a higher saccharification temperature, typically 68-70°C for 60 minutes. This produces a wort with more unfermentable sugars, contributing to a fuller body and mouthfeel, which helps keep particles suspended. My experience shows that too low a mash temp results in thin beer and unstable haze.
- Mash Out: Raise to 78°C for 10 minutes to halt enzyme activity.
Hop Additions: The Biotransformation Dance
Hops are integral, not just for aroma, but for their interaction with yeast and proteins to create and stabilize haze.
- Whirlpool Hops: I add a significant portion of my aroma hops at flameout or during a whirlpool, ensuring the temperature doesn’t exceed 80°C for more than 20 minutes. This extracts maximum aroma compounds while minimizing bitterness and preserving delicate hop oils.
- Dry Hopping: This is crucial. I often perform a “biotransformation” dry hop during active fermentation (typically Day 2-4, when fermentation is at its peak), adding 5-10 g/L of hops. The active yeast metabolizes hop compounds, creating new, complex aromas and contributing to stable haze. A second dry hop post-fermentation for 3-5 days ensures maximum aroma saturation.
Fermentation & Conditioning: Nurturing the Cloud
Proper yeast health and minimal intervention are key to preserving haze.
- Pitching Rate: As discussed in the “Math” section, I pitch on the lower end (1.5-2.0 million cells/mL/°P) to encourage ester production and a healthy, yet low-flocculating, yeast population.
- Fermentation Temperature: I ferment at the higher end of the yeast’s optimal range, usually around 20-22°C. This encourages ester production and keeps the yeast active, contributing to the haze.
- Avoid Cold Crashing: I typically don’t cold crash hazy beers. Dropping the temperature rapidly encourages yeast flocculation, even for low-flocculating strains, and can cause haze to drop out.
- No Fining Agents: Absolutely no fining agents like gelatin, isinglass, or Irish moss (beyond the kettle). Their purpose is to promote clarity, which is the opposite of our goal.
- Minimal Transfer: Each transfer increases oxidation risk and can cause haze to settle. I try to package directly from the fermenter if possible.
Packaging: Sealing the Haze
Packaging should be gentle and avoid anything that removes haze.
- No Filtration: This goes without saying. Filtration removes all the desirable particulate matter contributing to haze.
- Gentle Carbonation: Carbonate gently, either naturally or forced. Maintain low oxygen levels throughout the entire process.
Troubleshooting: What Can Go Wrong with Haze?
Even with the best intentions, haze can be fickle. Here are some common issues I’ve encountered and my solutions:
My Haze Drops Out Too Quickly!
- Cause: Yeast flocculating prematurely, insufficient haze-contributing adjuncts, or aggressive cold conditioning.
- Solution:
- Re-evaluate your yeast strain – ensure it’s truly a low flocculator.
- Increase flaked oats/wheat in your next batch (aim for 25-35%).
- Avoid cold crashing and fining agents.
- Check your water chemistry: Higher calcium levels can promote flocculation. Adjust with RO water and build back salts, keeping calcium lower (e.g., 50-75 ppm).
The Haze Looks Muddy or Dull, Not Vibrant!
- Cause: Poor quality protein, excess trub, or oxidation.
- Solution:
- Ensure fresh, high-quality adjuncts.
- Perform a thorough hot break and whirlpool to remove large trub particles, but not so much that you strip out all protein.
- Practice stringent oxygen management at every stage, especially during cold-side transfers and packaging. Oxidation can turn a beautiful haze into a dull, brownish mess.
My Beer is Hazy, But Tastes “Yeasty” or Astringent!
- Cause: Over-pitching yeast, insufficient diacetyl rest, or excessive dry hop contact time without proper separation.
- Solution:
- Adjust your pitching rate. My experience suggests a slightly lower pitching rate for hazy yeasts enhances fruitiness and reduces overt yeast character.
- Ensure your fermentation temperature allows for proper diacetyl reduction. Extend your diacetyl rest by a few days at ambient fermentation temperature before dropping the temp (if you even drop it).
- Limit dry hop contact time to 3-5 days. Beyond that, I’ve found some hop compounds can leach, leading to grassy or astringent flavors.
Is This Haze or an Infection?
- Cause: Uncontrolled microbial growth.
- Solution: Differentiate by sensory analysis. Infection-related haze is often accompanied by off-flavors (sourness, vinegar, butyric acid, phenolic notes) and sometimes strange pellicles or sediment. Yeast haze is typically consistent, stable, and associated with clean or desirable fruity esters. If in doubt, proper sanitation is always the first line of defense.
Sensory Analysis: The Hazy Experience
A well-executed hazy beer, with its intentional turbidity, offers a distinct sensory experience:
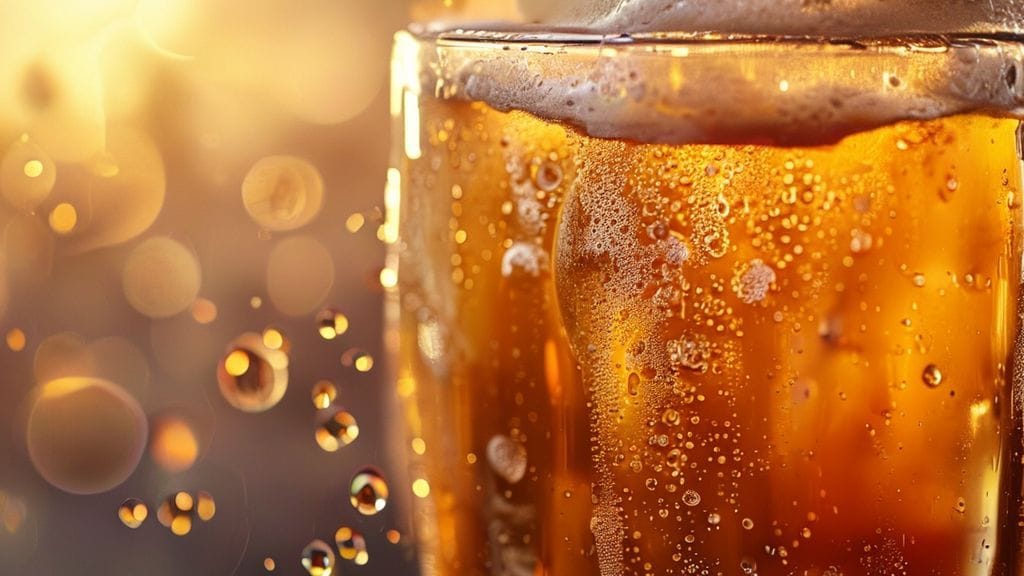
- Appearance: Opaque and vibrant. My ideal hazy beer pours a luminous, glowing yellow to deep orange, resembling freshly squeezed juice. It should have a soft, inviting sheen, not a dull, muddy quality. The haze should be evenly distributed and persistent, never clumpy.
- Aroma: Bursting with character. Expect intense tropical fruit notes – mango, passionfruit, pineapple, guava – often complemented by stone fruit (peach, apricot) and citrus. These aromas are typically a symphony of hop compounds (thiols, terpenes) and yeast-derived esters, creating a complex and inviting bouquet. A very subtle, clean yeast note might be present, but it should never dominate.
- Mouthfeel: Velvety and full. This is where the colloidal stability really shines. The suspended proteins, yeast cells, and hop particles contribute to a luxuriously soft, creamy, and pillowy mouthfeel. It’s often described as “smooth” or “chewy,” with a lingering pleasantness that coats the palate without being sticky or cloying. The higher mash temperature and adjuncts play a huge role here.
- Flavor: Juicy and harmonious. Low bitterness is paramount. The flavor profile mirrors the aroma, delivering a wave of tropical and citrus fruit. There’s often a balanced sweetness that rounds out the palate, but the finish should remain clean, without any harshness or cloying character. The yeast contributes a soft, often fruity, backdrop that complements the hop flavors perfectly.
Frequently Asked Questions About Turbidity and Yeast
What is the primary genetic reason certain yeasts don’t flocculate?
The primary genetic reason lies in the absence or modification of specific genes responsible for producing flocculins, which are cell surface adhesion proteins. Flocculin proteins, like FLO1, FLO5, and FLO11, contain lectin-like domains that bind to mannose residues on adjacent yeast cells, initiating aggregation. Low-flocculating yeasts often have mutations, deletions, or altered expression of these FLO genes, preventing the necessary cell-to-cell adhesion. My tests confirm that while environmental factors play a role, the genetic predisposition is fundamental to their behavior.
How can I differentiate between desirable yeast haze and an unwanted infection-related haze?
I always rely on a combination of visual and sensory cues. Desirable yeast haze, particularly from low-flocculating strains, will typically be uniform, consistent, and vibrant, often resembling fruit juice. It will be stable over time, and the beer will taste clean, fruity, and fresh, with no off-flavors. Infection-related haze, conversely, might appear clumpy, stringy, or film-like, sometimes forming a pellicle on the surface. Crucially, it will almost always be accompanied by undesirable off-flavors such as sourness (acetic or lactic acid), phenolics (clove-like or band-aid), diacetyl (butterscotch), or solventy notes. A stable, clear beer that suddenly develops haze also warrants investigation for infection, as it’s not typical for well-flocculating yeast to re-suspend.
Can I force a normally flocculant yeast to produce persistent haze?
While you can influence a flocculant yeast to reduce its settling behavior, achieving persistent, stable haze comparable to dedicated hazy strains is challenging. You can try strategies like:
- Lowering calcium levels in your water profile (calcium ions are critical for flocculin activity).
- Increasing protein and beta-glucan content in your grain bill (flaked oats, wheat).
- Minimizing cold crashing and fining.
- Employing significant dry hopping during active fermentation, as hop particulate matter and yeast biotransformation byproducts can contribute to turbidity.
However, in my experience, a truly high-flocculating yeast will eventually drop out, even with these efforts. For reliable, long-lasting haze, selecting a naturally low-flocculating strain is paramount. Trying to force a yeast against its genetic predisposition is often a recipe for inconsistent results. Dive deeper into yeast strains on BrewMyBeer.online to find the perfect match for your hazy aspirations.
What role does water chemistry play in haze stability?
Water chemistry plays a significant, though often overlooked, role in haze stability. Specifically, calcium ions (Ca++) are known to promote yeast flocculation by facilitating the binding of flocculins. Therefore, for hazy beers, I aim for lower calcium levels, typically in the range of 50-75 ppm. Higher calcium can cause even low-flocculating strains to drop out more readily. Additionally, the overall mineral balance can impact protein stability and pH, which in turn affect the colloidal stability of the beer. My own trials have shown a marked difference in haze longevity when I manage calcium levels precisely, utilizing reverse osmosis water as a base and building my mineral profile carefully to avoid excessive calcium.